The Ultimate No-Bake Chocolate Peanut Butter Pie: A Slice of Decadent Heaven
There are few flavor pairings in the culinary world as universally beloved, fiercely defended, and intensely craved as chocolate and peanut butter. It is a marriage of contrasting yet perfectly complementary profiles: the rich, slight bitterness of cocoa mingling flawlessly with the salty, savory, roasted sweetness of peanuts. When these two powerhouse ingredients are brought together in the form of a chilled, creamy, luxurious dessert, the result is nothing short of spectacular. Enter the No-Bake Chocolate Peanut Butter Pie—a dessert so incredibly decadent, visually stunning, and ridiculously easy to make that it will instantly earn a permanent spot in your recipe repertoire.
Whether you are hosting a sweltering summer backyard barbecue where turning on the oven is out of the question, planning a holiday menu that already has your oven working overtime, or simply craving a bakery-quality dessert on a random Tuesday, this pie is the ultimate solution. It requires absolutely zero baking, utilizes straightforward, accessible ingredients, and delivers a show-stopping presentation that looks like it took hours of painstaking pastry work. In this comprehensive guide, we will explore the nuances of creating the perfect no-bake pie, from achieving a flawless crumb crust to whipping up the airiest peanut butter mousse, and capping it off with a foolproof, glossy chocolate ganache.
The Undeniable Magic of Chocolate and Peanut Butter
Before we dive into the mechanics of the recipe, it is worth appreciating why this specific combination resonates so deeply with our palates. The magic lies in the balance of sweet, salty, and umami. Peanut butter is naturally rich in fats and savory notes, which mellow out the sharp sweetness often found in desserts. Chocolate, particularly semi-sweet or dark chocolate, provides a complex, slightly astringent counterpart that cuts through the heavy richness of the peanut butter.
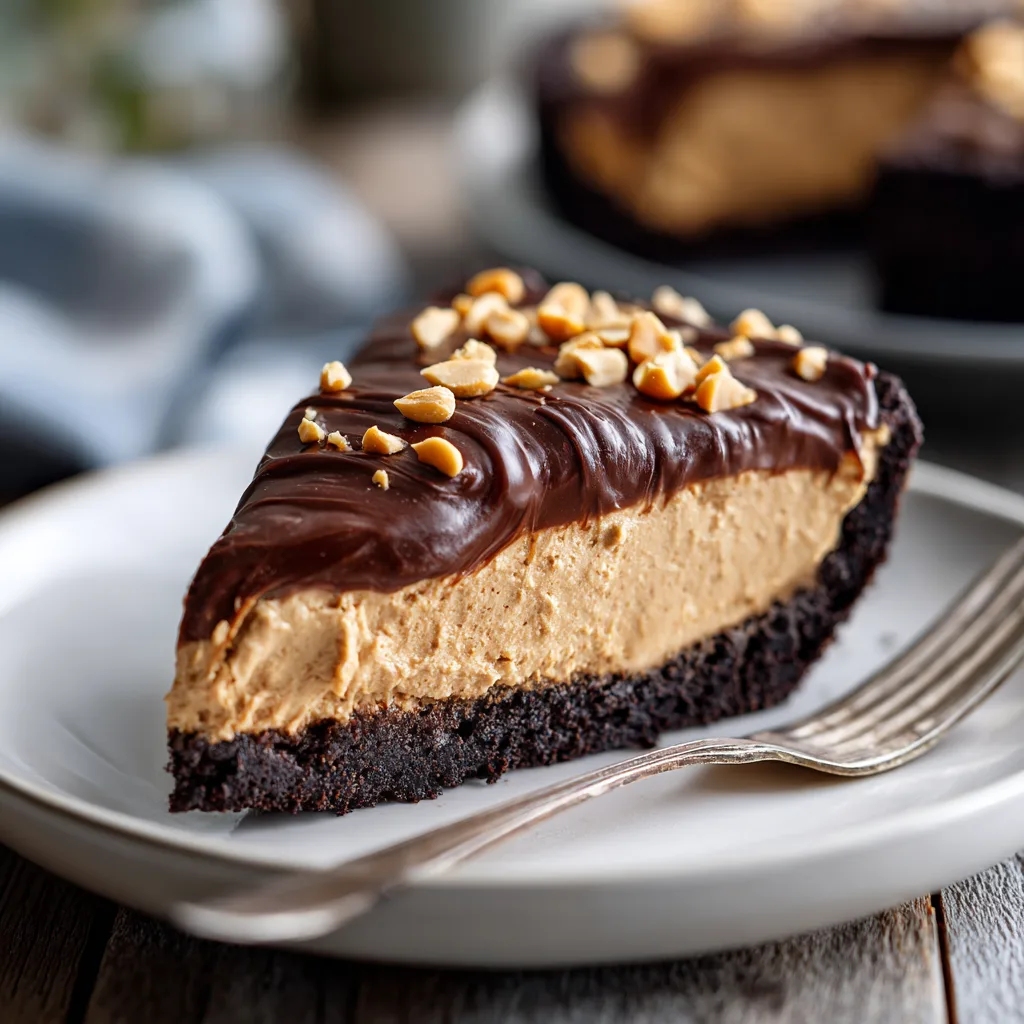
In this pie, we elevate this classic duo through a masterful play on textures. You are not just eating chocolate and peanut butter; you are experiencing the satisfying crunch of a buttery cookie crust, the ethereal, cloud-like melt of a whipped peanut butter cream cheese filling, and the dense, silky snap of a chilled chocolate ganache. Every single bite is a symphony of textures and flavors that keeps you coming back for more.
Why This No-Bake Pie Will Become Your Go-To Dessert
There is a vast ocean of pie recipes available online, but this specific No-Bake Chocolate Peanut Butter Pie stands head and shoulders above the rest. Here is exactly why you will find yourself making it time and time again.
1. It is 100% Oven-Free
The term “no-bake” is music to a home cook’s ears, especially during the dog days of summer or the chaotic rush of the holiday season. By utilizing a crushed cookie crust bound with melted butter and a filling stabilized by cream cheese and whipped cream, you completely eliminate the need for heat. This means no monitoring oven temperatures, no worrying about soggy bottoms, and no heating up your kitchen.
2. The Ultimate Make-Ahead Marvel
Desserts that require last-minute assembly can induce unnecessary stress when you are entertaining. This pie actually demands to be made ahead of time. It requires a minimum of four hours in the refrigerator to set properly, but it is even better when left to chill overnight. This allows the flavors to meld and the layers to firm up into clean, beautiful, sliceable perfection. You can make it on a Friday night for a Saturday evening dinner party and not give it a second thought until it is time for dessert.
3. Intimidating Presentation, Effortless Execution
When you slice into this pie and reveal those distinct, perfectly defined layers—the dark crust, the towering peanut butter mousse, the thick ribbon of ganache—it looks incredibly professional. Your guests will assume you possess advanced pastry skills. In reality, the entire pie comes together in about 20 to 25 minutes of active prep time, primarily involving crushing cookies and whipping ingredients in a bowl.
Detailed Ingredient Breakdown: Building the Perfect Pie
Because there is no baking involved to transform the ingredients, the quality and specific type of each component you choose will directly impact the final result. Let’s break down the architecture of this pie.
The Chocolate Cookie Crust
- Chocolate Sandwich Cookies (e.g., Oreos): You need the whole cookie, including the cream filling. The filling acts as an additional binder and adds a touch of sweetness to the crust. Do not use Double Stuf, as the ratio of cream to cookie will make the crust too greasy.
- Unsalted Butter: Melted butter is the glue that holds the cookie crumbs together. We specify unsalted so that we can control the overall sodium level of the dessert, especially since we are using salty peanut butter in the filling.
The Fluffy Peanut Butter Filling
- Cream Cheese: This is the secret to the filling’s stability and slight tang, which cuts through the sweetness. You must use full-fat, brick-style cream cheese. Whipped cream cheese or the spreadable tub variety contains too much water and air, which will cause your pie to collapse. It must be completely softened to room temperature to avoid lumps.
- Creamy Peanut Butter: Use a standard, conventional commercial peanut butter (like Jif or Skippy). Avoid “natural” peanut butters that require stirring, as their oil separation can cause the pie filling to split, become grainy, or weep in the refrigerator.
- Powdered Sugar: Also known as confectioners’ sugar. This sweetens the filling while thickening it. Unlike granulated sugar, which would leave a gritty texture, powdered sugar dissolves instantly into the cream cheese for a silky smooth finish.
- Pure Vanilla Extract: A splash of vanilla enhances the sweet notes of the peanut butter and ties the flavors together.
- Whipped Topping (or Heavy Cream): Folding in a stabilized whipped topping (like Cool Whip) gives the dense peanut butter and cream cheese mixture an airy, mousse-like texture. If you prefer not to use store-bought whipped topping, you can whip 1.5 cups of cold heavy whipping cream to stiff peaks and gently fold it in.
The Decadent Chocolate Ganache Topping
- Semi-Sweet Chocolate Chips: Semi-sweet strikes the perfect balance, ensuring the ganache isn’t too bitter or overly cloying. You can also use finely chopped high-quality chocolate bars.
- Heavy Whipping Cream: The cream is heated and poured over the chocolate to melt it into a luscious, pourable glaze. Do not substitute with milk or half-and-half, as they lack the fat content necessary to create a proper, thick ganache emulsion.
- Chopped Roasted Peanuts: For the garnish. The crunch of the peanuts provides a necessary textural contrast to the soft, creamy layers below.
Step-by-Step Instructions for No-Bake Perfection
Follow these meticulous steps to ensure your pie turns out flawlessly structured and undeniably delicious.
- Prepare the Crust: Place the whole chocolate sandwich cookies into a food processor and pulse until they are fine, uniform crumbs. Alternatively, place them in a heavy-duty ziplock bag and crush them with a rolling pin. Transfer the crumbs to a medium bowl and pour in the melted butter. Stir with a fork until the mixture resembles wet sand and holds together when squeezed.
- Form the Base: Pour the buttery crumb mixture into a standard 9-inch pie dish (or a springform pan for easier slicing). Use the back of a measuring cup or your fingers to press the crumbs firmly and evenly into the bottom and up the sides of the dish. Place the crust in the freezer to set while you prepare the filling.
- Whip the Cream Cheese and Peanut Butter: In a large mixing bowl, use a hand mixer or a stand mixer fitted with the paddle attachment to beat the softened cream cheese and creamy peanut butter together on medium speed until completely smooth, combined, and slightly fluffy. This should take about 2-3 minutes.
- Sweeten the Deal: Add the powdered sugar and vanilla extract to the peanut butter mixture. Start your mixer on low speed to prevent a sugar dust cloud, then increase to medium until the sugar is fully incorporated and the mixture is thick.
- Fold in the Fluff: Add the whipped topping (or stiffly whipped heavy cream) to the bowl. Using a rubber spatula, gently fold the whipped cream into the peanut butter mixture. Use a scooping motion, bringing the mixture from the bottom of the bowl over the top. Do not stir vigorously or use the electric mixer, as this will deflate the air you just carefully incorporated. Fold until no white streaks remain.
- Fill the Crust: Remove the chilled crust from the freezer. Spoon the fluffy peanut butter filling into the crust, using an offset spatula to smooth the top into an even, flat layer. Return the pie to the refrigerator to chill while you make the ganache.
- Create the Ganache: Place the chocolate chips in a heat-safe glass or metal bowl. In a small saucepan or in the microwave, heat the heavy cream just until it begins to gently simmer (do not let it come to a rapid boil). Pour the hot cream directly over the chocolate chips. Let it sit completely undisturbed for 3 to 5 minutes to gently melt the chocolate.
- Whisk and Pour: After resting, use a whisk to gently stir the cream and chocolate together, starting in the center and working your way outward in small circles. It will initially look separated, but keep whisking until it comes together into a dark, glossy, smooth ganache.
- Top and Chill: Pour the warm ganache evenly over the chilled peanut butter layer. Use a spatula to gently spread it to the edges. Sprinkle the chopped roasted peanuts generously over the top while the ganache is still soft.
- The Final Rest: Place the pie in the refrigerator and chill for a minimum of 4 hours, though 8 hours or overnight is highly recommended for the cleanest slices.
Pro Tips for a Flawless Dessert
Even simple recipes benefit from professional techniques. Here is how to ensure your pie is bakery-worthy.
- Room Temperature is Non-Negotiable: The cream cheese must be incredibly soft before you begin mixing. If it is even slightly cold, you will end up with unappealing little white lumps of cream cheese throughout your smooth peanut butter filling that are impossible to beat out later.
- The Hot Knife Trick for Clean Slices: Because this pie is dense and chilled, cutting clean slices can be tricky. To get perfect, magazine-worthy slices, run a sharp chef’s knife under very hot water, wipe it completely dry with a towel, and make your cut. Repeat the hot water and wiping process for every single slice. The heat of the blade will melt cleanly through the ganache and mousse without dragging the chocolate down into the peanut butter layer.
- Rescuing a Broken Ganache: If your ganache looks oily or grainy, it has “broken” (the fat has separated). Do not panic! You can usually fix it by vigorously whisking in a teaspoon of cold heavy cream or cold milk until the emulsion comes back together and turns glossy again.
Delicious Variations and Crust Alternatives
While the classic chocolate cookie crust is phenomenal, this highly adaptable recipe welcomes experimentation.
The Salty Pretzel Crust
If you love the sweet-and-salty dynamic, swap the Oreo crust for a pretzel crust. Crush 2 cups of salted mini pretzels, mix with 1/4 cup of granulated sugar and 3/4 cup (1.5 sticks) of melted butter. Press into the pan and proceed as normal. The extra hit of salt takes the peanut butter flavor to another dimension.
The Classic Graham Cracker
As seen in one of the variations in the original image, a standard graham cracker crust creates a lighter, slightly honey-infused flavor profile that lets the chocolate ganache stand out as the sole chocolate element in the dessert. Use 2 cups of graham crumbs, 1/3 cup sugar, and 6 tablespoons of melted butter.
Mocha Peanut Butter Pie
Coffee and chocolate are best friends. To give your pie an adult, sophisticated twist, dissolve one teaspoon of instant espresso powder into the hot heavy cream before pouring it over your chocolate chips for the ganache. It enhances the deep chocolate flavor beautifully.
Storage, Freezing, and Serving Instructions
Because of the dairy content, this pie must be kept cold until right before serving.
Refrigerator Storage: Store the pie in the refrigerator, lightly covered with plastic wrap (ensure the plastic is not touching the ganache to avoid ruining the shiny surface), or in a pie keeper. It will stay fresh and delicious for up to 5 days.
Freezing the Pie: This pie is an exceptional candidate for the freezer. In fact, many people prefer to eat it semi-frozen! To freeze, place the fully assembled and chilled pie in the freezer uncovered for one hour until the ganache is solid. Then, wrap the entire pie tightly in a double layer of plastic wrap and a layer of aluminum foil. It will keep for up to 3 months. To serve, thaw it in the refrigerator overnight, or let it sit at room temperature for about 15-20 minutes before slicing if you prefer a frozen texture.
Frequently Asked Questions (FAQs)
Can I use a store-bought crust?
Absolutely. If you are incredibly short on time, a pre-made Oreo or graham cracker crust in a foil pan will work perfectly. You may have a small amount of leftover peanut butter filling depending on the depth of the store-bought crust.
Why is my peanut butter filling runny?
A runny filling is almost always the result of using “natural” peanut butter (the kind where the oil separates at the top) or using a low-fat/tub-style cream cheese. Natural peanut butter does not have the stabilizers required to hold the fluffy structure, and tub cream cheese contains too much water. Always use standard creamy peanut butter and full-fat brick cream cheese.
Can I make this dairy-free or vegan?
Yes, with the right substitutions. Use a dairy-free cream cheese block, a dairy-free whipped topping (like a coconut-whip), and ensure your chocolate chips and sandwich cookies are certified vegan. Substitute the heavy cream in the ganache with full-fat canned coconut milk (the thick cream part at the top).
Do I have to use whipped topping?
No! While whipped topping (like Cool Whip) provides exceptional stability, you can easily use real whipped cream. Whip 1.5 cups of very cold heavy whipping cream with a tablespoon of powdered sugar until stiff peaks form, then gently fold it into the peanut butter and cream cheese mixture exactly as directed.
This No-Bake Chocolate Peanut Butter Pie is a testament to the fact that you do not need an oven to create a masterpiece. With its luxurious textures and iconic flavor profile, it is guaranteed to elicit groans of satisfaction from anyone lucky enough to get a slice.
No-Bake Chocolate Peanut Butter Pie
Ingredients
Equipment
Method
- Prepare the crust: Mix the crushed chocolate cookies with the melted butter until it resembles wet sand. Press the mixture firmly into the bottom and up the sides of a 9-inch pie dish. Place in the freezer to set.
- Make the filling: In a large bowl, beat the softened cream cheese and creamy peanut butter together until smooth and fluffy (about 2 minutes).
- Add the powdered sugar and vanilla extract to the peanut butter mixture, beating until thick and completely combined.
- Gently fold the whipped topping into the peanut butter mixture using a spatula until no white streaks remain. Do not overmix.
- Spread the peanut butter filling evenly over the chilled cookie crust. Return to the refrigerator.
- Make the ganache: Place chocolate chips in a heat-safe bowl. Heat the heavy cream in a small saucepan just until simmering, then pour over the chocolate chips. Let sit undisturbed for 5 minutes.
- Whisk the cream and chocolate together gently until a smooth, dark, glossy ganache forms.
- Pour the ganache evenly over the peanut butter pie layer, smoothing to the edges. Sprinkle the chopped roasted peanuts on top.
- Chill the pie in the refrigerator for at least 4 hours, or overnight, until completely firm before slicing.