Teriyaki Chicken Wrap
The Ultimate Teriyaki Chicken Wrap Recipe: Sweet, Savory, and Perfectly Toasted
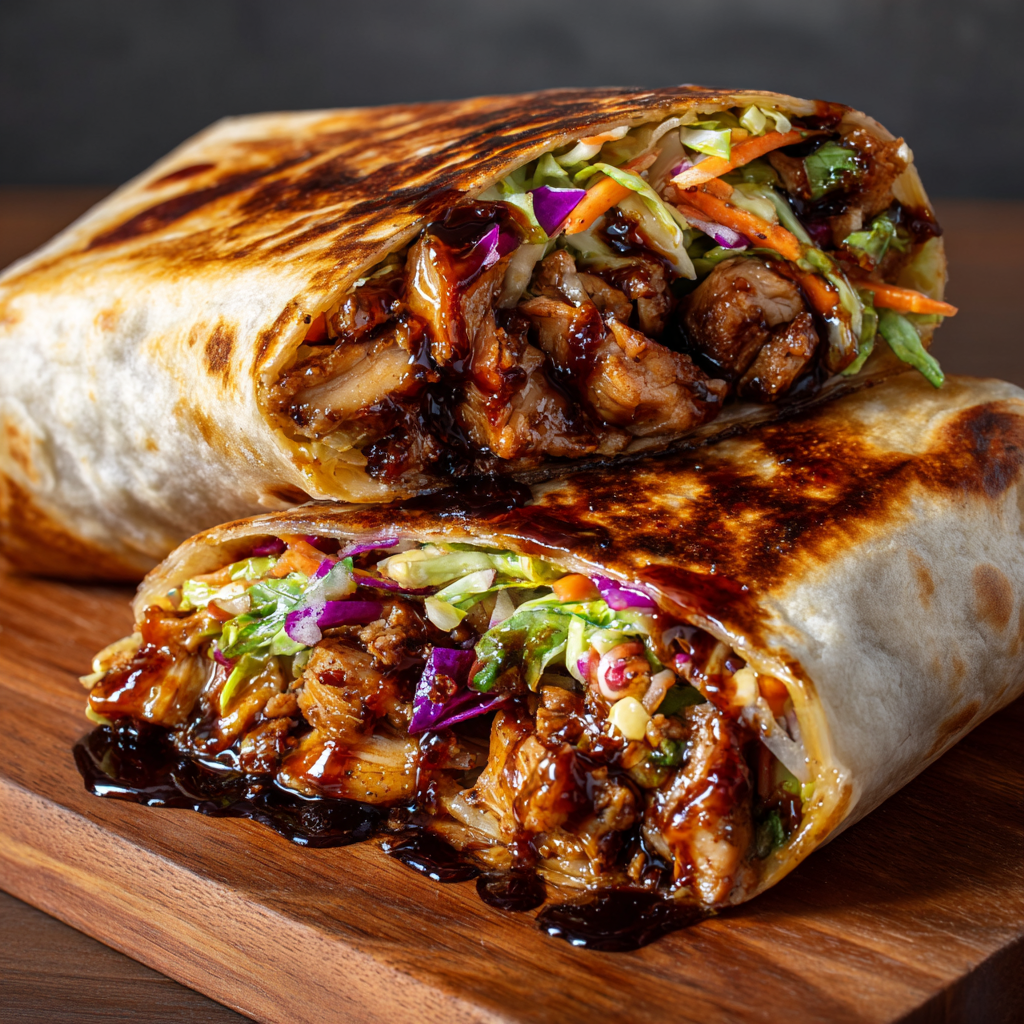
If there is one lunch that creates envy in the office breakroom or brings absolute silence to the family dinner table, it is this Teriyaki Chicken Wrap. Imagine biting into a warm, toasted flour tortilla that gives way to a filling of tender, juicy chicken thighs drenched in a homemade, ultra-glossy teriyaki glaze. The richness of the chicken is perfectly balanced by the crunch of fresh shredded lettuce, julienned carrots, and a hint of purple cabbage, all brought together with a touch of creamy mayo or extra sauce. It is a symphony of textures and flavors—sweet, salty, umami, crunchy, and soft—all wrapped up in one handheld package.
This isn’t just another dry wrap recipe; this is a guide to creating a restaurant-quality meal right in your own kitchen. Whether you are looking for a quick weeknight dinner, a high-protein post-workout meal, or a meal-prep solution that actually tastes good days later, this Teriyaki Chicken Wrap checks every single box. In this comprehensive guide, we will walk you through making the best sticky teriyaki sauce from scratch (it’s easier than you think!), how to cook the chicken to perfection, and the secret to folding and toasting the wrap so it never falls apart.
Why You Will Love This Recipe
There are countless reasons why this recipe deserves a permanent spot in your meal rotation. Here is why home cooks everywhere are obsessed with it:
- Flavor Explosion: The homemade teriyaki sauce is far superior to bottled versions. It is thick, glossy, and packed with garlic and ginger notes that permeate every bite of chicken.
- Texture Contrast: The combination of hot, sticky chicken and cool, crisp vegetables creates a delightful contrast that keeps your palate engaged.
- Versatile: You can use chicken breast, thighs, or even leftover rotisserie chicken. The vegetables can be swapped based on what is in your crisper drawer.
- Meal Prep Friendly: The chicken and sauce can be made ahead of time. Store the components separately, and assemble fresh wraps in minutes throughout the week.
- Kid-Friendly: The sweetness of the teriyaki sauce usually wins over even the pickiest eaters, making this a great way to sneak in some fresh veggies.
The Secret to the Perfect Teriyaki Sauce
While you can certainly use a store-bought sauce if you are in a pinch, the magic of this wrap lies in the homemade glaze. Authentic-style teriyaki sauce relies on the interplay between soy sauce, mirin (or sugar), ginger, and garlic. When reduced, the sugar caramelizes slightly, creating that signature “liquid glass” look that coats the chicken beautifully. The key is to let it simmer until it coats the back of a spoon—thick enough to cling to the meat, but fluid enough to drizzle.
Ingredients
To make these mouth-watering Teriyaki Chicken Wraps, you will need the following simple ingredients. We have broken them down into the sauce, the filling, and the assembly components.
For the Homemade Teriyaki Sauce
- Soy Sauce: 1/2 cup (Use low-sodium if you prefer to control saltiness)
- Water: 1/4 cup
- Brown Sugar: 1/3 cup, packed (provides the deep molasses flavor and sticky texture)
- Honey: 1 tablespoon (adds a floral sweetness and glossy finish)
- Rice Vinegar: 1 tablespoon (adds acidity to balance the sugar)
- Sesame Oil: 1 teaspoon (essential for that nutty aroma)
- Garlic: 2 cloves, minced finely
- Fresh Ginger: 1 teaspoon, grated (fresh is best, but powder works in a pinch)
- Cornstarch Slurry: 1 tablespoon cornstarch mixed with 2 tablespoons cold water (the thickener)
For the Chicken & Filling
- Chicken: 1.5 lbs boneless, skinless chicken thighs (recommended for juiciness) or breasts, cut into bite-sized pieces
- Oil: 1 tablespoon neutral oil (vegetable or canola) for searing
- Salt & Pepper: To taste
- Lettuce: 2 cups shredded iceberg or romaine lettuce (Iceberg provides the best crunch)
- Carrots: 1 cup julienned or shredded carrots
- Red Cabbage: 1/2 cup shredded (optional, for color and crunch)
- Green Onions: 2 stalks, sliced thinly (for garnish)
- Sesame Seeds: 1 teaspoon, toasted (for garnish)
For Assembly
- Tortillas: 4 large flour tortillas (burrito size, roughly 10-12 inches)
- Mayonnaise: 2 tablespoons (optional, adds creaminess to the wrap base)
- Butter or Oil: Small amount for toasting the wraps in the pan
Instructions
Step 1: Prepare the Teriyaki Sauce
In a small saucepan over medium heat, combine the soy sauce, water, brown sugar, honey, rice vinegar, sesame oil, minced garlic, and grated ginger. Whisk continuously until the sugar has completely dissolved. Bring the mixture to a gentle simmer. Slowly pour in the cornstarch slurry while whisking to prevent clumps. Continue to simmer for 2–3 minutes until the sauce thickens and becomes glossy. Remove from heat and set aside; it will thicken further as it cools.
Step 2: Cook the Chicken
Heat the neutral oil in a large skillet over medium-high heat. Pat the chicken pieces dry with a paper towel (this ensures a good sear) and season lightly with salt and pepper. Add the chicken to the hot skillet in a single layer—do not overcrowd the pan; cook in batches if necessary. Sear for 4–5 minutes per side until golden brown and cooked through.
Step 3: Glaze the Chicken
Once the chicken is fully cooked, reduce the heat to low. Pour about 3/4 of your prepared teriyaki sauce over the chicken. Toss well to coat. Let it bubble gently for 1 minute so the sauce clings to the meat, creating a thick, wet, delicious coating. Remove from heat. (Save the remaining sauce for drizzling or dipping).
Step 4: Prepare the Vegetables
While the chicken cools slightly, ensure your vegetables are prepped. Shred the lettuce finely, julienne the carrots, and slice the cabbage. If you want a more cohesive slaw, you can toss the veggies together in a bowl, but layering them works perfectly fine too.
Step 5: Assemble the Wraps
Lay a large flour tortilla flat on a clean surface or cutting board. If you like, spread a thin layer of mayonnaise in the center of the tortilla. Layer a generous handful of the shredded lettuce, carrots, and cabbage in the center. Top the veggies with a heaping portion of the warm, saucy teriyaki chicken. Sprinkle with sliced green onions and toasted sesame seeds. Drizzle a little extra sauce on top if you want it extra “drippy.”
Step 6: Fold the Wraps
Fold the sides of the tortilla inward (about 1–2 inches). Then, bring the bottom flap up and over the filling, tucking it tightly under the chicken. Roll the wrap forward firmly until it is completely sealed. The tight roll is crucial for keeping everything inside while eating.
Step 7: Toast for Perfection
Wipe out your skillet and return it to medium heat. Add a small smear of butter or a spray of oil. Place the wraps in the pan, seam-side down first. This seals the burrito so it doesn’t open. Cook for 2–3 minutes until golden brown and crispy. Flip carefully and toast the other side for another 1–2 minutes.
Step 8: Serve
Transfer the toasted wraps to a cutting board. Slice them in half diagonally with a sharp serrated knife to reveal the beautiful layers inside. Serve immediately while hot and crispy!
Tips for Success
- Don’t Skip the Toasting: Toasting the wrap not only adds a satisfying crunch but also reinforces the structural integrity of the burrito, preventing it from getting soggy from the sauce.
- Chicken Thighs vs. Breasts: We highly recommend using chicken thighs for this recipe. They are more forgiving, retain moisture better, and have a richer flavor that stands up well to the bold teriyaki sauce. If using breasts, be careful not to overcook them before adding the sauce.
- Warm Your Tortillas: Before assembling, zap your tortillas in the microwave for 10 seconds. Pliable warm tortillas are much easier to roll and less likely to crack than cold ones.
- The “Wet” Factor: The prompt for this dish calls for a glossy, wet look. To achieve this, don’t let the sauce reduce to a paste. Keep it fluid enough to drip. If it gets too thick, add a tablespoon of water to loosen it up.
Variations to Try
Customizing your Teriyaki Chicken Wrap is part of the fun. Here are a few creative twists:
1. Spicy Teriyaki Wrap: Add a tablespoon of Sriracha or a teaspoon of red pepper flakes to the sauce while it simmers. You can also add sliced jalapeños to the fresh veggie mix.
2. Pineapple Teriyaki: For a tropical Hawaiian vibe, grill some pineapple rings or chunks and add them inside the wrap. The acidity and sweetness of pineapple pair divinely with the salty soy glaze.
3. The “Crunch” Factor: Add chow mein noodles or crispy fried onions inside the wrap for an unexpected crunch.
4. Low Carb Option: Skip the tortilla and serve the filling inside large butter lettuce leaves for teriyaki lettuce wraps, or serve it over a bowl of cauliflower rice.
Serving Suggestions
This wrap is a complete meal on its own, but if you are serving it for dinner and want to round out the table, consider these sides:
- Edamame: Steamed with sea salt.
- Miso Soup: A warm, comforting starter.
- Cucumber Salad: Sliced cucumbers with rice vinegar and sesame oil to cleanse the palate.
- Tempura Vegetables: For a more indulgent feast.
Storage and Reheating
Storage: If you have leftovers, it is best to store the filling separately from the tortillas to prevent sogginess. The cooked chicken in sauce will keep in an airtight container in the fridge for up to 4 days.
Reheating: Reheat the chicken in a pan or microwave until hot. Assemble the wrap fresh. If you have a fully assembled leftover wrap, reheating it in an air fryer at 350°F for 3–5 minutes is the best way to crisp up the exterior without making the lettuce too wilted.
Frequently Asked Questions
Can I use store-bought teriyaki sauce?
Yes, absolutely. Look for a brand that is thick and glaze-like (often labeled “Teriyaki Glaze” or “Marinade and Sauce”) rather than the thin watery marinades.
Is this recipe gluten-free?
To make it gluten-free, use Tamari instead of soy sauce for the glaze and use gluten-free tortillas. Ensure your other ingredients (like cornstarch) are certified gluten-free.
Can I freeze these wraps?
You can freeze the cooked chicken in the sauce. Freezing assembled wraps with fresh lettuce is not recommended, as the lettuce will become slimy upon thawing. If you want to make freezer burritos, omit the lettuce and cucumber, and use sautéed cabbage or rice instead.
Enjoy making these glossy, delicious Teriyaki Chicken Wraps! They are a true crowd-pleaser that brings the joy of takeout food right into your home kitchen.
Teriyaki Chicken Wrap
Ingredients
Equipment
Method
- In a saucepan, whisk soy sauce, water, sugar, honey, ginger, and garlic. Simmer. Add cornstarch slurry and cook until thickened.
- Cut chicken into bite-sized pieces. Heat oil in a skillet and sear chicken until cooked through and golden.
- Pour 3/4 of the sauce over chicken, tossing to coat. Cook 1 minute to glaze.
- Warm tortillas slightly. Layer lettuce, carrots, and glazed chicken in the center.
- Fold sides in and roll tightly. Toast in a hot skillet seam-side down until golden brown.
- Cut in half diagonally and serve immediately.