Mini Red Velvet Cheesecakes: The Perfect Bite-Sized Treat
Mini Red Velvet Cheesecakes: The Perfect Bite-Sized Treat
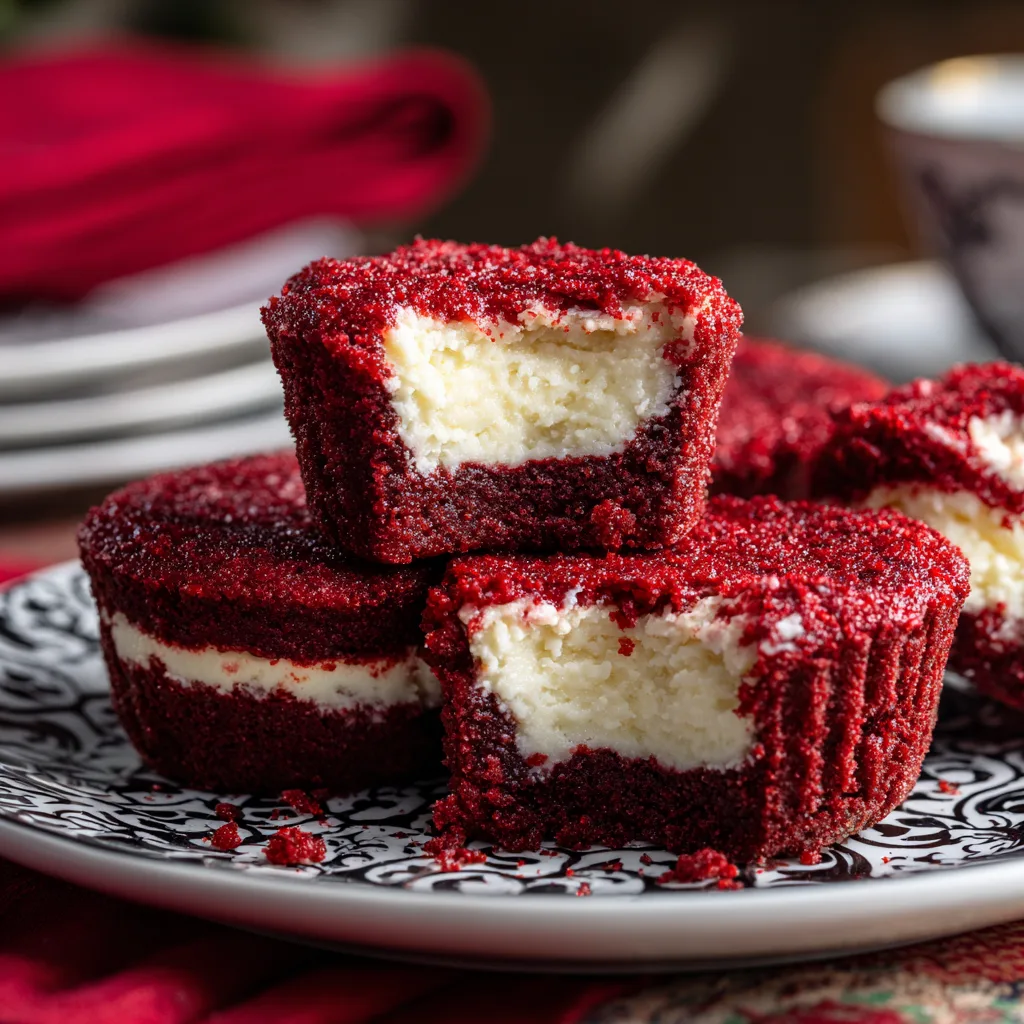
There are few flavor combinations as iconic and beloved as red velvet and cream cheese. The dramatic visual of deep red cake contrasted with stark white filling is only matched by the delicious interplay of flavors: the subtle cocoa and tangy buttermilk of the cake, balanced by the rich, sweet-tart creaminess of the cheesecake. These Mini Red Velvet Cheesecakes take this classic pairing and shrink it down into adorable, individual portions that are perfect for any occasion.
Unlike a large cheesecake that requires a water bath and a long baking time, these mini versions are surprisingly simple to make. They are baked in a standard muffin tin, which not only makes portion control easy but also significantly cuts down on baking and cooling time. The result is a batch of perfectly formed, moist red velvet cakes with a surprise creamy cheesecake center. They are elegant enough for a dinner party or a romantic Valentine’s Day dessert, yet easy enough for a weekend baking project. The texture is a delightful marriage of soft, tender cake and dense, smooth cheesecake in every single bite.
Why You Will Love This Recipe
- Perfect Portion Control: These individual servings are just the right size for a satisfying dessert without being overly heavy.
- Stunning Presentation: The vibrant red color makes them a beautiful addition to any dessert table, especially for holidays like Christmas or Valentine’s Day.
- No Water Bath Needed: Baking in a muffin tin eliminates the need for a fussy water bath, simplifying the process and removing the risk of water seeping into your dessert.
- Quick and Easy: With a short baking time and simple assembly, you can have these impressive treats ready in no time.
- The Best of Both Worlds: You don’t have to choose between cake and cheesecake – you get both in one delicious bite.
Ingredients
To create these delightful mini desserts, you will need two sets of ingredients: one for the red velvet cake batter and one for the cream cheese filling.
Mini Red Velvet Cheesecake
Ingredients
Equipment
Method
- Preheat oven to 350°F (175°C) and line a 12-cup muffin tin with paper liners.
- To make the filling, beat softened cream cheese and 1/4 cup sugar until smooth. Add 1 egg and 1/2 tsp vanilla, beating on low just until combined. Set aside.
- For the cake batter, whisk together flour, 3/4 cup sugar, cocoa powder, baking soda, and salt in a large bowl.
- In a separate bowl, whisk together buttermilk, oil, 1 egg, food coloring, vinegar, and 1 tsp vanilla.
- Pour wet ingredients into dry and whisk just until combined. Do not overmix.
- Spoon 1 tbsp of batter into each muffin cup. Top with 1 tbsp of cream cheese filling. Cover with remaining batter.
- Bake for 15-18 minutes until set. Cool in pan for 10 minutes, then transfer to a wire rack to cool completely. Chill before serving.
Notes
For the Cheesecake Filling:
- Cream Cheese: 8 oz (one standard block), softened to room temperature. This is crucial for a lump-free filling.
- Sugar: 1/4 cup granulated sugar, to sweeten the filling.
- Egg: 1 large egg, at room temperature. This helps bind the filling and gives it structure.
- Vanilla Extract: 1/2 teaspoon, for flavor.
For the Red Velvet Cake Batter:
- All-Purpose Flour: 1 cup plus 2 tablespoons.
- Sugar: 3/4 cup granulated sugar.
- Cocoa Powder: 1 tablespoon unsweetened cocoa powder. This provides the subtle chocolate flavor characteristic of red velvet.
- Baking Soda: 1/2 teaspoon, for leavening.
- Salt: 1/4 teaspoon, to balance the flavors.
- Buttermilk: 1/2 cup, at room temperature. This adds moisture and the classic tang.
- Vegetable Oil: 1/2 cup. Oil creates a moister cake than butter.
- Egg: 1 large egg, at room temperature.
- Red Food Coloring: 1-2 tablespoons liquid food coloring, or 1 teaspoon gel paste. Adjust the amount to achieve your desired shade of red.
- White Vinegar: 1/2 teaspoon. The vinegar reacts with the baking soda to help the cake rise and enhances the red color.
- Vanilla Extract: 1 teaspoon.
Instructions
Follow these steps to create your own batch of these irresistible mini cheesecakes.
1. Prepare Your Equipment
Preheat your oven to 350°F (175°C). Line a standard 12-cup muffin tin with paper liners. This will make removing the cheesecakes much easier and make for a cleaner presentation.
2. Make the Cheesecake Filling
In a medium bowl, use a hand mixer to beat the softened cream cheese and 1/4 cup of sugar until smooth and creamy. Scrape down the sides of the bowl. Add the egg and 1/2 teaspoon of vanilla extract, and beat on low speed just until combined. Be careful not to overmix, as incorporating too much air can cause the cheesecake filling to crack during baking. Set this mixture aside.
3. Combine Dry Ingredients for the Cake
In a large bowl, whisk together the flour, 3/4 cup sugar, cocoa powder, baking soda, and salt. Ensure there are no lumps of cocoa or baking soda.
4. Combine Wet Ingredients for the Cake
In a separate medium bowl or a large measuring cup, whisk together the buttermilk, vegetable oil, egg, red food coloring, vinegar, and 1 teaspoon of vanilla extract until well combined and the color is uniform.
5. Create the Red Velvet Batter
Pour the wet ingredients into the dry ingredients. Whisk gently just until the batter is combined and no streaks of flour remain. Do not overmix, as this can lead to a dense or tough cake.
6. Assemble the Cheesecakes
Spoon about 1 tablespoon of the red velvet batter into the bottom of each lined muffin cup. You may need to gently tap the pan on the counter to help it spread. Next, dollop about 1 tablespoon of the cream cheese filling into the center of each cup, directly on top of the batter. Finally, top with the remaining red velvet batter, dividing it evenly among the cups (about another tablespoon per cup). The batter should cover the cream cheese filling, though a little white peeking through is fine.
7. Bake and Cool
Bake for 15-18 minutes, or until the tops of the cakes are set and spring back when lightly touched. A toothpick inserted into the red velvet part (try to avoid the center filling) should come out clean. Allow the cheesecakes to cool in the pan for about 10 minutes before carefully removing them to a wire rack to cool completely. The cheesecake centers will firm up as they cool.
Tips for Success
Room Temperature Ingredients: It is essential that your cream cheese, eggs, and buttermilk are at room temperature before you begin. This ensures they mix together smoothly, preventing lumps in your cheesecake filling and creating a uniform batter.
Don’t Overmix: Whether you are making the cheesecake filling or the cake batter, mix only until the ingredients are just combined. Overmixing can lead to a tough cake and can cause the cheesecake filling to puff up and then crack or sink.
Measure Flour Correctly: For the most accurate results, spoon your flour into the measuring cup and level it off with a flat edge. Scooping directly from the bag can pack the flour, leading to a dry cake.
Cooling is Key: Allow the mini cheesecakes to cool completely on a wire rack before serving. For the best texture and flavor, chill them in the refrigerator for at least an hour before enjoying. This allows the cheesecake filling to set properly.
Variations
- Oreo Crust: For an extra layer of flavor and texture, you can add a simple Oreo crust. Crush about 12 Oreo cookies and mix with 2 tablespoons of melted butter. Press about a tablespoon of the mixture into the bottom of each muffin liner before adding the red velvet batter.
- Chocolate Ganache Topping: For a decadent finish, drizzle the cooled cheesecakes with chocolate ganache. Simply melt chocolate chips with a little heavy cream and spoon it over the top.
- Cream Cheese Frosting: If you want even more cream cheese flavor, you can pipe a small swirl of cream cheese frosting on top of each mini cake once they are completely cooled.
Serving and Storage
Serving: These mini red velvet cheesecakes are best served chilled. Their small size makes them easy to serve on a platter for a party or as individual plated desserts. The visual contrast of the red cake and white filling is most striking when they are cut in half.
Storage: Store any leftover cheesecakes in an airtight container in the refrigerator for up to 5 days. They can also be frozen. To freeze, place them in a single layer on a baking sheet to freeze solid, then transfer them to a freezer-safe bag or container for up to 3 months. Thaw in the refrigerator overnight before serving.