Italian Sushi
Italian Sushi: The Viral Charcuterie Roll-Up That Is Taking Over Dinner Parties
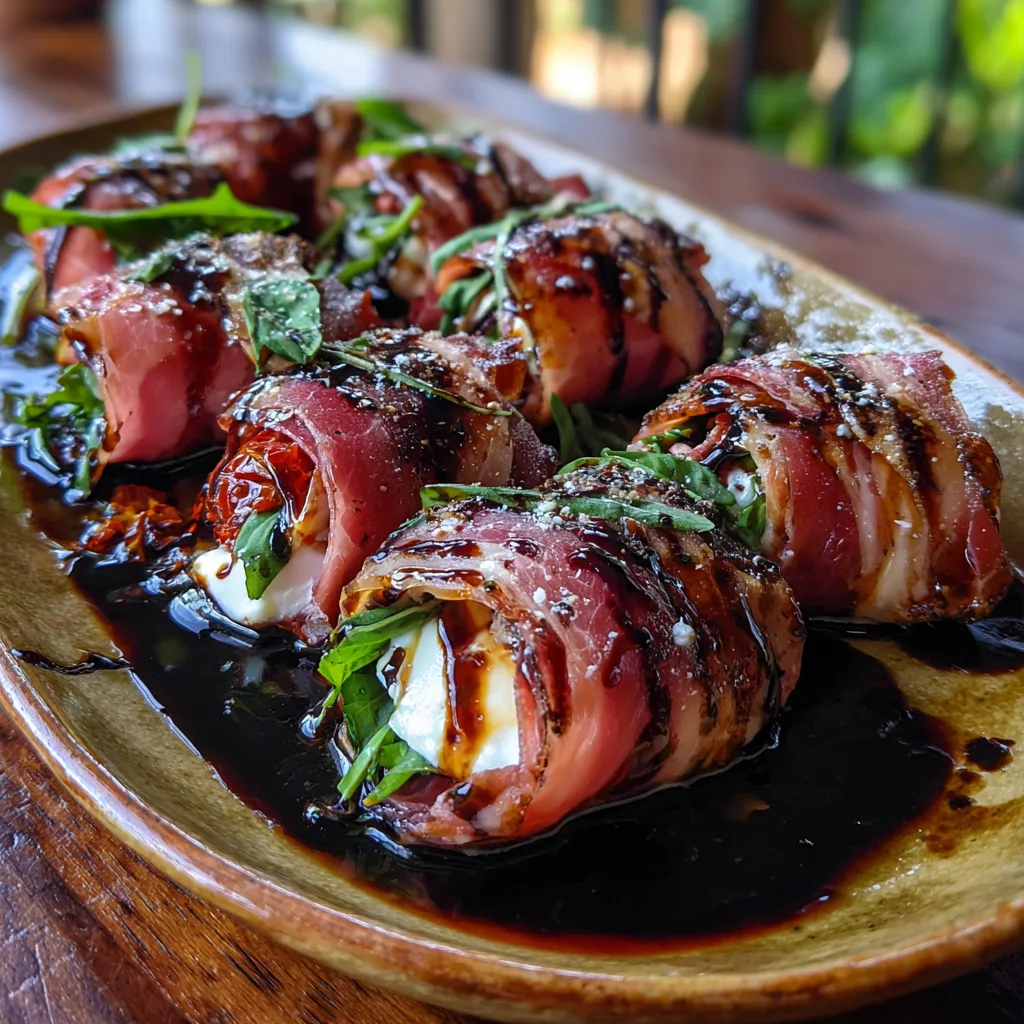
Forget the rice, seaweed, and raw fish. There is a new “sushi” in town, and it speaks the language of Tuscany rather than Tokyo. Welcome to the world of Italian Sushi—a playful, delicious, and visually stunning twist on the classic charcuterie board. Imagine all the best elements of an antipasto platter: salty prosciutto, savory salami, peppery arugula, and creamy fresh mozzarella, all rolled into a tight, bite-sized spiral and drizzled with a sweet and tangy balsamic glaze.
This dish is the ultimate “low effort, high reward” appetizer. It requires absolutely no cooking, just a bit of assembly and patience. It is naturally low-carb, gluten-free, and keto-friendly, making it a crowd-pleaser for guests with various dietary restrictions. But more importantly, it is fun. It turns the act of eating cold cuts into an experience. The contrast of textures—the silky meat, the crunch of the greens, the soft yield of the cheese—is perfection in a single bite.
In this comprehensive guide, we are going to teach you exactly how to master the art of the “Italian Sushi” roll. While it looks impressive, it can be tricky to get that tight spiral without the right technique. We will walk you through the layering process, the parchment paper hack, and the slicing secrets that ensure your rolls look like they came from a professional caterer. Get ready to have your fingers sticky with balsamic glaze and your tastebuds dancing.
Why This Recipe Works
The genius of Italian Sushi lies in its construction. Standard charcuterie boards are great, but they can be messy to eat while standing at a party. You have to balance a cracker, a slice of meat, and a piece of cheese. Italian Sushi solves this engineering problem by combining everything into one self-contained mouthful.
- The Flavor Balance: You have salt from the cured meats, creaminess from the cheese, bitterness from the arugula, and acidity/sweetness from the balsamic glaze. It hits every part of the palate.
- Visual Appeal: The cross-section of these rolls is beautiful. The pinks, whites, and greens create a vibrant mosaic that looks stunning on a platter.
- Versatility: Just like traditional sushi, you can customize the fillings. Don’t like arugula? Use spinach. Prefer provolone to mozzarella? Swap it out.
- Make-Ahead Magic: These actually benefit from sitting in the fridge for an hour before serving, making them the perfect stress-free party prep.
Ingredients Checklist
To create the perfect Italian Sushi, quality matters. Since there is no cooking to hide behind, buy the best cold cuts and cheese you can afford.
Italian Sushi (Prosciutto & Mozzarella Rolls)
Ingredients
Equipment
Method
- Lay out a large sheet of parchment paper. Arrange prosciutto slices vertically, overlapping them slightly to form a rectangle base.
- Layer the salami slices on top of the prosciutto.
- Spread the fresh arugula evenly over the meats. Place the mozzarella or burrata in a line across the bottom edge.
- Sprinkle sun-dried tomatoes and drizzle a small amount of balsamic glaze inside.
- Using the parchment paper to help, lift the bottom edge and roll the meats tightly around the cheese (like rolling sushi). Peel back the paper as you roll.
- Wrap the finished log tightly in the parchment or plastic wrap. Twist ends to seal.
- Refrigerate for at least 30 minutes to firm up the roll.
- Unwrap and slice into 1-inch rounds. Arrange on a platter and drizzle with extra balsamic glaze and olive oil.
Notes
The Wrapper (The “Nori” & “Rice”)
- Prosciutto di Parma (6-8 slices): This forms the outer “skin” of your roll. You want slices that are thin but not falling apart. Prosciutto has a natural stickiness that helps seal the roll.
- Salami (8-10 slices): Large, round slices of Genoa or Milano salami work best. They add a second layer of stability and a different texture to the prosciutto.
The Fillings
- Fresh Mozzarella or Burrata: You can use a log of fresh mozzarella (sliced into strips) or tear up a ball of burrata. Burrata offers a creamier, messier, more decadent center, while mozzarella offers a cleaner slice.
- Baby Arugula (Rocket): This adds a necessary peppery bite and freshness to cut through the heavy fats of the meat and cheese.
- Sun-Dried Tomatoes: Oil-packed strips add a concentrated burst of umami and sweetness.
- Cream Cheese or Soft Goat Cheese (Optional): Spreading a thin layer of soft cheese on the meats before adding the other fillings can act as “glue” to hold everything together tightly.
The Garnish
- Balsamic Glaze: Do not use regular vinegar; it is too runny. You want the thick, syrupy glaze that sits on top of the food.
- Olive Oil: A drizzle of high-quality extra virgin olive oil enhances the shine and flavor.
- Black Pepper: Freshly cracked.
Step-by-Step Instructions
Phase 1: The Setup
- Prepare Your Workspace: Lay out a large sheet of parchment paper or plastic wrap on your counter. This is your “sushi mat.” You cannot roll this tightly without it.
- Create the Prosciutto Layer: Lay the prosciutto slices vertically on the parchment paper, overlapping them slightly. You want to create a solid rectangle of meat, about 10×12 inches. Ensure there are no gaps.
- Add the Salami Layer: Arrange the salami slices on top of the prosciutto. You can do two rows or cover the entire surface, leaving about an inch of prosciutto exposed at the top (the far end) to help seal the roll later.
Phase 2: The Filling
- The Green Bed: Scatter a generous handful of fresh arugula over the salami. Don’t overstuff it, or the roll will be loose, but ensure an even layer for color in every bite.
- The Cheese Core: Place your cheese in a horizontal line across the bottom third of the rectangle (the end closest to you). If using burrata, break it into chunks. If using mozzarella, line up the pieces or the log.
- Flavor Accents: Sprinkle the sun-dried tomatoes and drizzle a little balsamic glaze inside the roll over the cheese. Season with cracked black pepper.
Phase 3: The Roll & Chill
- Start the Roll: Lift the edge of the parchment paper closest to you. Use it to lift the meat and fold it over the cheese core. Tuck it in tightly, just like rolling a burrito or sushi.
- Roll Tight: Continue rolling away from you, peeling back the parchment paper as you go so it doesn’t get rolled inside the meat. Use your hands to compress the cylinder firmly as you roll.
- Wrap and Chill: Once fully rolled, wrap the entire log tightly in the parchment paper (or plastic wrap). Twist the ends like a candy wrapper to compress it further.
- Refrigerate: Place the log in the fridge for at least 30 minutes to 1 hour. This step is non-negotiable! The cold solidifies the fats in the cheese and meat, holding the shape together so you can slice it cleanly.
Phase 4: Slicing and Serving
- Slice: Unwrap the chilled log. Using a very sharp knife, slice into 1-inch thick rounds. Wipe the knife blade between cuts if the cheese gets sticky.
- Plate: Arrange the rounds on a wooden board or platter.
- Garnish: Drizzle heavily with more balsamic glaze and olive oil for that glossy, appetizing finish. Serve immediately.
Tips for the Perfect Roll
1. Overlapping is Key:
When laying out the prosciutto, if you don’t overlap the slices enough, the roll will split when you try to slice it. Be generous with your base layer.
2. Don’t Skip the Chill:
If you try to cut this at room temperature, the cheese will squish out, and the meat will slide around. The refrigerator acts as the binding agent.
3. Use a Serrated Knife:
Surprisingly, a serrated bread knife often works better than a chef’s knife for cutting through the fibrous prosciutto without squashing the soft cheese inside.
4. “Glue” with Cream Cheese:
If you are struggling to get the rolls to stay tight, spread a thin layer of cream cheese on the prosciutto before adding the salami. This acts as edible cement.
Variations to Try
- The “Caprese”: Stick to just mozzarella, fresh basil leaves (instead of arugula), and tomato.
- The “Spicy Italian”: Use hot capicola instead of salami, and add some pickled hot cherry peppers inside.
- The “Vegetarian”: Use long thin slices of grilled eggplant or zucchini as the wrapper instead of prosciutto.
- The “Pesto”: Drizzle basil pesto inside the roll before rolling for an explosion of herb flavor.
Serving Suggestions
Italian Sushi is a heavy appetizer because it is almost entirely meat and cheese. Pair it with lighter items to balance the board:
- Crackers or Crostini: Serve these on the side for guests who want a crunchy vessel.
- Olives and Pickles: The acidity of cornichons or olives cuts through the fat.
- Fresh Fruit: Grapes, melon, or figs pair beautifully with salty prosciutto.
- Wine Pairing: A crisp Pinot Grigio or a light Chianti works perfectly. Bubbles (Prosecco) are also excellent for cutting the richness.
Frequently Asked Questions
Can I make this the day before?
Yes! You can roll the logs and keep them wrapped in the fridge overnight. However, wait to slice them until just before serving to prevent the edges of the meat from drying out or oxidizing.
What if I don’t like Arugula?
Spinach is a great mild alternative. Fresh basil leaves are also delicious but use them sparingly as the flavor is intense.
Is this expensive to make?
It can be, depending on the quality of meat. To budget, use a standard ham for the inner layer and save the expensive prosciutto for the outer wrapper where it matters most for texture and appearance.
Conclusion
Italian Sushi is more than just a clever name; it is a reinvention of how we enjoy classic Italian flavors. It takes the familiar components of a charcuterie board and transforms them into a finger-food format that is fun to eat and beautiful to look at. The combination of salty, savory, creamy, and sweet in one glossy, balsamic-drenched bite is truly addictive.
Next time you are tasked with bringing a dish to a potluck or hosting a wine night, leave the cooking to the stove and roll up some Italian Sushi instead. It is guaranteed to be the first thing to disappear from the table.