No-Bake Protein Balls
No-Bake Protein Balls: The Ultimate 10-Minute Energy Boost
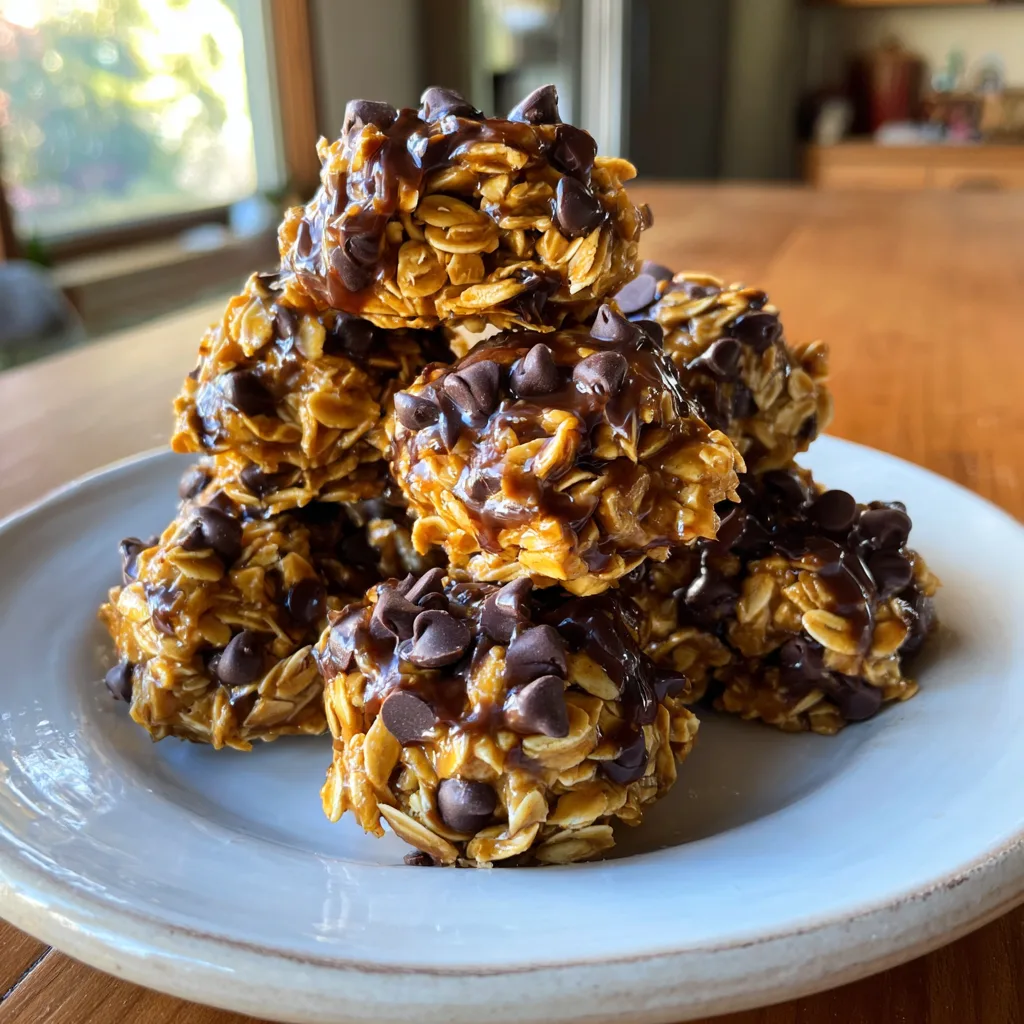
In the fast-paced world of meal prepping and healthy eating, few recipes have stood the test of time like the humble No-Bake Protein Ball. Also known as energy bites, power balls, or oatmeal bites, these spherical snacks are the perfect solution for the mid-afternoon slump, the pre-gym hunger pang, or the late-night sweet tooth. Based on the classic combination of peanut butter, oats, and chocolate chips shown in the image, this recipe is a masterclass in simplicity and flavor.
Unlike store-bought protein bars which are often laden with artificial preservatives, sugar alcohols, and unpronounceable ingredients, these homemade protein balls use pantry staples that you likely already have on hand. They are chewy, sweet, satisfyingly dense, and packed with healthy fats and fiber. The best part? There is absolutely no baking involved. You simply mix, roll, and chill.
This comprehensive guide will walk you through everything you need to know to make the perfect batch of protein balls, from selecting the right oats to customizing the flavor profile to suit your dietary needs. Whether you are a busy parent packing lunchboxes or an athlete looking for clean fuel, this recipe is about to become a staple in your kitchen.
Why You Will Love This Recipe
Zero Cooking Required: As the name suggests, keep your oven off. This is a “one-bowl” recipe that saves you time and energy, making it perfect for summer months or busy weekends.
Macro-Balanced: These balls offer a trifecta of nutrition: complex carbohydrates from the rolled oats for sustained energy, healthy monounsaturated fats and protein from the peanut butter, and a quick antioxidant-rich mood boost from the dark chocolate chips.
Highly Portable: Once set, these balls are firm and travel well. Throw them in a Ziploc bag for a hike, a Tupperware for the office, or a jar for the car cup holder.
Endlessly Customizable: Think of this recipe as a template. Don’t like peanut butter? Use almond butter. Hate chocolate? Use dried cranberries. The possibilities are infinite.
Ingredients Needed
To achieve that perfect sticky-sweet texture seen in the photo, ratio is key. Here is what you need:
No-Bake Protein Balls
Ingredients
Equipment
Method
- In a large bowl, whisk together the peanut butter, honey, and vanilla extract until smooth.
- Add the rolled oats, flax seeds, salt, and protein powder (if using). Stir until well combined.
- Fold in the chocolate chips gently.
- Chill the mixture in the refrigerator for 15-20 minutes to make it easier to handle.
- Roll the mixture into 12-15 bite-sized balls using your hands.
- Store in the fridge for up to 2 weeks.
Notes
- Rolled Oats (Old Fashioned): These provide the structural base. Do not use steel-cut oats (too hard) or instant oats (too mushy). Rolled oats offer the perfect chewy texture.
- Creamy Peanut Butter: This acts as the primary binder. We recommend a “drippy” natural peanut butter. If using a commercial brand like Jif or Skippy, the balls will be sweeter and firmer.
- Honey or Maple Syrup: The sticky sweetener that glues everything together. Honey offers a distinct floral flavor, while maple syrup is a great vegan alternative.
- Protein Powder (Optional): To boost the protein content, you can add a scoop of vanilla or chocolate whey/plant protein. *Note: If you add dry powder, you may need to add a splash of water or milk to balance the moisture.*
- Chocolate Chips: Mini semi-sweet or dark chocolate chips work best as they distribute more evenly than standard size chips.
- Vanilla Extract: A splash elevates the flavor from “good” to “bakery quality.”
- Chia Seeds or Flax Seeds (Optional): For an invisible boost of Omega-3s and fiber without altering the taste.
- Salt: A pinch of sea salt is essential to cut the sweetness and enhance the chocolate and peanut butter flavors.
Step-by-Step Instructions
1. Prepare Your Ingredients
Measure out all your ingredients. If your peanut butter has been sitting in the fridge and is hard, microwave it for 15–20 seconds so it is runny and easy to mix.
2. Mix the Wet Ingredients
In a large mixing bowl, combine the peanut butter, honey (or maple syrup), and vanilla extract. Whisk or stir vigorously until they are fully combined into a thick, glossy caramel-colored sludge. This ensures the flavor is distributed evenly.
3. Add the Dry Ingredients
Pour in the rolled oats, protein powder (if using), seeds, and salt. Stir with a sturdy spatula or wooden spoon. It will take some elbow grease! You want every single oat flake to be coated in the peanut butter mixture. The mixture should look wet and sticky.
4. Fold in the Chocolate
Once the dough has cooled slightly (if you heated the peanut butter), fold in the chocolate chips. If the dough is too hot, the chips will melt and create a chocolate muddy look—which is tasty, but not the classic look we are going for.
5. Roll into Balls
Using a small cookie scoop or a tablespoon, portion out the dough. Roll between the palms of your hands to form tight spheres. Pro Tip: Wet your hands slightly with water or oil to prevent the mixture from sticking to your skin.
6. Chill to Set
Place the balls on a parchment-lined plate or baking sheet. Transfer to the refrigerator for at least 30 minutes. This allows the oats to absorb some moisture and the peanut butter to firm up, giving the balls a chewy, fudge-like consistency.
Troubleshooting Your Texture
Because peanut butter brands vary in oil content, you might need to adjust on the fly:
Too Dry/Crumbly? If the mixture isn’t holding together when you squeeze it, add more honey or a teaspoon of water/milk. Keep adding liquid in small increments until it sticks.
Too Wet/Sticky? If it’s an impossible mess, add more oats or a tablespoon of coconut flour/protein powder to soak up the excess moisture. Chilling the dough for 20 minutes before rolling can also help manage sticky dough.
Variations to Keep It Exciting
The “Almond Joy”: Use almond butter instead of peanut butter, add shredded coconut, and place a whole almond in the center of each ball.
Oatmeal Raisin Cookie: Swap the chocolate chips for raisins and add a generous pinch of cinnamon and nutmeg.
Double Chocolate: Add a tablespoon of cocoa powder to the dry ingredients for a truffle-like experience.
Seed Butter (Nut-Free): For school-safe snacks, swap the peanut butter for sunflower seed butter or tahini. Note that tahini has a stronger savory flavor, so you may want to increase the honey slightly.
Serving Suggestions
- Pre-Workout: Eat 1-2 balls 30 minutes before exercise for a quick digesting carb source.
- Yogurt Topping: Crumble a ball over a bowl of Greek yogurt for texture.
- Dessert: Serve alongside a glass of cold milk for a healthy alternative to cookies.
Nutritional Deep Dive: Are They Healthy?
Yes, but portion control is key. These are energy-dense snacks.
Oats: Contains beta-glucan, a soluble fiber that aids in cholesterol management and gut health.
Peanut Butter: Provides satiety. The fats slow down the absorption of sugar from the honey, preventing a massive insulin spike.
Dark Chocolate: If you choose dark chocolate (70% cocoa or higher), you are getting flavonoids that support heart health.
Storage and Meal Prep FAQ
How long do they last?
Stored in an airtight container in the refrigerator, these will stay fresh for up to 2 weeks. Though, honestly, they rarely last that long because they are so addictive.
Can I freeze them?
Absolutely. These freeze beautifully. Place them in a freezer-safe bag, and they will keep for up to 3 months. You can eat them straight from the freezer (they don’t freeze rock solid due to the fat content) or let them thaw for 5 minutes.
Why are my balls flattening?
If your peanut butter was very oily or you didn’t add enough oats, gravity might take over. Ensure you chill them thoroughly. If they are still soft, keep them stored in the fridge rather than on the counter.
Fun Facts: The History of the Energy Ball
While “protein balls” are a modern gym staple, the concept dates back to the 1970s health food movement, often called “energy nuggets” or “hippy balls” made with carob and molasses. Today’s version is a refined, tastier descendant that aligns with the modern focus on protein and convenient nutrition. They bridge the gap between a raw food diet and the need for sweet comfort food.
Enjoy making these No-Bake Protein Balls! They are the perfect example of how simple ingredients, when combined correctly, can create something greater than the sum of their parts.