No-Fry Fried Ice Cream Balls
There is a specific kind of magic that happens when you combine the freezing cold temperature of premium vanilla bean ice cream with the earthy, toasted warmth of a crunchy nut coating. It is a sensory experience that dances between extremes—creamy and crispy, cold and comforting, sweet and savory. If you have ever dined at a Mexican-style restaurant and ordered the fried ice cream, you know exactly the delight I am describing. However, the prospect of actually deep-frying a ball of ice cream in hot oil at home is daunting, messy, and frankly, a little dangerous for the average home cook. Enter the “No-Fry” Fried Ice Cream Ball—a genius culinary hack that delivers 100% of the flavor and texture without a single drop of deep-fryer oil.
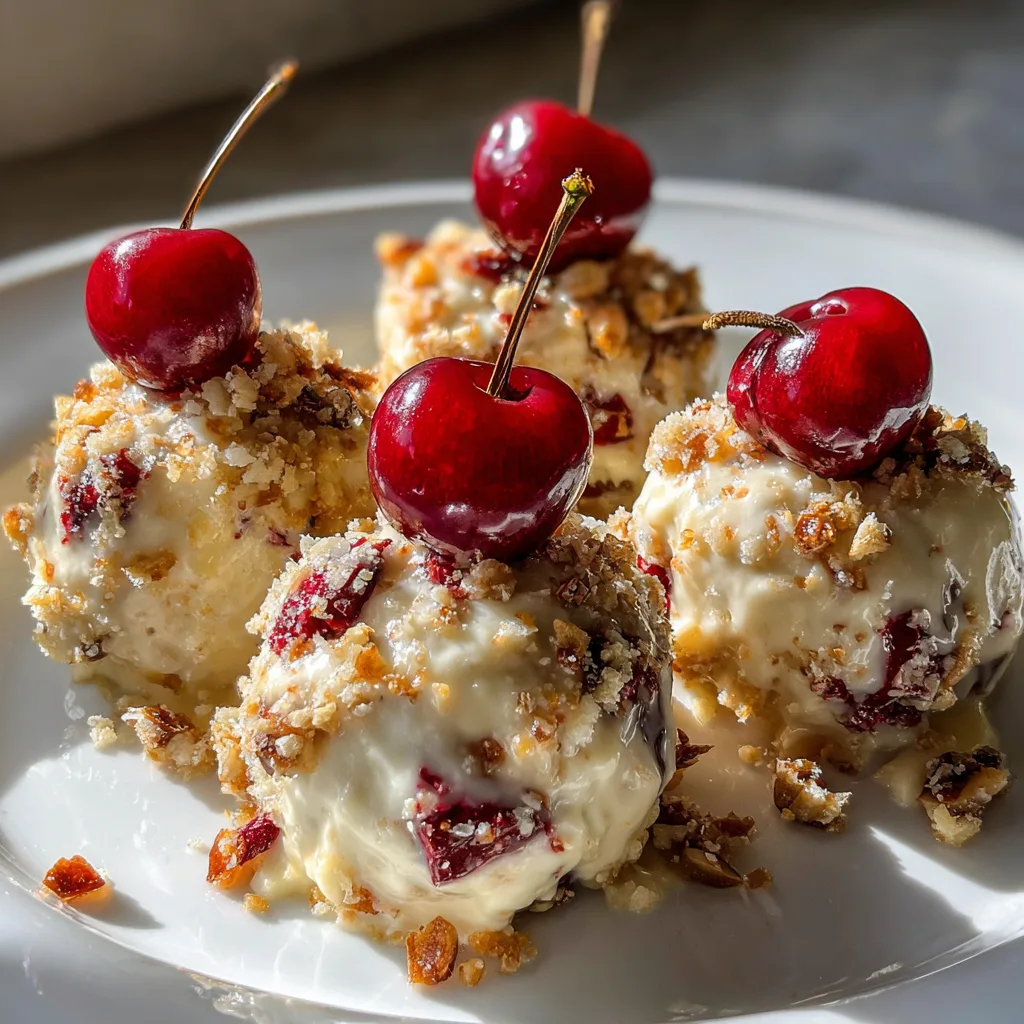
This comprehensive guide will walk you through creating these stunning dessert spheres, just like the ones pictured: luscious rounds of ice cream rolled in a butter-toasted armor of crushed cornflakes, cinnamon, and chopped pecans, all crowned with a jewel-like maraschino cherry. Whether you are hosting an elegant dinner party, looking for a fun project to do with kids, or simply craving a high-end dessert on a Tuesday night, this recipe is your golden ticket.
Why This Recipe Works
The success of this dish lies in the deception of the palate. “Fried” ice cream is beloved not necessarily because it is oily, but because the coating is crispy and warm (or room temperature) while the inside remains frozen. We achieve this by creating a “mock fry” coating.
By tossing crushed cereal and nuts in butter and sugar on a stovetop pan, we toast the ingredients to golden perfection. This creates a shell that tastes exactly like a fried crust. The addition of pecans adds a layer of sophistication and a buttery crunch that cornflakes alone cannot provide. Furthermore, the visual appeal of the stemmed cherry on top transforms a humble scoop of ice cream into a patisserie-style tartufo.
The Science of the Scoop: Texture and Temperature
Before we dive into the ingredients, it is essential to understand the physics at play here. Ice cream melts. This is an immutable fact of life. However, fat insulates. By coating the ice cream in a mixture of butter-toasted crumbs and nuts, we are essentially creating an insulating layer that protects the core of the ice cream from melting too quickly when it hits the tongue. This allows for that momentary pause where you crunch through the shell before the cold cream hits your tastebuds.
To achieve the perfect sphere seen in the photos, temperature management is key. We will utilize a “double freeze” method. You scoop and freeze the naked ice cream first to get it rock hard. Then, you roll it in the coating and freeze it again. This ensures the balls hold their shape and don’t turn into a puddle on the plate.
Ingredients
The beauty of this recipe is that it uses pantry staples to create something extravagant. Here is what you will need to assemble these frozen masterpieces:
Crunchy Pecan Ice Cream Balls (No-Fry)
Ingredients
Equipment
Method
- Line a baking sheet with parchment paper. Scoop 6 large balls of ice cream and place on the sheet.
- Freeze the ice cream balls for at least 1 hour until rock hard.
- In a skillet over medium heat, melt the butter. Add crushed cornflakes and chopped pecans.
- Stir in sugar and cinnamon. Cook for 4-5 minutes until golden and toasted.
- Remove mixture from heat and let it cool completely in a shallow dish.
- Roll the frozen ice cream balls in the cooled crumb mixture until fully coated.
- Top each ball with a cherry and return to the freezer for 30 minutes before serving.
Notes
- Vanilla Bean Ice Cream – 1 Quart (High quality is best, look for visible vanilla specks).
- Cornflakes Cereal – 3 Cups (Crushed).
- Unsalted Butter – 1/2 Cup (1 stick).
- Granulated Sugar – 1/3 Cup.
- Ground Cinnamon – 2 Teaspoons.
- Pecans or Walnuts – 1 Cup (Finely chopped).
- Maraschino Cherries – 6-8 (With stems attached for the look).
- Honey or Caramel Sauce – Optional (For drizzling).
- Sea Salt – A pinch (To balance the sweetness).
Step-by-Step Instructions
Follow these steps closely to ensure your ice cream balls come out perfectly round and beautifully coated.
Phase 1: The Pre-Freeze
- Line a baking sheet or a flat tray with parchment paper or wax paper. Ensure this tray fits inside your freezer.
- Take your ice cream out of the freezer and let it sit on the counter for about 5 to 7 minutes to soften slightly. It should be scoopable but not melting.
- Using a large ice cream scoop, create 6 large, distinct round balls. If you want them perfectly spherical, you can briefly use gloved hands (work very quickly!) to smooth them out.
- Place the scoops onto the prepared baking sheet.
- Immediately place the sheet in the freezer. Freeze for at least 1 hour. The ice cream balls must be rock hard before coating.
Phase 2: The Crunchy Coating
- While the ice cream is freezing, prepare the coating. Place the cornflakes in a zip-top bag and crush them using a rolling pin. You want a texture that resembles coarse breadcrumbs—not a fine powder, but no large flakes remaining.
- Finely chop your pecans or walnuts.
- In a medium skillet over medium heat, melt the butter.
- Add the crushed cornflakes and chopped nuts to the melted butter. Stir constantly to coat everything evenly.
- Sprinkle in the sugar, cinnamon, and the pinch of salt.
- Continue to cook, stirring constantly, for about 4-5 minutes. The mixture should become golden brown and fragrant. Do not walk away, as the sugar can burn quickly.
- Remove from heat and pour the mixture into a shallow, wide bowl or pie dish. Allow it to cool completely. Note: If you roll the ice cream in hot crumbs, it will melt instantly.
Phase 3: Assembly and Final Freeze
- Once the coating is cool and the ice cream balls are frozen solid, remove the ice cream from the freezer.
- Working with one ball at a time, roll the ice cream in the crumb mixture. Press the crumbs gently into the surface of the ice cream to ensure a thick, even layer covers the entire sphere.
- Return the coated ball to the baking sheet. Repeat with the remaining balls.
- Once all are coated, top each ball with a stemmed maraschino cherry, pressing it slightly into the top so it adheres.
- Place the tray back into the freezer for at least 30 minutes to firm up.
- Serve immediately from the freezer. You can drizzle with honey or caramel if desired.
Variations to Try
While the classic vanilla and cinnamon profile is timeless, this recipe is incredibly versatile. Here are some creative twists to match different seasons or cravings:
1. The Chocolate Lover’s Dream
Swap the vanilla ice cream for a dark chocolate fudge ice cream. For the coating, use crushed chocolate wafer cookies (like Oreos without the cream) mixed with the butter and hazelnuts instead of pecans. Drizzle with hot fudge sauce.
2. The Tropical Crunch
Use coconut ice cream or pineapple sherbet. For the coating, toast shredded coconut mixed with crushed graham crackers and macadamia nuts. Top with a piece of candied pineapple instead of a cherry.
3. The Strawberry Shortcake
Use strawberry ice cream. In the coating, mix freeze-dried strawberry powder with crushed vanilla wafers and almonds. This creates a vibrant pink and golden coating that tastes just like the classic ice cream truck bar.
Tips for the Perfect Round Scoop
Achieving that photogenic, perfect sphere can be tricky. Here are pro tips from the test kitchen:
- The Warm Water Trick: Dip your metal ice cream scoop into a cup of hot water before scooping. Shake off the excess water, then scoop. The heat helps the metal glide through the cream, creating a smoother surface.
- Plastic Wrap Shaping: If your scoop looks rough, tear off a piece of plastic wrap. Place the scoop in the center, gather the wrap around it, and twist. Use your hands to mold the ice cream inside the plastic into a perfect ball. Freeze it inside the plastic wrap, then unwrap before rolling in crumbs.
- Don’t Overwork: Hand heat is the enemy. If the ice cream starts getting shiny or soft, stop immediately and put it back in the freezer for 15 minutes.
Serving Suggestions and Pairings
These No-Fry Fried Ice Cream Balls are a showstopper on their own, but the right presentation can elevate them to Michelin-star status.
Plating: Use chilled plates. This buys you extra time before the dessert melts. A smear of caramel or raspberry coulis on the bottom of the plate not only looks artistic but acts as a “glue” to keep the ball from rolling around.
Drink Pairings:
Coffee: A hot espresso or cappuccino provides a beautiful temperature contrast to the cold dessert.
Dessert Wine: A glass of Pedro Ximénez sherry or a Tawny Port pairs wonderfully with the caramel notes of the toasted cornflakes and pecans.
Storage and Make-Ahead Guide
This is the ultimate make-ahead dessert for parties. Because they need to be frozen firm, you actually must make them ahead of time.
Freezer Life: Once fully frozen on the baking sheet (after step 17), you can transfer the balls into a large airtight container or a freezer-safe zip-top bag. They will keep perfectly for up to 2 months.
Serving from Storage: If they have been frozen for a long time (more than 24 hours), let them sit at room temperature for about 3-4 minutes before serving. This softens the ice cream just enough to be spoonable without being runny.
The History of Fried Ice Cream
The origins of fried ice cream are somewhat murky and hotly debated. Some claim it originated at the 1893 Chicago World’s Fair, where a clever vendor invented a way to encase ice cream in a batter that could withstand momentary frying. Others trace it back to Japanese tempura ice cream in the 1960s.
However, the version most Americans are familiar with—the cinnamon-dusted, cornflake-crusted ball—was popularized by Mexican chain restaurants in the United States in the 1980s. While not traditionally Mexican (in the way flan or tres leches is), it has become a staple of Tex-Mex cuisine. Our “No-Fry” version pays homage to this restaurant classic, retaining the festive flair while removing the hassle of hot oil.
Nutritional Note
While this is an indulgent treat, it does offer some nutritional density thanks to the pecans. Pecans are rich in healthy monounsaturated fats, fiber, and protein. By controlling the ingredients at home, you can also opt for lower-sugar ice cream or gluten-free cornflakes to accommodate dietary needs.
Conclusion
The No-Fry Fried Ice Cream Ball with Pecan Crunch is a testament to the fact that sometimes, the “hack” is better than the original. It removes the danger and mess of deep-frying while preserving the beloved contrast of hot-toasted crunch and cold, creamy vanilla. The visual appeal of the red cherry against the golden crumb makes it an instant hit on any dinner table.
Whether you are celebrating a birthday, a holiday, or just the joy of a Friday night, these frozen treats bring a sense of nostalgia and fun. So, clear a spot in your freezer, grab that bag of cornflakes, and get ready to roll your way to dessert perfection.