Adorable Turtle Sugar Cookies
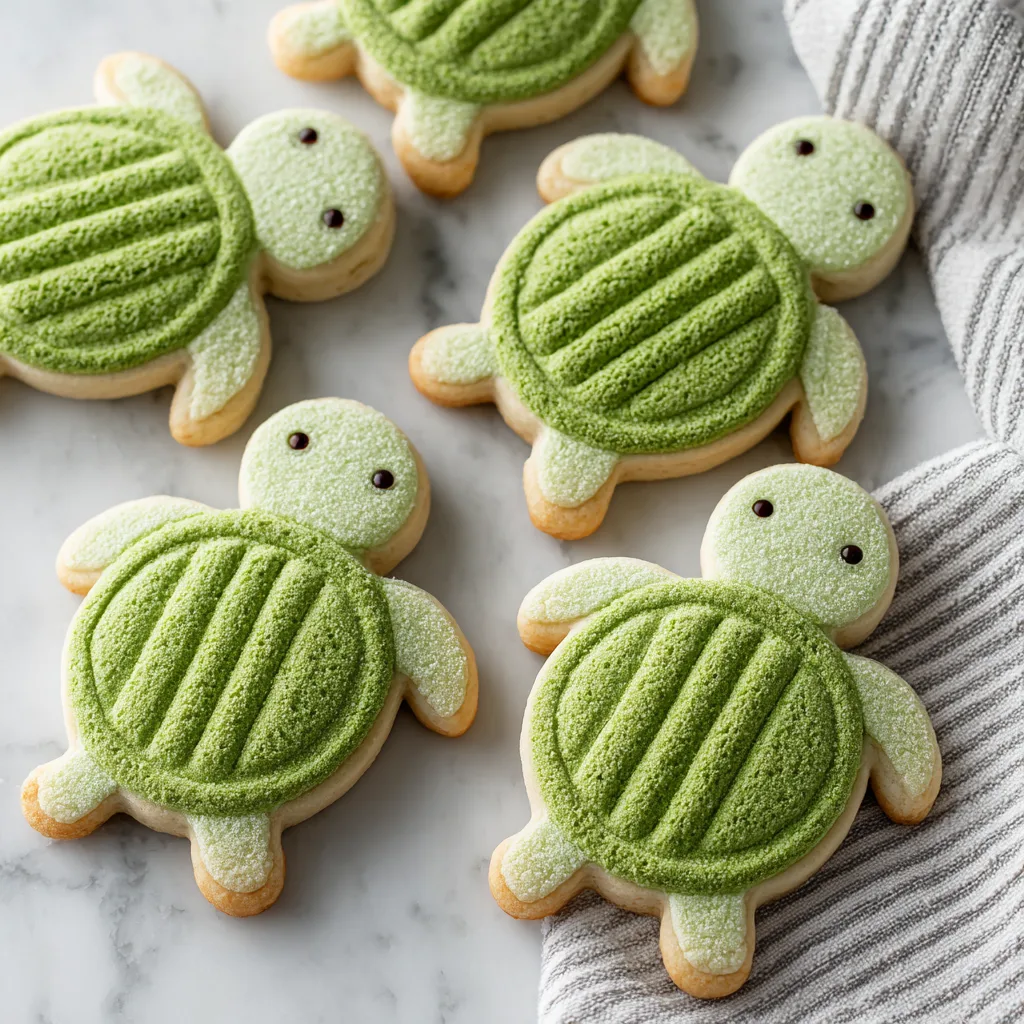
Baking is about more than just yielding a delicious treat; it is about creating memories, having fun in the kitchen, and sometimes, bringing a little bit of whimsy to your dessert table. If you are looking for a recipe that is guaranteed to bring a smile to anyone’s face, look no further than these Adorable Turtle Sugar Cookies. These delightful, pastel green treats are an incredibly fun twist on a classic sugar cookie, transforming a simple dough into the cutest little reptiles you have ever seen. Whether you are planning a child’s birthday party, looking for a rainy-day activity to do with the kids, or just want to add a playful touch to your cookie jar, these turtles are an absolute must-bake.
The beauty of this recipe lies in its simplicity. You don’t need any special cookie cutters, complicated icing techniques, or advanced pastry skills. The charming turtle shape is achieved entirely by hand-rolling simple balls of dough and using a standard kitchen fork to create the textured shell. The result is a buttery, soft-baked sugar cookie with slightly crisp edges that tastes just as nostalgic and comforting as it looks. Let’s dive into how you can bring these sweet little turtles to life in your own kitchen.
Why This Recipe is a Guaranteed Hit
There are countless sugar cookie recipes out there, but these Turtle Sugar Cookies offer something uniquely special. Here is why they will quickly become a highly requested favorite:
- Interactive and Fun: This is the ultimate kid-friendly baking project. Children will absolutely love helping to roll the dough into “turtle parts” and assembling their very own edible friends. It is essentially edible playdough!
- No Cookie Cutters Needed: Forget digging through a bin of cookie cutters trying to find the right shape. These turtles are constructed from basic spheres of dough, making the prep work wonderfully accessible for bakers of all skill levels.
- The Perfect Texture: Beyond their cute appearance, these are genuinely fantastic sugar cookies. They strike that perfect balance: slightly chewy in the center, soft throughout, with a satisfying, delicate snap around the edges of the little flippers.
- Customizable: While the classic green is picture-perfect, you can easily divide the dough and use different food colorings to create a whole rainbow of colorful turtles.
The Ingredients: Simple Pantry Staples
You likely already have everything you need to make these cookies in your pantry and fridge. Here is what you need to gather:
- Unsalted Butter: The foundation of any good sugar cookie. Make sure it is softened to room temperature so it creams perfectly with the sugar, providing that tender, melt-in-your-mouth crumb.
- Granulated Sugar: For the perfect amount of sweetness and to help create slightly crisp edges.
- Egg: To bind the dough together and provide structure.
- Vanilla Extract: Use pure vanilla extract for the best flavor. This gives the cookies that classic, bakery-style taste.
- All-Purpose Flour: The structural base of the cookie. Be sure to measure your flour correctly (spoon it into the measuring cup and level it off) to avoid dry, crumbly dough.
- Baking Powder: Provides just enough lift so the cookies are soft and tender, rather than dense and flat.
- Green Food Coloring: Liquid or gel food coloring works perfectly. Gel coloring will give you a more vibrant color without adding extra moisture to the dough, but use whatever you have on hand to achieve that fun, pastel green hue.
- The Eyes: You have a few options for the turtle’s eyes. You can use an edible black marker, tiny black nonpareil sprinkles, mini chocolate chips pressed in point-side down, or simply a tiny dot of black icing or food coloring applied with a toothpick.
Step-by-Step Guide to Assembling Your Turtles
Creating these little guys is a breeze once you get the hang of the assembly process. Follow these steps for perfect results every time:
- Prepare the Dough: In a large bowl, cream together the softened butter and sugar until light and fluffy. Beat in the egg and vanilla extract. Slowly add the green food coloring until you reach your desired shade of green. In a separate bowl, whisk together the flour, baking powder, and salt. Gradually add the dry ingredients to the wet ingredients, mixing until just combined. Do not overmix!
- Chill the Dough: This is a crucial step! Wrap the dough in plastic wrap and chill it in the refrigerator for at least 30-45 minutes. Chilled dough is much easier to roll and, more importantly, it prevents the turtles from spreading out and losing their shape in the hot oven.
- Roll the Turtle Parts: Preheat your oven and line a baking sheet with parchment paper. Take your chilled dough and start rolling. For each turtle, you will need one larger ball (about 1 inch) for the shell, one medium-small ball for the head, and four smaller balls for the legs/flippers.
- Assemble on the Pan: Place the large ball (the shell) on the prepared baking sheet. Gently press the head and four legs into the bottom edges of the shell so they stick together. The baking process will fuse them completely.
- Create the Shell Pattern: Take a standard kitchen fork and gently press it into the center of the large ball (the shell) to flatten it slightly. Then, press the fork in the opposite direction to create a crosshatch pattern. This gives the cookies their signature “turtle shell” look!
- Add the Eyes: Using a toothpick dipped in black food coloring, an edible marker, or tiny sprinkles, carefully add two small eyes to the turtle’s head.
- Bake and Cool: Bake the cookies until they are just set. You do not want them to brown heavily, but you might notice a very slight golden color on the tips of the legs and head. Let them cool on the baking sheet for a few minutes before transferring them to a wire rack to cool completely.
Pro-Tips for Cookie Perfection
- Don’t Skip the Chill: If your kitchen is very warm and the dough gets soft while you are rolling the balls, pop the assembled, unbaked turtles back into the fridge for 10 minutes before putting them in the oven. This ensures they keep their cute, distinct shape.
- Size Matters: Try to keep the sizes of the heads and legs consistent across all your cookies so they bake evenly. If some legs are tiny and others are huge, the tiny ones will burn before the rest of the cookie is done.
- Flavor Twists: While vanilla is classic, you can easily switch up the flavor profile! Swap out half of the vanilla extract for almond extract, lemon extract, or even a dash of coconut extract for a tropical twist.
Storing Your Turtle Cookies
These cookies store wonderfully, making them great for making ahead of a party or event.
Room Temperature: Once the cookies are completely cool, store them in an airtight container at room temperature. They will stay soft and fresh for up to 5 days.
Freezing the Dough: You can freeze the unbaked dough! Roll the dough into a ball, wrap it tightly in plastic wrap, and place it in a freezer bag for up to 3 months. Thaw overnight in the refrigerator before rolling and assembling your turtles.
Freezing Baked Cookies: Fully baked and cooled cookies can also be frozen in an airtight container with parchment paper between the layers for up to 2 months. Let them come to room temperature on the counter before serving.
Gather your little helpers, preheat your oven, and get ready to create the most charming, delicious batch of Turtle Sugar Cookies you have ever tasted. Happy baking!
Adorable Turtle Sugar Cookies
Ingredients
Equipment
Method
- In a large bowl, cream together the softened butter and granulated sugar using a mixer until light and fluffy (about 2-3 minutes).
- Add the egg and vanilla extract, beating until well combined. Slowly add the green food coloring until the dough reaches your preferred shade of green.
- In a separate medium bowl, whisk together the flour, baking powder, and salt. Gradually add the dry ingredients to the wet ingredients, mixing on low speed until just combined. Do not overmix.
- Form the dough into a disc, wrap tightly in plastic wrap, and refrigerate for 30 to 45 minutes.
- Preheat your oven to 350°F (175°C) and line a baking sheet with parchment paper.
- Remove dough from the fridge. For each turtle, roll one 1-inch ball for the shell, one slightly smaller ball for the head, and four small balls for the legs/flippers.
- Place the large shell ball on the baking sheet. Gently press the head and four legs around the base of the shell to attach them.
- Use a standard fork to press down gently on the shell ball, flattening it slightly. Press again in the opposite direction to create a crosshatch pattern.
- Use an edible marker, a dot of black icing on a toothpick, or tiny sprinkles to carefully add two eyes to the turtle’s head.
- Bake for 8-10 minutes, or until the cookies are just set and the edges of the legs are barely starting to turn golden brown. Let cool on the baking sheet for 5 minutes before transferring to a wire rack to cool completely.