Cinnamon Roll Bliss Bars
Cinnamon Roll Bliss Bars: All the Flavor, None of the Kneading
We all love the smell of fresh cinnamon rolls baking in the oven. It is the scent of comfort, warmth, and home. But let’s be honest: working with yeast, kneading dough, and waiting for two separate rises is a weekend project that requires patience. Enter the Cinnamon Roll Bliss Bar. This recipe captures everything you adore about a classic cinnamon bun—the buttery dough, the gooey brown sugar filling, and the tangy cream cheese glaze—and packs it into an easy, no-fuss cookie bar.
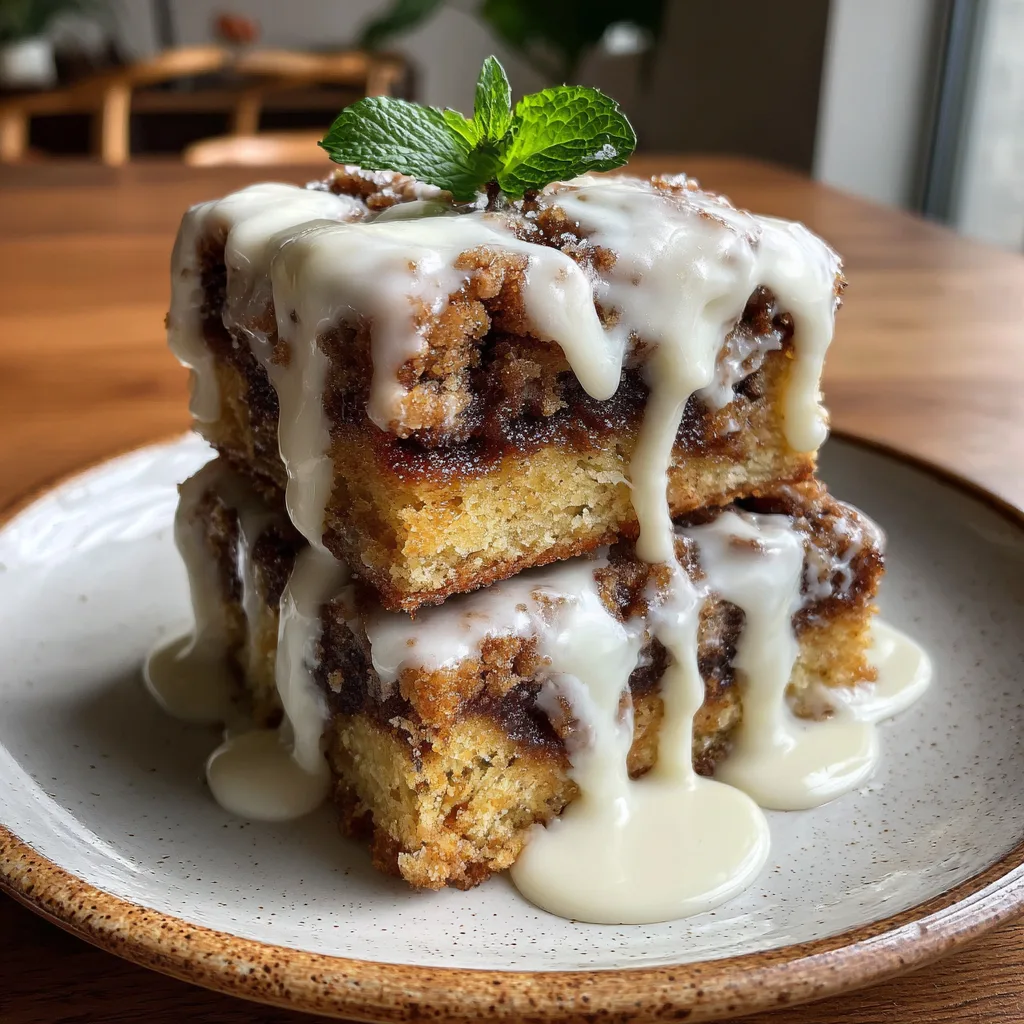
As seen in the photo, these bars are stacked high with distinct layers of texture. You have a dense, chewy blondie-like base that mimics the soft interior of a roll. Then comes the “bliss” factor: a ripple of melted butter, brown sugar, and cinnamon that caramelizes in the oven, creating sticky pockets of flavor. Finally, it is drenched in a thick, glossy cream cheese icing that drips down the sides, sealing in the moisture. These bars are faster than yeast rolls, easier to share, and arguably even more delicious.
Why These “Bliss Bars” Will Become a Staple
The magic of this recipe lies in its texture. Unlike a cakey cinnamon square, these are denser and fudgier, much like a blondie. This means they hold up well to being stacked and transport easily to potlucks or parties. The absence of yeast means you can go from craving to eating in under an hour.
Furthermore, the ratio of filling to dough is customizable. The “swirl” layer is thick and generous, ensuring that every single bite has that punch of warm spice. The icing isn’t just a drizzle; it’s a blanket of sweet, creamy richness that cuts through the spice perfectly.
The Anatomy of a Bliss Bar
The Dough Base:
Think of this as a cross between a sugar cookie and a dense cake. It relies on butter and vanilla for flavor and baking powder for a slight lift. It needs to be sturdy enough to hold the filling but soft enough to melt in your mouth.
The Cinnamon Filling:
This is where the flavor lives. We use dark brown sugar for a deeper molasses taste, plenty of cinnamon, and melted butter. When baked, this layer bubbles and becomes almost toffee-like.
The Glaze:
A cinnamon roll is naked without cream cheese icing. This glaze is whisked until it is pourable but thick enough to cling to the bars, setting into a soft, sticky finish.
Ingredients Needed
Pantry staples come together to create magic. Here is what you need.
Cinnamon Roll Bliss Bars
Ingredients
Equipment
Method
- Preheat oven to 350°F (175°C). Line a 9×13 pan with parchment paper.
- Cream butter and sugar until fluffy. Add eggs and vanilla.
- Mix in flour, baking powder, and salt until a soft dough forms.
- Press 2/3 of the dough into the bottom of the pan.
- Mix brown sugar, cinnamon, and melted butter. Sprinkle over the bottom dough layer.
- Crumble the remaining dough over the cinnamon layer.
- Bake for 25-30 minutes until edges are golden. Cool slightly.
- Whisk glaze ingredients together and pour over warm bars.
Notes
For the Cookie Base:
- Unsalted Butter: 1 cup (2 sticks), softened. This provides the rich flavor.
- Granulated Sugar: 1 cup.
- Eggs: 2 large eggs, room temperature.
- Vanilla Extract: 2 teaspoons. Don’t skimp on this!
- All-Purpose Flour: 3 cups. Measure by spooning and leveling to avoid dense bars.
- Baking Powder: 2 teaspoons.
- Salt: ½ teaspoon.
- Milk: ¼ cup (if the dough is too stiff).
For the Cinnamon Swirl Filling:
- Dark Brown Sugar: ½ cup, packed.
- Ground Cinnamon: 2 tablespoons.
- Unsalted Butter: 3 tablespoons, melted.
For the Cream Cheese Glaze:
- Cream Cheese: 4 oz, softened.
- Powdered Sugar: 1 ½ cups.
- Milk: 2-3 tablespoons (adjust for consistency).
- Vanilla Extract: 1 teaspoon.
Step-by-Step Instructions
Follow these simple steps to baking bliss.
1. Prep the Oven and Pan
Preheat your oven to 350°F (175°C). Line a 9×13 inch baking pan with parchment paper, leaving an overhang on the sides for easy removal later. Grease the paper lightly with cooking spray.
2. Make the Dough
In a large bowl or stand mixer, cream the softened butter and granulated sugar together until light and fluffy (about 2-3 minutes). Beat in the eggs one at a time, followed by the vanilla.
Gradually add the flour, baking powder, and salt. Mix on low speed until just combined. If the dough is very crumbly, add the milk one tablespoon at a time until it comes together into a soft, tacky dough.
3. Assemble the Layers
Take about 2/3 of the dough and press it firmly into the bottom of your prepared pan to form an even base layer.
The Filling: In a small bowl, mix the brown sugar, cinnamon, and melted butter until it looks like wet sand. Sprinkle this mixture evenly over the bottom layer of dough.
4. Top and Bake
Take the remaining 1/3 of the dough. You can either crumble it over the top for a rustic look or flatten small pieces with your hands and patch them over the cinnamon layer (like a cobbler).
Bake: Bake for 25–30 minutes. The edges should be lightly golden, and a toothpick inserted into the center should come out clean (or with just a few moist crumbs). Be careful not to overbake, or they will dry out.
5. The Glaze
While the bars are baking, whisk together the softened cream cheese, powdered sugar, milk, and vanilla until smooth and glossy.
Glazing: Let the bars cool for about 15 minutes. While they are still warm (but not piping hot), pour the glaze over the top. Use a spatula to spread it to the edges. The warmth will help the glaze melt slightly and seep into the cracks.
6. Cool and Cut
Let the bars cool completely before lifting them out of the pan using the parchment handles. Slice into squares and serve stacked for maximum impact.
Expert Tips for Success
Room Temperature Ingredients:
Ensure your butter and cream cheese are truly soft before mixing. This prevents lumps in your dough and glaze.
The “Swirl” Effect:
For a more marbled interior, take a knife and gently swirl the cinnamon filling into the bottom dough layer before adding the top dough.
Don’t Over-mix:
Once you add the flour, mix only until the white streaks disappear. Over-mixing develops gluten and makes the bars tough instead of tender.
Garnish:
A sprig of fresh mint adds a pop of color for presentation, though you remove it before eating.
Creative Variations
1. Pecan Praline:
Add ½ cup of chopped pecans to the cinnamon filling mixture for a crunch that mimics a sticky bun.
2. Apple Pie Bars:
Dice one Granny Smith apple finely and scatter it over the cinnamon layer before adding the top dough.
3. Pumpkin Spice:
Add 1 teaspoon of pumpkin pie spice to the dough and use maple syrup instead of milk in the glaze for a fall twist.
4. Coffee Glaze:
Substitute the milk in the icing for strong brewed coffee or espresso for a “latte” flavor profile.
Storage and Reheating
Counter: Store in an airtight container at room temperature for up to 3 days.
Fridge: Because of the cream cheese glaze, you can store them in the fridge for up to a week. Let them come to room temperature before eating for the best texture.
Freezer: These freeze beautifully (even glazed). Wrap individual squares in plastic wrap and freeze for up to 3 months. Thaw on the counter.
Nutritional Highlights
These bars are a dessert, meant to be savored. They provide a quick energy boost from the carbohydrates and a satisfying richness from the dairy fats. While not a health food, homemade treats allow you to control the quality of ingredients, avoiding the preservatives found in store-bought pastries.
Enjoy your Cinnamon Roll Bliss Bars—the perfect solution when you need a hug in the form of a pastry.