Cookie Butter Cheesecake Cups
Cookie Butter Cheesecake Cups: The Ultimate No-Bake Indulgence
If you have been searching for a dessert that balances creamy decadence with a satisfying crunch, look no further than these Cookie Butter Cheesecake Cups. There is something truly magical about the combination of spiced Speculoos cookies and the rich, velvety texture of sweetened cream cheese. This recipe takes the beloved flavor profile of Biscoff and transforms it into an elegant yet incredibly simple individual dessert that requires absolutely no oven time. Whether you are hosting a dinner party, looking for a quick treat to bring to a potluck, or simply satisfying a late-night sweet tooth, these cups are the answer.
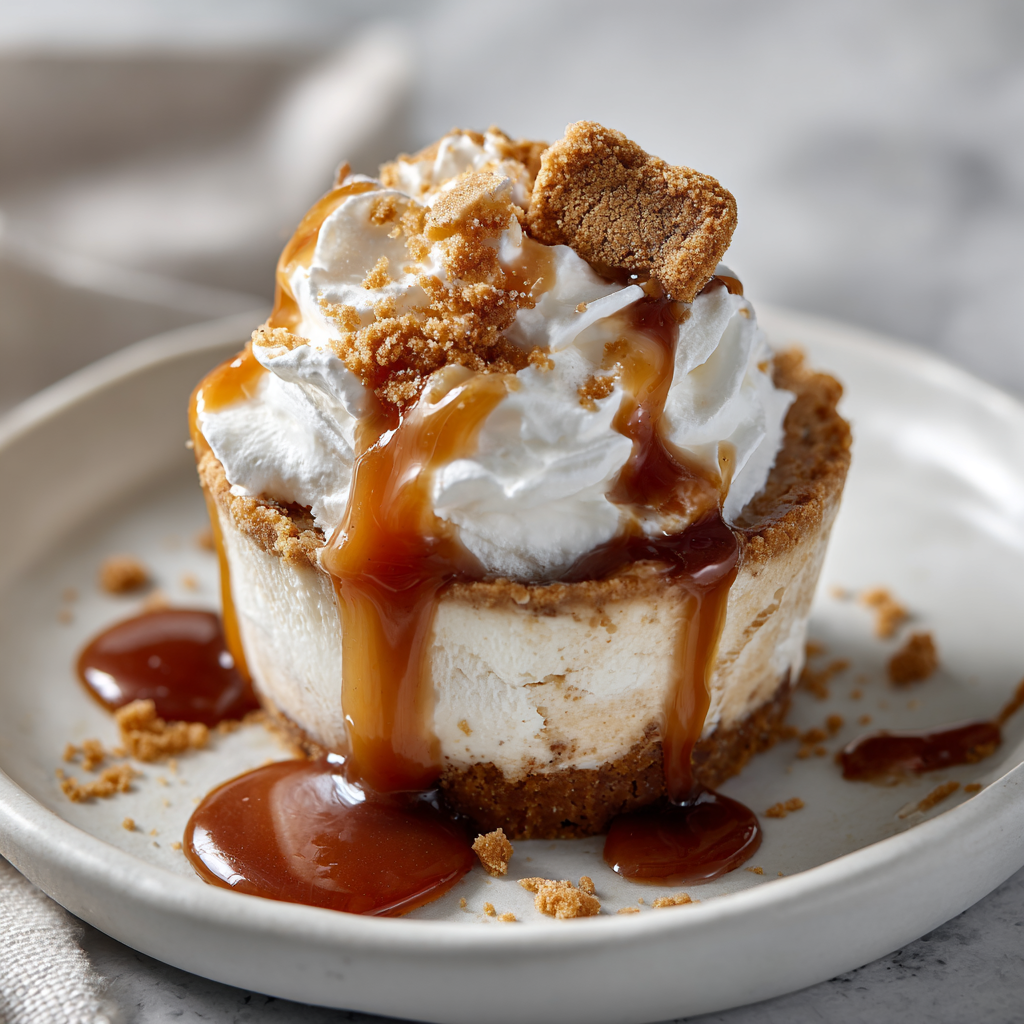
The beauty of this dessert lies in its simplicity and its texture. The crust is not a hard-baked shell but a loose, buttery crumble that sits at the bottom of the cup, providing a salty-sweet foundation. The filling is a mousse-like cheesecake mixture that is lightened with whipped cream but grounded by the deep, caramelized gingerbread flavor of the cookie butter. Topped with more crumbs and a whole cookie, it is a feast for the eyes as well as the palate. Because they are served in individual clear cups, you get to see every luscious layer, making them look far more complicated to make than they actually are.
Why This Recipe Will Become Your New Favorite
The appeal of these Cookie Butter Cheesecake Cups goes beyond just their taste. One of the biggest advantages is the “no-bake” aspect. In the heat of summer, or even when your oven is occupied with a main course during the holidays, having a dessert that sets in the refrigerator is a lifesaver. Furthermore, portion control is built right in. Instead of slicing a messy wedge from a large springform pan, you have neat, portable cups that are easy to serve and store.
Another reason to love this recipe is its versatility. While we are using Speculoos cookies and spread here, the method teaches you the fundamentals of making mousse-style cheesecake cups. Once you master the consistency of the filling and the ratio of crust to cream, you can experiment with other flavors. However, there is a reason the cookie butter version is a viral sensation—the spices in the cookies (cinnamon, nutmeg, ginger, cloves) pair perfectly with the tang of the cream cheese, cutting through the richness so it never feels too heavy. It is a sophisticated flavor profile that appeals to both children and adults alike.
The texture play is also significant here. You have the sandy, buttery crunch of the base, the smooth and airy cheesecake filling, and the slightly softened cookie on top. It is a sensory experience in every bite. Plus, because they are made in advance, the flavors have time to meld together in the fridge, making them taste even better the next day. This makes them the ultimate make-ahead dessert for stress-free entertaining.
Ingredients
- 1 packet (8.8 oz) Biscoff/Speculoos cookies (plus extra for garnish)
- 4 tablespoons unsalted butter, melted
- 16 oz cream cheese, softened to room temperature
- 1 cup creamy cookie butter spread (Biscoff or similar generic brand)
- 1 cup powdered sugar, sifted
- 1 teaspoon vanilla extract
- 1 1/2 cups heavy whipping cream, cold
- 1/4 cup melted cookie butter (for drizzling)
Instructions
- Begin by preparing the crust layer. Place the packet of Biscoff cookies into a food processor and pulse until they are fine crumbs. If you do not have a food processor, place the cookies in a large zip-top bag and crush them with a rolling pin.
- Transfer the cookie crumbs to a medium bowl. Pour the melted butter over the crumbs and mix with a fork until the texture resembles wet sand.
- Set out 8-10 small dessert cups or jars (6-8 oz size). Spoon about 2 tablespoons of the crumb mixture into the bottom of each cup. Use the back of a spoon or a small glass to press the crumbs down gently to form a base. Save the remaining crumbs for the topping.
- In a large mixing bowl, beat the softened cream cheese using a hand mixer or stand mixer on medium speed until it is completely smooth and creamy, about 2-3 minutes. Ensure there are no lumps.
- Add the 1 cup of creamy cookie butter, powdered sugar, and vanilla extract to the cream cheese. Beat again until well combined and fluffy. Scrape down the sides of the bowl as needed.
- In a separate cold bowl, whip the cold heavy cream until stiff peaks form. Be careful not to over-whip it into butter.
- Gently fold the whipped cream into the cookie butter cream cheese mixture using a silicone spatula. Fold slowly to keep the mixture light and airy; do not stir vigorously or you will deflate the air bubbles.
- Transfer the filling into a piping bag fitted with a large round or star tip. If you do not have a piping bag, a large zip-top bag with the corner snipped off works perfectly.
- Pipe a layer of the cheesecake filling into each cup over the crust, filling it about halfway.
- Sprinkle a layer of the reserved cookie crumbs over the filling.
- Pipe another swirl of the cheesecake filling on top, reaching near the rim of the cup.
- Melt the remaining 1/4 cup of cookie butter in the microwave for 15-20 seconds until it is liquid and pourable. Drizzle this gooey sauce over the top of each cup.
- Garnish each cup with a whole cookie or a half cookie stuck into the frosting.
- Refrigerate the cups for at least 2 hours to allow the filling to set and the flavors to meld. Serve chilled.
Tips for Achieving the Perfect Texture
The success of a no-bake cheesecake lies heavily in the temperature of your ingredients. Your cream cheese must be truly at room temperature. If it is too cold, it will remain lumpy no matter how much you beat it, resulting in a grainy mouthfeel rather than a smooth mousse. Conversely, your heavy whipping cream needs to be ice cold. Warm cream will not whip up to the volume needed to give the dessert its structure.
When folding the whipped cream into the heavier cheese mixture, patience is key. “Folding” means cutting through the mixture with a spatula, scraping the bottom of the bowl, and bringing the bottom over the top. Turning the bowl as you go helps. This technique preserves the air bubbles you created during whipping, which is what makes the dessert light rather than a dense block of cheese.
For the presentation, using a piping bag really elevates the look of the dessert. It keeps the sides of the cups clean and allows for a professional swirl on top. If you spoon the mixture in, it can smear against the clear plastic or glass, looking messy. If you don’t have professional piping bags, the zip-top bag hack is a legitimate kitchen trick that works wonders.
Storage and Make-Ahead Advice
These Cookie Butter Cheesecake Cups are excellent for making ahead of time. In fact, they arguably taste better after sitting in the fridge for 24 hours, as the moisture from the filling slightly softens the cookie layers, creating a cake-like consistency similar to an icebox cake.
To store them, ensure each cup is covered. If your cups came with lids, snap them on. If not, tightly wrap the top of each cup with plastic wrap. They will stay fresh in the refrigerator for up to 4 days. After that, the crust may become too soggy.
You can also freeze these cups! Prepare them up to the point of garnishing (hold off on the final cookie on top). Cover them tightly and freeze for up to 1 month. To serve, thaw them in the refrigerator overnight. Add the fresh cookie garnish just before serving to ensure it stays crisp. Do not freeze them with the garnish cookie, as it will become mushy upon thawing.
Customization and Flavor Variations
While Speculoos is the star here, this base recipe is incredibly adaptable. If you cannot find Biscoff cookies, graham crackers or gingersnaps make excellent substitutes. Gingersnaps will provide that similar spicy kick, while graham crackers will yield a more traditional cheesecake flavor profile.
For a chocolate twist, you could use chocolate sandwich cookies (like Oreos) for the crust and mix melted chocolate into the cream cheese instead of cookie butter. Or, for a “turtle” variation, use pecans in the crust and drizzle caramel and chocolate sauce on top.
You can also play with the jar size. This recipe makes standard dessert portions, but you could make “mini” versions in shot glasses for a large party or wedding dessert table. Conversely, you could layer this into a single large trifle bowl for a family-style presentation, though the individual cups are generally easier to serve and eat.
Conclusion
Cookie Butter Cheesecake Cups are the epitome of high-reward, low-effort baking. They capture the cozy, warming spices of autumn and winter but are served in a cool, refreshing format perfect for any season. The visual appeal of the distinct layers through the clear glass, combined with the rich, glossy drizzle of melted cookie butter, makes them look like they came from a high-end bakery. Yet, the rugged, amateur-friendly nature of the assembly—crushing cookies and whipping cream—makes them accessible to any home cook. Whether you are a novice in the kitchen or a seasoned pro looking for a quick fix, these cups are guaranteed to impress. Gather your ingredients, clear off a spot on your counter, and get ready to enjoy one of the most delicious no-bake treats you will ever make.
Cookie Butter Cheesecake Cups
Ingredients
Equipment
Method
- Crush the cookies into fine crumbs using a food processor or a rolling pin.
- Mix cookie crumbs with melted butter until the texture resembles wet sand.
- Press about 2 tablespoons of the crumb mixture into the bottom of each dessert cup. Reserve remaining crumbs.
- In a large bowl, beat softened cream cheese until smooth. Add 1 cup cookie butter, powdered sugar, and vanilla; beat until combined.
- In a separate bowl, whip heavy cream until stiff peaks form.
- Gently fold the whipped cream into the cream cheese mixture until smooth and airy.
- Pipe the filling into cups, layering with reserved crumbs in the middle if desired.
- Top with a final swirl of filling, drizzle with melted cookie butter, and garnish with a cookie.
- Refrigerate for at least 2 hours before serving.