Elevate Your Spring Brunch: Easter Chicken Salad Crescent Roll Cones
Spring has officially arrived, bringing with it longer days, blooming flowers, and the anticipation of joyful gatherings. As Easter approaches, the hunt for the perfect recipe—one that balances seasonal freshness with convenience—begins. We all want to impress our guests with beautifully presented dishes, but nobody wants to spend the entire holiday stuck in the kitchen. Enter these delightful Easter Chicken Salad Crescent Roll Cones.
This recipe is a whimsical, sophisticated twist on a classic American appetizer. It takes the beloved familiarity of chicken salad and the comforting, buttery flaky texture of refrigerated crescent dough and transforms them into stunning, portable cones. The result is a hand-held treat that is as pleasing to the eye as it is to the palate. With vibrant bursts of color from fresh parsley, celery, and sweet red grapes, this dish encapsulates the freshness of spring in every bite.
What makes this recipe truly magical—and essential for busy hosts—is its impressive visual impact relative to the minimal effort required. While the final product looks like something from a gourmet deli or high-end catering event, it can be whipped up quickly, staying true to its promise of being ready in just 30 minutes of active time (plus a little baking and cooling time). It is the perfect blend of aesthetic charm and practicality.
Why You’ll Love This Quick Easter Appetizer
First and foremost, this recipe addresses the perennial holiday struggle: time management. When you have multiple dishes to prepare, from the main ham to varied side dishes and intricate desserts, having an impressive appetizer that requires minimal hands-on time is a godsend. These crescent cones look intricate, but the technique is surprisingly straightforward and incredibly fast.
Beyond convenience, the flavor profile is meticulously balanced. The creaminess of the mayonnaise-based dressing is punctuated by the sharp crunch of diced celery, providing a necessary textural contrast. The shredded chicken offers a savory, hearty base, while the red grapes add sporadic pockets of natural sweetness, cutting through the richness. The final touch of fresh parsley adds brightness and visual pop, creating a multi-dimensional eating experience that appeals to both adults and children.
Furthermore, these cones are incredibly versatile. They are perfect for an Easter brunch spread, a light lunch accompanying a spring shower, or as a charming appetizer for a garden party. Because they are individually portioned, they are easy for guests to enjoy while mingling, eliminating the need for plates and extra cutlery. This makes them ideal for modern, casual entertaining.
The Secrets to Perfect Crescent Roll Cones
Creating the cone shape is the key visual component of this dish, and it is far simpler than it looks. The secret weapon is cream horn molds (also known as lady lock forms). These inexpensive metal cones are designed specifically for baking pastry into this shape. However, if you don’t have them, don’t despair; you can easily fashion your own sturdy cones using heavy-duty aluminum foil.
The trick to ensuring the crescent rolls hold their shape is crucial. When wrapping the strips of refrigerated dough around the mold, you must start from the pointed tip and wrap upwards, slightly overlapping the previous layer. This slight overlap seals the cone, preventing leaks, and also creates those signature flaky ridges that make the cones so appealing. Be careful not to stretch the dough too thin as you wrap, which could lead to tears.
Another important tip is to bake them seam-side down on the baking sheet. This ensures the point of the cone stays sharp and the shape remains uniform. Once baked to a perfect golden brown, it’s essential to let the cones cool slightly—about 5 minutes—before gently twisting the metal mold to remove it. If you try to remove them while they are steaming hot, you risk tearing the delicate, warm pastry.
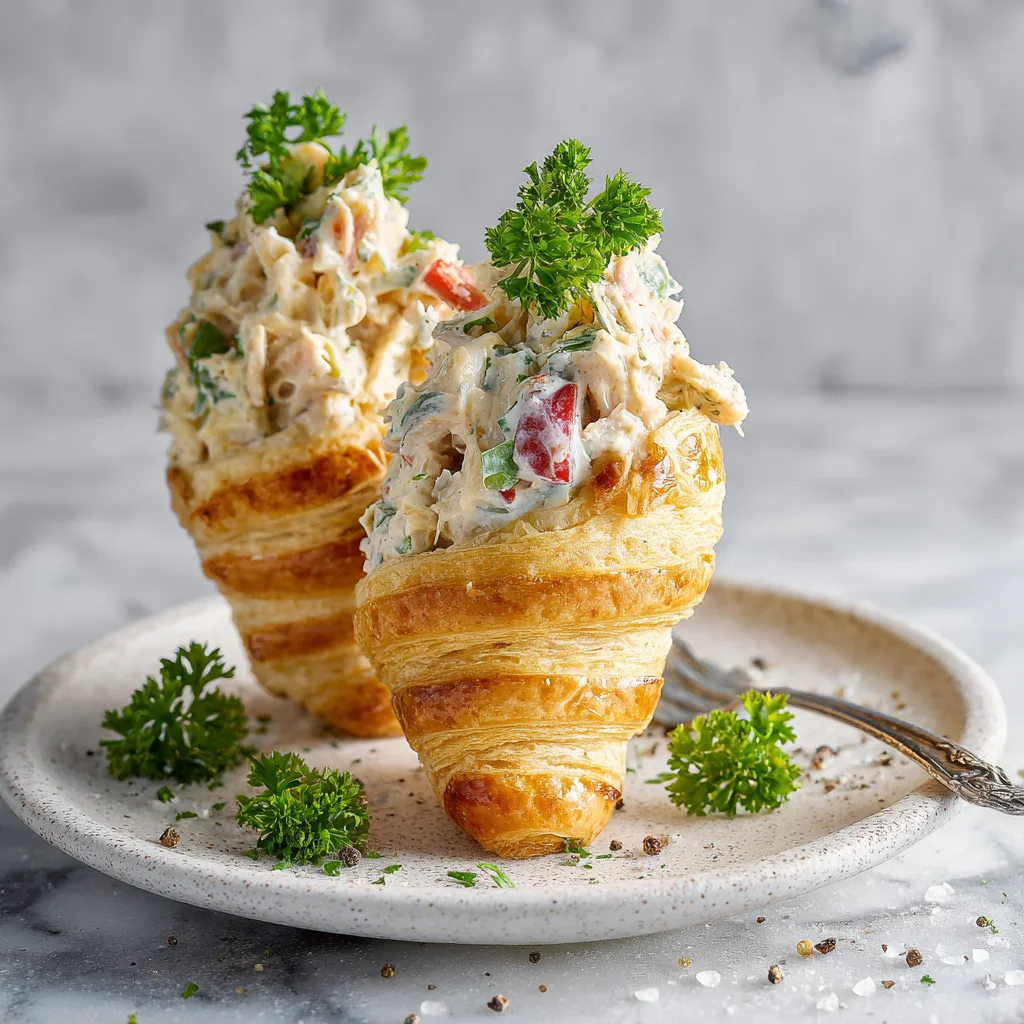
Ingredients for Easter Chicken Salad Crescent Rolls
We believe in using high-quality, simple ingredients to let natural flavors shine. Here is what you will need for this recipe:
- Refrigerated Crescent Roll Dough: One standard tube (8 oz) typically provides eight crescents, which forms eight cones. Look for the seamless sheet option if available for easier cutting, or just use regular crescent rolls and pinch the perforated seams.
- Cooked Chicken Breast: Shredded cooked chicken is best. This is an excellent way to use leftover roast chicken or a store-bought rotisserie chicken for ultimate convenience.
- Mayonnaise: This provides the creamy base for the salad. You can use full-fat for maximum richness or a light version if you prefer.
- Celery: Finely diced celery adds the essential crunchy texture and a subtle vegetal flavor that balances the salad.
- Red Grapes: Halved or quartered red grapes provide bursts of natural sweetness and beautiful color. Seedless varieties are best.
- Salt and Pepper: Crucial for seasoning and bringing out the flavors of the chicken and celery.
- Fresh Parsley: A generous garnish of fresh curly or flat-leaf parsley is not just for show; it adds a bright, fresh finish and completes the festive, spring look.
Step-by-Step Instructions
This recipe comes together very quickly. The key is multitasking: while your cones bake and cool, you mix the salad.
Step 1: Prep and Preheat
Preheat your oven to the temperature indicated on the crescent roll dough package, usually 375°F (190°C). Prepare a baking sheet by lining it with parchment paper for easy cleanup. If you are using DIY foil cones, mold them now.
Step 2: Create the Crescent Cones
Unroll the refrigerated crescent dough sheet and pinch any perforated seams to seal. Using a pizza cutter or sharp knife, cut the dough into eight long, even strips (if using a seamless sheet). If using perforated triangles, you may need to slice the 8 triangles into thin strips. Take one dough strip and wrap it around a cream horn mold or foil cone, starting from the pointed tip and overlapping slightly as you wind upwards to the wide end. Repeat with all eight strips. Place the wrapped cones seam-side down on the prepared baking sheet.
Step 3: Bake the Pastry
Bake the cones for 10–12 minutes, or until they are puffed and a beautiful deep golden brown. The baking time may vary slightly, so keep a close eye on them to prevent burning. Remove the baking sheet from the oven. Let the cones cool on the sheet for 5 minutes. While they are still warm but not hot, gently twist and remove the molds or foil. Place the hollow cones on a wire rack to cool completely. They must be completely cool before filling, or they will make the salad runny and the pastry soggy.
Step 4: Prepare the Chicken Salad
While the cones are baking and cooling, prepare the filling. In a medium bowl, combine the shredded cooked chicken, mayonnaise, finely diced celery, and halved red grapes. Season generously with salt and pepper to taste. Mix until all ingredients are well combined and coated in the dressing. For best results, chill the chicken salad in the refrigerator for 15–30 minutes to allow the flavors to meld.
Step 5: Assemble and Serve
Just before serving, use a small spoon to carefully fill each completely cooled crescent cone with the chicken salad mixture. Top each cone with a generous sprig of fresh parsley to create a beautiful, decorative finish that looks like greenery emerging from the cone. Arrange the finished cones on a platter and serve immediately.
Easter Chicken Salad Crescent Roll Cones
Ingredients
Equipment
Method
- Preheat your oven according to the instructions on the crescent roll package (typically 375°F / 190°C). Line a baking sheet with parchment paper.
- Unroll the refrigerated crescent dough. Pinch the seams to seal. Cut the dough into 8 long strips.
- Wrap each strip around a cream horn mold or a handmade foil cone, starting from the pointed tip and overlapping slightly as you work up to the wide end. Place seam-side down on the prepared baking sheet.
- Bake for 10–12 minutes until the cones are puffed and golden brown.
- Let the cones cool for 5 minutes, then gently twist and remove the molds. Move the hollow cones to a wire rack to cool completely.
- While the cones are cooling, make the filling: In a medium mixing bowl, combine the shredded cooked chicken, mayonnaise, finely diced celery, and halved red grapes. Mix well. Season with salt and pepper to taste.
- Once the cones are completely cool, spoon the chicken salad mixture into each cone. Top each one with a generous garnish of fresh parsley sprigs and serve immediately.
Notes
Pro Tips for Success
For the chicken salad, consistency is key. You want the salad to be creamy enough to bind together but not so runny that it seeps out of the cone. Start with the recommended amount of mayonnaise and add more one tablespoon at a time if the mixture feels too dry.
When preparing the chicken, ensure it is completely cool before mixing it with the mayonnaise. Warm chicken will cause the mayo to liquefy, leading to a greasy and soggy salad. If using a rotisserie chicken, shred it and then refrigerate it for at least an hour before proceeding.
If you don’t have cream horn molds, fashioning them from foil is easy. Take a square of heavy-duty aluminum foil and fold it into a triangle. Then, starting from one corner, roll it into a cone shape. Secure the edge. You may need multiple layers of foil to make it sturdy enough to hold the dough without collapsing.
Delicious Variations and Substitutions
This recipe is highly customizable. If you want a healthier twist, replace all or half of the mayonnaise with plain Greek yogurt. This adds a delightful tang and cuts down on fat and calories while increasing the protein content.
For a different fruit element, swap the red grapes for dried cranberries (Craisins). The tartness of the cranberries pairs exceptionally well with the savory chicken. To add an extra layer of crunch and rich flavor, toast half a cup of pecans or almonds, chop them finely, and mix them into the salad just before assembly.
If you prefer a different type of crescent base, this recipe also works beautifully with canned biscuit dough that you flatten slightly, cut into strips, and wrap around the molds. These will result in a slightly denser, less flaky cone, which some people prefer.
Make-Ahead Instructions and Storage
Because these cones rely on flaky pastry, they are best served immediately after filling. Once filled, the moisture from the chicken salad will slowly seep into the pastry, eventually making it soggy. We recommend assembly no more than an hour before your event.
However, you can prepare the components ahead of time to save precious minutes on the big day. The crescent cones can be baked and stored in an airtight container at room temperature for up to 24 hours. The chicken salad (without any added nuts, which would go soft) can be mixed and stored in an airtight container in the refrigerator for up to two days. When you are ready to serve, simply pull out the prepped components, quickly fill the cones, and garnish.
Serving Suggestions for a Festive Spread
These Easter Chicken Salad Crescent Roll Cones look stunning on a tiered serving stand or arranged in a circle on a large round platter. For a full Easter spread, serve them alongside:
- A glazed honey ham.
- Deviled eggs (classic or avocado version).
- A colorful spring salad with lemon-tahini dressing.
- Homemade hot cross buns.
- A basket of seasonal fresh fruit.
Whether you’re hosting a formal brunch or a casual backyard egg hunt, these cones are guaranteed to be the star appetizer, offering gourmet appeal with minimal holiday stress. Enjoy the freshness of spring and the joy of effortless entertaining!