Homemade Klondike Ice Cream Bar Crunch Cake
There is a certain nostalgia associated with the sound of a thin chocolate shell cracking. For decades, the Klondike bar has reigned supreme in the world of frozen treats, offering a simple yet perfect combination of cold vanilla ice cream and a snappy chocolate coating. But what if you could take that experience and amplify it? What if you could add a crunch that goes beyond the shell, incorporating layers of crispy wafers and a rich, velvety texture that a standard store-bought bar simply can’t match? Enter the Klondike Ice Cream Bar Crunch Cake.
This recipe isn’t just a dessert; it’s an event. It’s the kind of treat that stops conversations when it’s brought to the table. By combining the ease of a no-bake dessert with the indulgence of a high-end patisserie creation, we have developed a recipe that is accessible for the home cook but tastes like a professional masterpiece. In this guide, we will walk through every step of creating this giant frozen wonder, from the multi-layered wafer base to the signature “magic shell” chocolate topping.
Why This Recipe Works
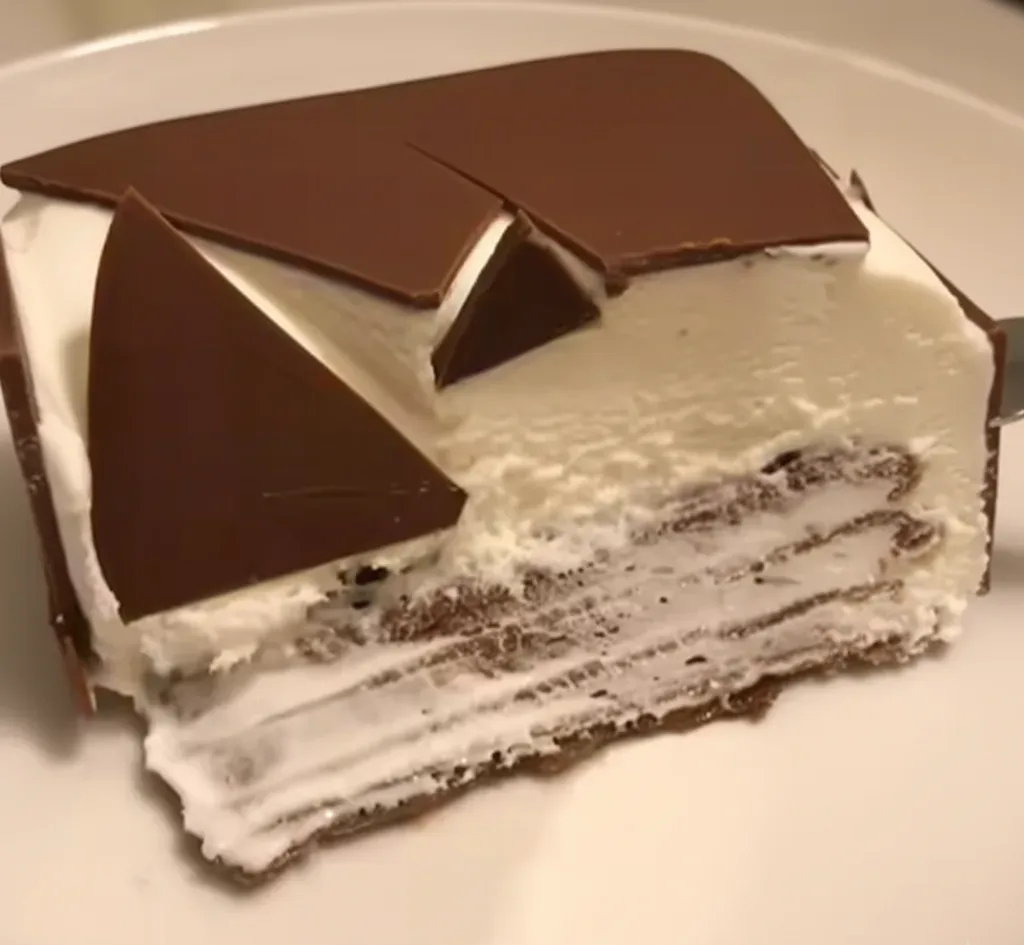
The magic of the Klondike Ice Cream Bar Crunch lies in the contrast of textures. Most frozen desserts suffer from being one-dimensional—either they are too soft or too hard. This cake solves that problem by using a structured wafer base. These layers provide a rhythmic “crunch” that sustains itself even after being frozen. Additionally, by using a high-fat cream base for the vanilla layer, we ensure that the cake remains scoopable and creamy rather than turning into a block of ice. Finally, the inclusion of coconut oil in the chocolate topping creates that iconic “crack” that defines the Klondike experience.
Ingredients You Will Need
To create this masterpiece, you’ll need simple ingredients, but quality matters. Since there is no baking involved, the flavor of the cream and the chocolate will be front and center.
The Wafer Base
- – 2 packages (9 oz each) chocolate-filled wafer cookies
- – 1/4 cup unsalted butter, melted
- – 1 tablespoon cocoa powder (for extra depth)
The Vanilla Ice Cream Filling
- – 2 cups heavy whipping cream, cold
- – 1 can (14 oz) sweetened condensed milk
- – 1 tablespoon pure vanilla bean paste or extract
- – 1/4 teaspoon fine sea salt (to balance the sweetness)
The Signature Chocolate Crunch Shell
- – 12 oz semi-sweet chocolate chips or chopped chocolate bars
- – 1/3 cup refined coconut oil (this is the secret to the snap)
- – 1/2 cup crushed puffed rice cereal or crushed pretzels (optional, for the “crunch” version)
Step-by-Step Instructions
Step 1: Preparing the Pan
Begin by lining an 8×8 inch square baking pan with parchment paper. Ensure there is enough overhang on the sides so you can easily lift the cake out once it is fully frozen. This is a crucial step; without the parchment “sling,” removing the cake without breaking the chocolate shell is nearly impossible.
Step 2: Constructing the Wafer Foundation
In a food processor, pulse half of the wafer cookies until they are fine crumbs. Mix these with the melted butter and cocoa powder. Press this mixture firmly into the bottom of the pan to create a solid base. Then, take the remaining whole wafer cookies and lay them flat over the crumbs. This creates a “dual-layer” crunch that is structurally sound and delicious.
Step 3: Whipping the Vanilla Mousse
In a large chilled mixing bowl, beat the heavy whipping cream until stiff peaks form. In a separate bowl, whisk together the sweetened condensed milk, vanilla, and salt. Gently fold the whipped cream into the condensed milk mixture in three batches. Be careful not to deflate the air; this air is what keeps the cake light and creamy when frozen.
Step 4: The First Freeze
Pour the vanilla mixture over your wafer base. Smooth the top with a spatula to ensure it is perfectly level. Place the pan in the coldest part of your freezer for at least 4 hours. The surface must be firm before we apply the chocolate coating.
Step 5: Creating the Magic Shell
Combine the chocolate chips and coconut oil in a microwave-safe bowl. Heat in 30-second intervals, stirring in between, until the mixture is completely smooth and glossy. If you want the “crunch” topping, stir in your crushed cereal or pretzels now. Let the chocolate cool for about 5-10 minutes. It should still be liquid but not hot, or it will melt your ice cream layer.
Step 6: The Final Assembly
Remove the cake from the freezer. Pour the chocolate mixture over the frozen vanilla layer, tilting the pan to ensure it covers every corner. The chocolate will begin to set almost immediately. Quickly place it back in the freezer for another 2 hours to fully harden.
Klondike Ice Cream Bar Crunch Cake
Ingredients
Equipment
Method
- Line an 8×8 inch pan with parchment paper, leaving an overhang on two sides.
- Crush half of the wafers and mix with melted butter and cocoa. Press into the pan. Top with remaining whole wafers.
- In a large bowl, whip heavy cream until stiff peaks form.
- Gently fold in condensed milk, vanilla, and salt until smooth.
- Pour the mixture over the wafers and freeze for 4 hours until firm.
- Melt chocolate chips and coconut oil together in the microwave in 30-second bursts; stir in cereal if using.
- Pour the cooled (but liquid) chocolate over the frozen cake and tilt to cover.
- Freeze for an additional 2 hours. Slice with a hot knife and serve.
Notes
Expert Tips for Success
The Temperature Factor: Always use cold heavy cream. If the cream is room temperature, it won’t hold the air necessary to create a “no-churn” ice cream, resulting in an icy, hard texture. Similarly, ensure your sweetened condensed milk is at room temperature so it incorporates smoothly without causing the cream to clump.
The Clean Cut: To get those perfect, photo-ready slices like the ones seen on Reddit, use a sharp chef’s knife dipped in hot water. Wipe the knife dry between every single cut. The heat will glide through the hard chocolate shell without shattering it into a million pieces.
Refined vs. Unrefined Coconut Oil: If you want a pure chocolate flavor, use refined coconut oil. It has a neutral taste. If you enjoy a subtle tropical hint (which actually pairs lovely with vanilla), you can use unrefined virgin coconut oil.
Variations of the Klondike Crunch
While the classic vanilla and chocolate combination is legendary, this recipe serves as a perfect canvas for creativity. Here are a few ways to level up your Klondike Ice Cream Bar Crunch Cake:
1. Peanut Butter Blast: Swirl a half-cup of warmed creamy peanut butter into the vanilla mixture before freezing. You can also swap the wafer cookies for Nutter Butters for an explosion of peanut flavor.
2. Salted Caramel Drizzle: Before pouring the final chocolate shell, drizzle a thick layer of salted caramel over the frozen vanilla layer. This creates a “hidden” gooey center that is absolutely decadent.
3. Mint Chip Refresh: Add a teaspoon of peppermint extract and a drop of green food coloring to the cream mixture. Fold in mini chocolate chips for a refreshing “Mint Klondike” vibe.
The Cultural Icon of the Klondike Bar
The phrase “What would you do for a Klondike Bar?” became one of the most successful advertising slogans in history for a reason. It tapped into the universal desire for a treat that feels like a reward. The original bar was invented in the early 1920s by the Isaly Dairy Company in Ohio. For years, it was a regional secret, known for its lack of a stick—making it feel more like a “handheld cake” than a popsicle.
By making this cake at home, you are honoring that tradition of handheld indulgence but bringing it into a modern, shareable format. It’s a celebration of American dessert culture, combining the convenience of the frozen aisle with the love of a homemade kitchen.
Serving Suggestions
This cake is incredibly rich, so a little goes a long way. We recommend serving it on chilled plates to prevent the bottom from melting too quickly. If you want to go the extra mile, serve each slice with a side of fresh raspberries or strawberries. The acidity of the fruit cuts through the heavy fat of the cream and the sweetness of the chocolate, creating a balanced palate.
For an adult twist, a drizzle of espresso over the slice (Affogato style) makes for a sophisticated end-of-summer dinner party dessert. The hot coffee melting into the cold vanilla while the chocolate shell remains crisp is a sensory experience like no other.
Storing Your Masterpiece
If you have leftovers (though that is rare!), store them in an airtight container in the freezer. To prevent freezer burn, press a piece of plastic wrap directly against the exposed “cut” side of the cake. This prevents ice crystals from forming on the creamy interior. This cake will stay fresh and delicious for up to two weeks, making it a great “make-ahead” dessert for busy hosts.
Final Thoughts
The Klondike Ice Cream Bar Crunch Cake is a testament to the fact that you don’t need an oven to create a world-class dessert. It’s about assembly, temperature control, and high-quality ingredients. Whether you’re making this for a kid’s birthday party or just because it’s a Tuesday and you need a win, this cake delivers on every promise: it’s crunchy, creamy, chocolatey, and utterly unforgettable.