Luxuriou Raspberry Cheesecake Cups
Luxurious No-Bake Raspberry Cheesecake Mousse Cups
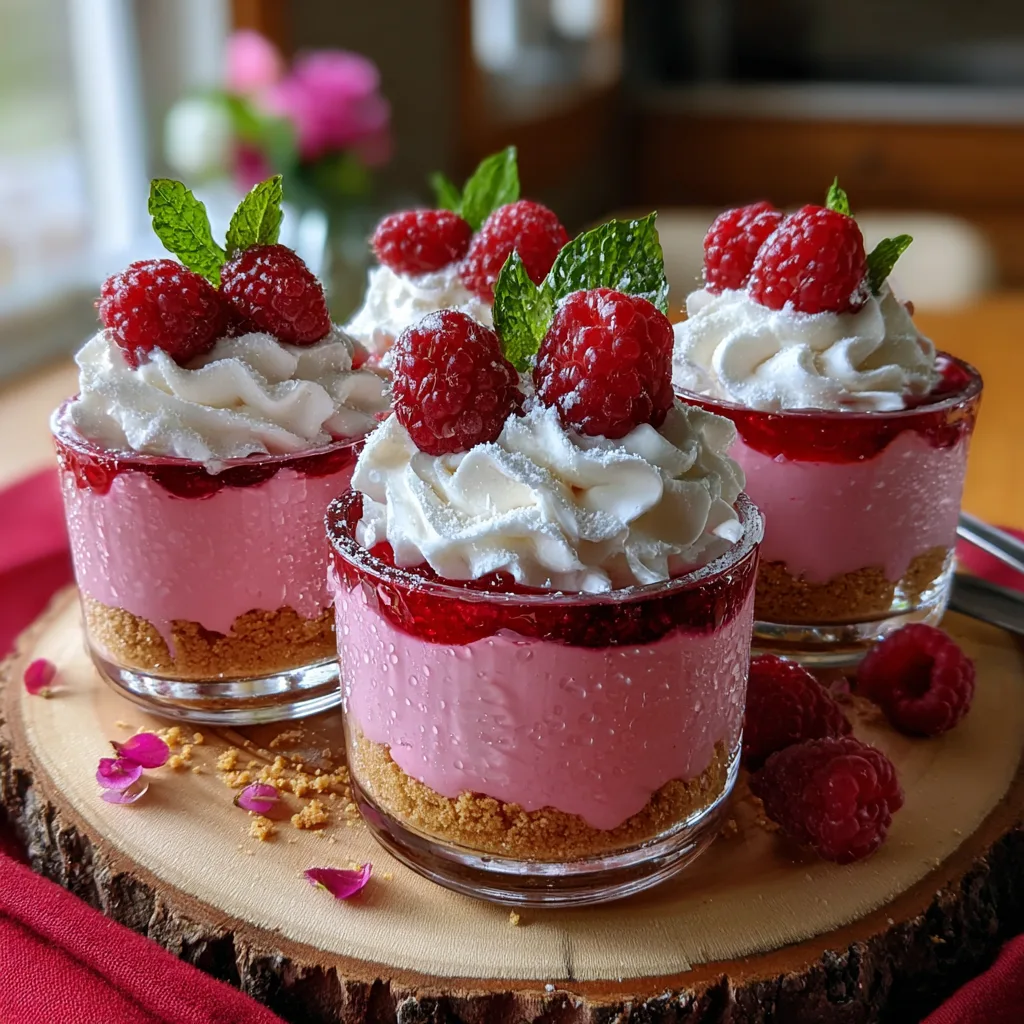
There is something inherently sophisticated about a dessert served in its own individual glass. It whispers of elegance, portion control (though we won’t tell if you have two!), and a touch of restaurant-style flair right in your own kitchen. These No-Bake Raspberry Cheesecake Mousse Cups are the ultimate intersection of “impressively beautiful” and “shockingly easy.” Imagine the tang of cheesecake, the lightness of a mousse, and the bright, acidic punch of fresh raspberries, all sitting atop a buttery, golden graham cracker crust. It is a dessert that looks like it took hours of tempering and setting, but in reality, it comes together with a hand mixer and a little bit of patience.
Whether you are planning a romantic Valentine’s Day dinner, a breezy summer garden party, or simply need a sweet treat to end a heavy meal, this recipe is your new best friend. The texture is cloud-like yet rich, creating a melt-in-your-mouth experience that is far superior to store-bought puddings. Plus, the vibrant pink hue is entirely natural—no food coloring required. Let’s dive into the secrets of making the perfect fruit mousse.
Why You Will Love This Recipe
This recipe has quickly become a staple in my household for several compelling reasons. First and foremost, it requires zero baking. When the weather is hot, or your oven is occupied with the main course, a no-bake dessert is a lifesaver. You simply whip, assemble, and chill.
Secondly, the balance of flavors is perfection. Traditional cheesecake can be dense and heavy, often leaving you feeling sluggish after a meal. This mousse version incorporates whipped cream to aerate the mixture, resulting in a texture that is light as a feather but still packs that signature cheesecake tang. The raspberries cut through the richness of the cream cheese, providing a refreshing finish that cleanses the palate.
Lastly, it is incredibly versatile. While we are using raspberries today, this base recipe works beautifully with strawberries, blackberries, or even mangoes. You can customize the jars to fit any color theme or season.
The Science of a Perfect Mousse
Before we start mixing, it helps to understand what makes this mousse stable without gelatin. Many mousse recipes rely on gelatin sheets or powder to hold their shape. However, gelatin can sometimes create a rubbery texture if not handled correctly. In this recipe, we rely on the fat structure of the cream cheese and heavy whipping cream.
When you beat cold heavy cream, you are trapping air bubbles inside a network of fat globules. By folding this whipped cream into a softened cream cheese mixture, you transfer that airy structure to the heavier base. The acid in the raspberries and the cream cheese also helps to firm up the proteins slightly. The result is a soft-set mousse that is spoonable and creamy, rather than stiff and gelatinous. The key is temperature: your heavy cream must be ice-cold to whip properly, while your cream cheese must be at room temperature to blend smoothly without lumps.
Ingredients
To recreate these stunning cups, you will need the following simple ingredients:
No-Bake Raspberry Cheesecake Mousse Cups
Ingredients
Equipment
Method
- Combine raspberries, 2 tbsp sugar, and lemon juice in a saucepan over medium heat. Simmer 5-7 mins until broken down. Strain through a sieve to remove seeds. Cool completely.
- Mix graham cracker crumbs, melted butter, and 1 tbsp sugar in a small bowl. Press firmly into the bottom of 4 serving glasses.
- In a chilled bowl, whip heavy cream until stiff peaks form. Set aside in fridge.
- In a large bowl, beat softened cream cheese until smooth. Add powdered sugar and vanilla; beat until fluffy.
- Mix cooled raspberry puree into the cream cheese mixture until uniform pink.
- Gently fold the whipped cream into the raspberry mixture until combined and no white streaks remain.
- Pipe or spoon the mousse into the glasses over the crust. Refrigerate for at least 2 hours to set.
- Garnish with fresh whipped cream, whole raspberries, and mint before serving.
Notes
For the Crust Layer
- Graham Cracker Crumbs – 1 cup. You can buy them pre-crushed or pulse full sheets in a food processor. Digestive biscuits or Biscoff cookies also work wonders here.
- Unsalted Butter – 3 tablespoons, melted. This acts as the glue that holds the salty-sweet crust together.
- Sugar – 1 tablespoon. Just a touch to enhance the crunch.
For the Raspberry Puree
- Fresh Raspberries – 12 oz (approx. 2 cups), plus extra for garnish. Fresh is best for flavor, but frozen works if thawed and drained.
- Granulated Sugar – 2 tablespoons. To macerate the berries and draw out their juices.
- Lemon Juice – 1 teaspoon. Brightens the berry flavor and preserves the pink color.
For the Cheesecake Mousse
- Cream Cheese – 8 oz (1 block), softened to room temperature. Full fat brick-style is non-negotiable for structure. Do not use tub spread.
- Powdered Sugar – 1 cup. Dissolves instantly without the grit of granulated sugar.
- Vanilla Extract – 1 teaspoon. High-quality extract makes a difference.
- Heavy Whipping Cream – 1 cup, very cold. Look for 36-40% fat content.
For Garnish
- Whipped Cream – Optional, for topping.
- Fresh Mint Leaves – Adds a pop of color contrast.
Step-by-Step Instructions
Follow these steps to ensure your mousse is smooth, airy, and beautifully layered.
1. Prepare the Raspberry Reduction
Place your raspberries, 2 tablespoons of sugar, and lemon juice in a small saucepan over medium heat. Cook for about 5-7 minutes, stirring occasionally, until the berries break down and release their juices. Mash them slightly with a fork. Remove from heat and, for a smooth mousse, press the mixture through a fine-mesh sieve to remove the seeds. You should end up with about 1/2 to 2/3 cup of thick raspberry puree. Set this aside to cool completely. Note: It must be cool before adding to the cream cheese, or it will melt the fat!
2. Make the Crust
In a small bowl, combine the graham cracker crumbs, melted butter, and 1 tablespoon of sugar. Stir until the mixture looks like wet sand. Divide this mixture evenly among 4-6 serving glasses (depending on the size of your glasses). Press it down gently with the back of a spoon to create a flat base.
3. Whip the Cream
In a chilled mixing bowl, beat the cold heavy cream until stiff peaks form. Stiff peaks mean that when you lift the beaters, the cream stands straight up without drooping. Be careful not to overbeat, or you will end up with butter! Set the whipped cream aside in the fridge.
4. Mix the Cheesecake Base
In a large mixing bowl, beat the softened cream cheese until it is completely smooth and creamy (about 2-3 minutes). There should be no lumps. Add the powdered sugar and vanilla extract and beat for another minute until combined and fluffy.
5. Combine and Fold
Pour the cooled raspberry puree into the cream cheese mixture and mix on low speed just until combined and the color is a uniform pink. Remove the mixer. Using a rubber spatula, gently fold in the whipped cream in two batches. Use a “cut and fold” motion—cut down the middle, scrape the bottom, and fold over the top. Do this gently to keep the air bubbles intact. Stop as soon as no white streaks remain.
6. Assemble and Chill
Pipe or spoon the mousse into the glasses over the crust layer. Using a piping bag with a large round tip creates the neatest look, but a spoon works fine for a rustic vibe. Refrigerate the cups for at least 2 hours (or up to 24 hours) to allow the mousse to set and firm up.
7. Garnish and Serve
Just before serving, top each cup with a dollop of whipped cream, a few fresh raspberries, and a mint leaf. Serve cold.
Tips for Success
- Room Temperature Cheese: This is the most critical rule. If your cream cheese is cold, it will not blend with the sugar and puree, leaving you with tiny white lumps in your pink mousse. If you’re in a rush, cut the cream cheese into cubes and microwave for 10-15 seconds.
- Chill the Bowl: Before whipping your heavy cream, place your metal bowl and beaters in the freezer for 10 minutes. This helps the cream whip up faster and hold its volume better.
- Piping vs. Spooning: For that professional bakery look seen in the photos, transfer your mousse to a large Ziploc bag, snip off the corner, and pipe it into the glasses. This prevents the mousse from smearing on the sides of the glass.
- Seedless is Smoother: While straining the raspberry puree takes extra effort, the texture of a seedless mousse is significantly more luxurious. If you like crunch, feel free to leave them in.
Variations to Try
Once you master this base, the sky is the limit!
- Lemon Raspberry: Add 1 tablespoon of lemon zest to the cream cheese mixture for a zesty kick.
- Chocolate Bottom: Swap the graham crackers for Oreo crumbs (with filling removed) for a chocolate-raspberry truffle vibe.
- Adults Only: Stir in a tablespoon of Chambord (raspberry liqueur) or Amaretto into the raspberry puree after it comes off the heat.
- Keto/Low Carb: Use almond flour and melted butter for the crust, and swap the sugar for a powdered erythritol sweetener (like Swerve). The heavy cream and cream cheese are naturally low carb.
Serving Suggestions
These mousse cups are perfect for entertaining because they must be made ahead, freeing up your time on the day of the party. Serve them on a wooden board with extra fresh fruit scattered around for a rustic presentation.
They pair wonderfully with a glass of crisp Prosecco or a Rosé wine, which complements the tartness of the berries. For a non-alcoholic pairing, an Earl Grey tea is lovely, as the bergamot citrus notes echo the fruitiness of the mousse.
Frequently Asked Questions
Can I freeze these cups?
Yes! You can freeze them for up to a month. Cover them tightly with plastic wrap. Thaw them in the refrigerator for 2-3 hours before serving. The texture might be slightly more ice-cream-like, which is delicious in its own right.
Can I use frozen berries?
Absolutely. Frozen raspberries are actually better for the puree step because they break down faster. Just make sure to measure them frozen, then cook them down.
How long do they last in the fridge?
They are best eaten within 3 days. After that, the crust may start to absorb moisture from the mousse and become soft, and the mousse may slightly deflate.
Enjoy making this beautiful, fuss-free dessert that celebrates the vibrant flavor of raspberries!