Marry Me No Bake Raspberry Chocolate Mousse Cups
There are desserts that satisfy a sweet tooth, and then there are desserts that change your life. The internet has long been fascinated with the “Marry Me” phenomenon—recipes so incredibly delicious, so perfectly balanced, and so comforting that serving them to a significant other is practically guaranteed to elicit a marriage proposal. While this trend famously began with savory chicken and pasta dishes, it is time for dessert to claim its rightful place on the romantic pedestal. Enter the Marry Me No Bake Raspberry Chocolate Mousse Cups. These layered, decadent, and visually stunning treats are an absolute triumph of flavor and texture, proving that true culinary magic does not always require an oven.
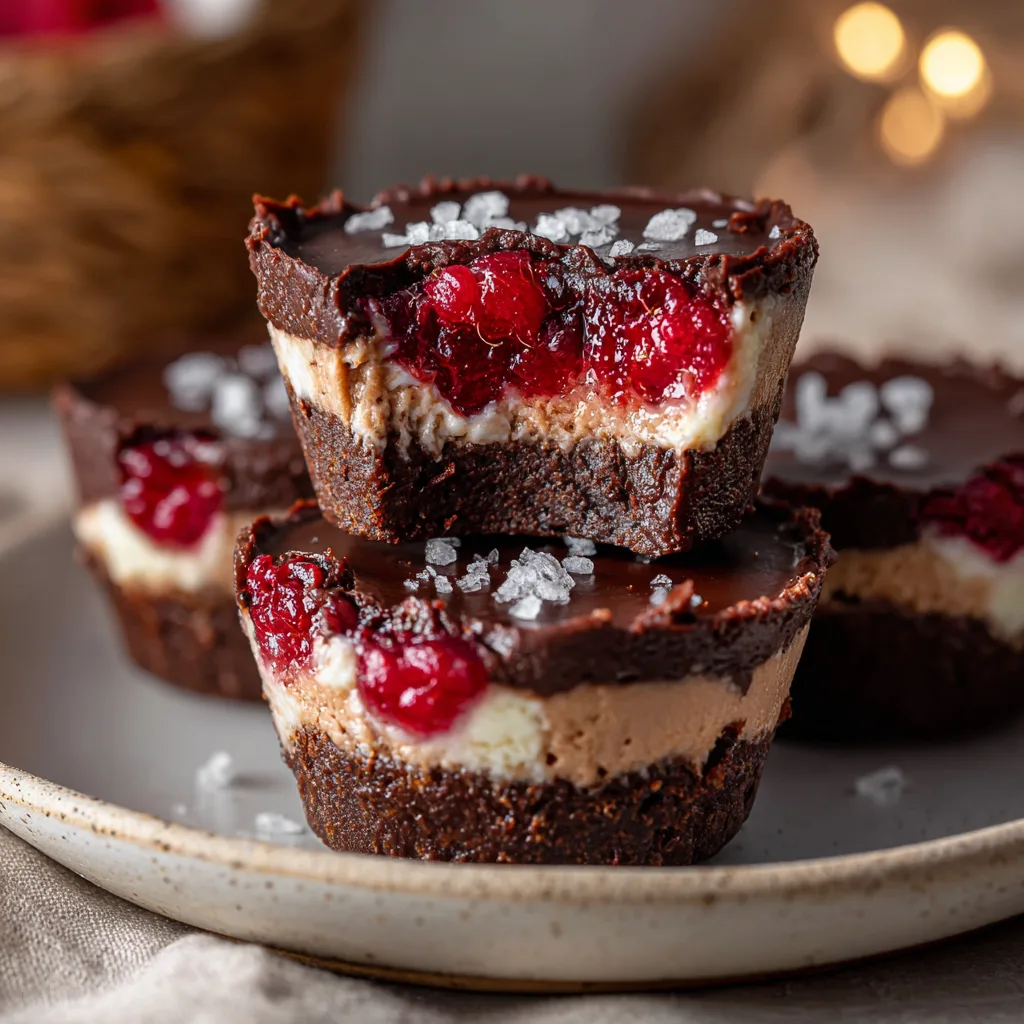
Imagine biting through a crisp, dark chocolate shell sprinkled with delicate flakes of sea salt, only to meet a bright, tart, and juicy layer of smashed raspberries. Below that lies a cloud-like, silky chocolate mousse, all resting on a dense, chewy, brownie-inspired crust. It is a symphony of contrasting textures and complementary flavors. The deep, bittersweet earthiness of the dark chocolate is perfectly cut by the sharp, acidic sweetness of the raspberries, while the flaky sea salt elevates every single note, ensuring the dessert never becomes cloyingly sweet. Best of all, this recipe leans into wholesome, plant-based ingredients, creating a treat that feels endlessly indulgent but leaves you feeling surprisingly energized.
Whether you are planning a romantic Valentine’s Day dinner, an anniversary surprise, a Galentine’s gathering, or simply a Tuesday night treat-yourself moment, these no-bake cups are the ultimate solution. They require minimal hands-on time, zero baking, and can be made completely ahead of time, allowing you to focus on the moment rather than stressing in the kitchen.
The Magic of the “No-Bake” Dessert Revolution
There is a unique joy in creating a show-stopping dessert without ever turning the dial on your oven. No-bake desserts have surged in popularity, and for good reason. They are inherently approachable, removing the anxiety that often accompanies traditional baking—there is no worrying about cakes falling, cookies spreading too thin, or crusts burning. Instead, no-bake recipes rely on the simple alchemy of chilling and setting.
For these Raspberry Chocolate Mousse Cups, the no-bake method actually preserves the integrity and brightness of the flavors. When raspberries are baked, they often lose their vibrant, fresh zing and turn into a muted, sugary jam. By keeping the raspberry layer raw and simply mashing the fresh fruit, we retain that crucial, punchy tartness that makes this dessert so dynamic. Similarly, the raw cocoa used in the crust maintains its complex, slightly bitter edge, which is essential for balancing the richer elements of the cup. The refrigerator and the freezer become your best tools, slowly transforming soft mixtures into sliceable, bite-able, perfect layers.
Deconstructing the Layers of Perfection
To truly understand why these cups are worthy of a proposal, we must look at the anatomy of the dessert. Every layer serves a distinct purpose, building upon the last to create a harmonious bite.
Layer 1: The Brownie-Bite Crust
A good house needs a solid foundation, and the same goes for a layered dessert. The crust for these cups mimics the dense, fudgy edges of a perfectly baked brownie. By combining finely ground almond flour, rich cocoa powder, pure maple syrup, and a touch of melted coconut oil, we create a mixture that easily presses into a muffin liner. When chilled, the coconut oil firms up, binding the ingredients into a sturdy, chewy base that holds its shape beautifully when you take a bite, yet yields effortlessly without being too hard.
Layer 2: The Silky Chocolate Mousse
This is the heart of the cup. Traditional mousse relies on raw eggs and heavy cream, which can be fussy and heavy. Our modernized, no-bake approach utilizes the magic of full-fat coconut milk (specifically, the solid cream that floats to the top of the can when chilled) blended with melted dark chocolate. When whipped together, these two ingredients emulsify into a ridiculously smooth, airy, yet rich filling. A splash of vanilla extract and a hint of maple syrup round out the flavor, creating a dairy-free mousse that rivals any French patisserie.
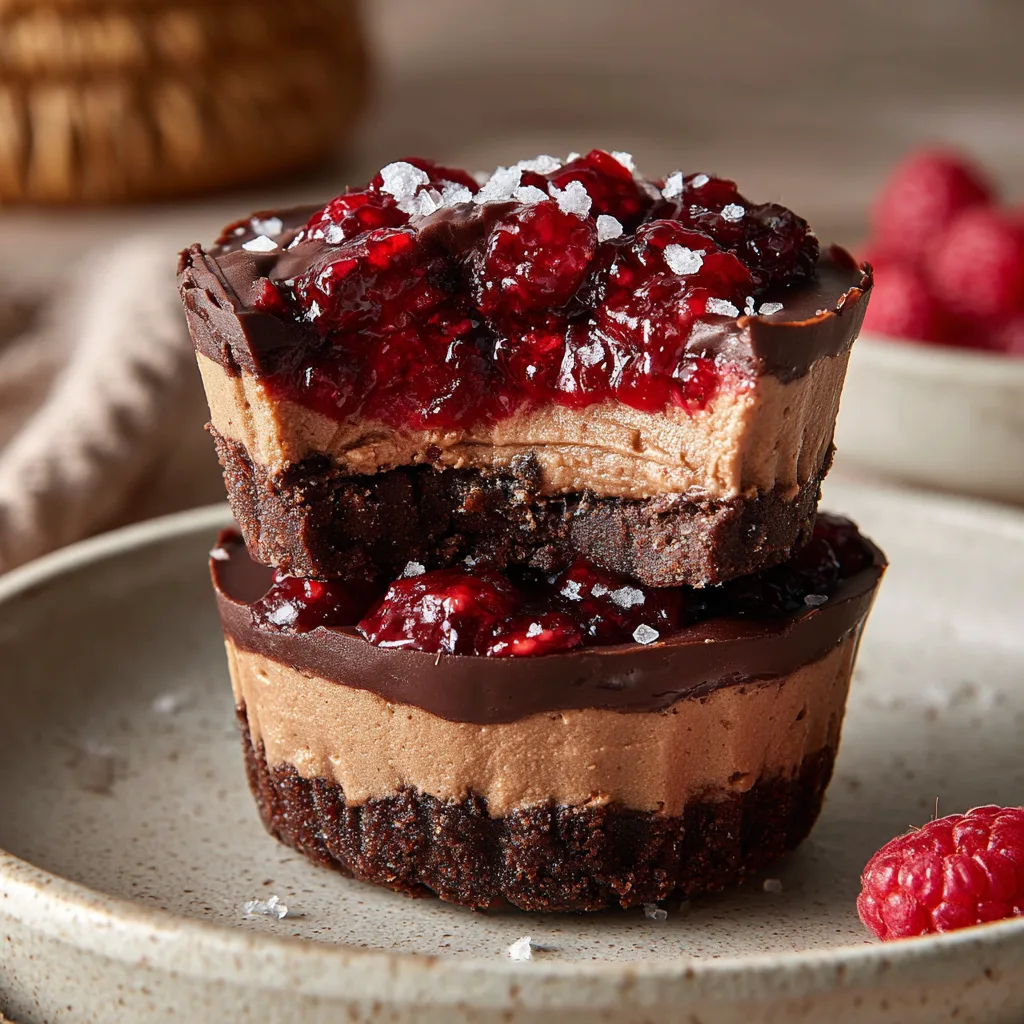
Layer 3: The Tart Raspberry Smash
If the mousse is the heart, the raspberry layer is the soul. Chocolate can be heavy, coating the palate in richness. To prevent the dessert from becoming overwhelming, we need an acidic counterpart. Fresh raspberries, mashed with a fork and slightly thickened with chia seeds, provide a vibrant burst of fruitiness. The chia seeds are a brilliant secret weapon here; they absorb the excess juices from the mashed berries, creating a jam-like consistency without the need for stovetop cooking or refined sugars.
Layer 4: The Crackle Shell and Sea Salt
The crowning glory. A thin layer of high-quality dark chocolate, melted with a tiny bit of coconut oil (to prevent it from cracking too aggressively and ruining the softer layers below when bitten), is smoothed over the top. While the chocolate is still wet, a generous sprinkle of coarse, flaky sea salt is applied. The salt hits your tongue first, waking up your taste buds and amplifying the cocoa and fruit flavors that follow.
Essential Ingredients for the Best Results
- Almond Flour: Use blanched, finely ground almond flour for the best crust texture. Almond meal will work but will result in a grittier base.
- Cocoa Powder: Unsweetened Dutch-processed cocoa powder offers the deepest, smoothest chocolate flavor without the sharp acidity of natural cocoa.
- Maple Syrup: Pure maple syrup is our sweetener of choice. It provides a warm, caramel-like undertone that pairs beautifully with the chocolate.
- Coconut Oil: This is crucial for both the crust and the chocolate shell. It solidifies when cold, giving the crust its structure and giving the chocolate topping its perfect “snap.”
- Full-Fat Coconut Milk: You must use full-fat canned coconut milk, and it must be chilled in the fridge overnight. You will only use the solid, thick cream that separates and floats to the top. Do not use the watery liquid underneath (save it for smoothies!).
- Dark Chocolate Chips: Opt for a high-quality, dairy-free dark chocolate chip (at least 60% cacao) to keep the flavors rich and deep.
- Fresh Raspberries: Fresh berries yield the best texture and brightest flavor. If using frozen, you must thaw and thoroughly drain them, or your jam layer will be too watery.
- Chia Seeds: These tiny powerhouses naturally thicken the raspberry smash into a cohesive, spreadable layer.
- Flaky Sea Salt: Maldon or another high-quality finishing salt. Standard table salt will not work and will ruin the topping.
Step-by-Step Instructions
- Prepare your Pan: Line a standard 12-cup muffin tin with paper or silicone muffin liners. Silicone liners are highly recommended for the easiest, cleanest removal of your delicate no-bake cups.
- Mix the Crust: In a medium mixing bowl, whisk together the almond flour and cocoa powder until no lumps remain. Pour in the melted coconut oil, maple syrup, and a pinch of salt. Stir vigorously until a thick, sticky dough forms.
- Form the Base: Divide the crust mixture evenly among the 12 muffin liners (about 1 rounded tablespoon per cup). Use your fingers or the back of a spoon to press the mixture firmly and evenly into the bottom of each liner. Place the pan in the freezer for 10 minutes to set while you prepare the mousse.
- Whip the Mousse: Open your chilled can of coconut milk and scoop only the solid white cream into a microwave-safe bowl (or a double boiler). Add the dark chocolate chips. Heat in 30-second intervals, stirring in between, until completely melted and smooth. Whisk in the maple syrup and vanilla extract. The mixture should be thick, glossy, and homogeneous.
- Layer the Mousse: Remove the muffin tin from the freezer. Spoon the chocolate mousse evenly over the chilled crusts, tapping the pan lightly on the counter to smooth the tops. Return the pan to the freezer for at least 30 minutes, or until the mousse is firm to the touch.
- Create the Raspberry Smash: While the mousse sets, place the fresh raspberries in a bowl. Using a fork, mash them vigorously until they break down into a chunky puree. Stir in the chia seeds and a teaspoon of maple syrup (if desired, for a slightly sweeter jam). Let this mixture sit for 10 minutes so the chia seeds can absorb the liquid and thicken the puree.
- Add the Fruit Layer: Once the mousse is firm, spoon the thickened raspberry smash evenly over the chocolate mousse layer, gently spreading it to the edges.
- Prepare the Chocolate Shell: In a small bowl, melt the remaining dark chocolate chips with 1 teaspoon of coconut oil until smooth and pourable.
- The Final Drizzle: Spoon a small amount of the melted chocolate over the raspberry layer of each cup, gently spreading it to cover the fruit completely. Before the chocolate sets, sprinkle generously with flaky sea salt.
- Final Chill: Place the cups in the refrigerator for at least 1 hour (or the freezer for 20 minutes) to allow the top shell to harden completely before serving.
Marry Me No Bake Raspberry Chocolate Mousse Cups
Ingredients
Equipment
Method
- Line a 12-cup muffin tin with silicone or paper liners. In a bowl, mix almond flour, cocoa powder, 1/4 cup maple syrup, and 2 tbsp melted coconut oil until a sticky dough forms.
- Press about 1 tablespoon of the crust mixture evenly into the bottom of each liner. Freeze for 10 minutes.
- In a microwave-safe bowl, melt the thick coconut cream and 1/2 cup dark chocolate chips together until smooth. Whisk in 2 tbsp maple syrup and vanilla extract.
- Spoon the chocolate mousse over the chilled crusts. Return the pan to the freezer for 30 minutes until the mousse is firm.
- In a small bowl, mash the raspberries with a fork. Stir in the chia seeds and 1 tsp maple syrup. Let sit for 10 minutes to thicken.
- Spoon the thickened raspberry jam evenly over the firm chocolate mousse layers.
- Melt the remaining 1/3 cup dark chocolate chips with 1 tsp coconut oil. Spoon a thin layer over the raspberries to cover them. Sprinkle immediately with flaky sea salt.
- Chill in the refrigerator for at least 1 hour before serving to allow the layers to set completely.
Notes
Pro Tips for the Perfect “Marry Me” Cups
While this recipe is beautifully straightforward, a few professional techniques will ensure your cups look as stunning as they taste.
The Coconut Cream Trick: The success of your mousse relies entirely on getting thick coconut cream. Always keep a can of full-fat coconut milk in the back of your fridge so you are ready to make these. If your kitchen is very warm, the cream might not separate well. Chilling the can for at least 24 hours guarantees a hard line between the cream and the water.
Silicone is Your Friend: Peeling paper liners off a chilled, sticky chocolate mousse cup can sometimes result in jagged edges. Using reusable silicone muffin liners allows you to simply push from the bottom and pop the perfectly smooth cup right out.
Tempering the Bite: These cups are best enjoyed cold, but eating them straight out of the freezer can make the top chocolate shell too hard to easily bite through without squishing the softer layers below. For the ultimate eating experience, store them in the fridge, or if frozen, let them sit at room temperature for 5-10 minutes before serving.
Delicious Flavor Variations
Once you master the basic formula, these cups are a fantastic canvas for your favorite flavor combinations.
Peanut Butter Cup Elegance: Swap the raspberry layer for a dollop of creamy, natural peanut butter mixed with a little maple syrup and a pinch of salt. Top with the chocolate shell and crushed roasted peanuts.
Espresso Chocolate: Add 1 teaspoon of instant espresso powder to the chocolate mousse layer. The coffee enhances the deep cocoa notes, creating a sophisticated, mocha-like flavor profile. Top the finished cups with a chocolate-covered espresso bean.
Strawberry Matcha: Swap the cocoa powder in the crust for vanilla protein powder or more almond flour. Swap the dark chocolate in the mousse for vegan white chocolate, and blend in a teaspoon of high-quality matcha powder. Use mashed strawberries instead of raspberries for the fruit layer.
Storage and Freezing Instructions
Because these cups are no-bake and contain fresh fruit, proper storage is essential for maintaining their pristine texture.
Refrigerator Storage: Store the fully set cups in an airtight container in the refrigerator for up to 5 days. They will maintain their perfect, bite-able consistency straight from the fridge.
Freezer Storage: These cups freeze exceptionally well. Place them in a single layer in a freezer-safe container for up to 3 months. When ready to enjoy, you can eat them semi-frozen for an ice-cream-cake-like experience, or let them thaw in the refrigerator for an hour to return to their original mousse-like texture.
The next time you want to show someone how much you care—or simply treat yourself to a dessert that checks every single box—whip up a batch of these Marry Me No Bake Raspberry Chocolate Mousse Cups. Just be prepared for the ensuing declarations of love.