No-Bake Strawberry Crunch Cheesecake Bars: Nostalgia in Every Bite
If you grew up chasing the ice cream truck down the street on a hot summer afternoon, chances are you are intimately familiar with the iconic strawberry shortcake ice cream bar. With its creamy center and that unforgettable, crunchy, sweet-and-tart pink coating, it remains an undisputed champion of nostalgic summer treats. But what if you could capture that exact flavor profile and magical texture in a decadent, sliceable dessert that you can serve at potlucks, barbecues, or elegant weekend brunches? Enter the No-Bake Strawberry Crunch Cheesecake Bars.
This recipe is a love letter to childhood summers, elevated for the adult palate. We take the flavor of those beloved ice cream bars and translate it into a rich, luscious cheesecake format. Best of all? It requires absolutely no oven time. This is a completely no-bake dessert that relies on the magic of the refrigerator to set up, making it the perfect stress-free recipe for when you want a show-stopping dessert without heating up your kitchen.
In this comprehensive guide, we will break down the three distinct layers of these magnificent bars. We will explore how to achieve the perfect tangy cheesecake filling without gelatin, how to recreate that authentic “strawberry crunch” using simple pantry staples, and how to slice them perfectly for that bakery-window presentation.
Why These Bars Will Be Your New Go-To Dessert
There are countless cheesecake recipes out there, but this one holds a special place in the dessert hall of fame. Here is why you will find yourself making these bars on repeat:
- The Nostalgia Factor: One bite of that pink, crumbly topping will instantly transport you back to childhood. It is a flavor combination that brings immediate joy to anyone who tries it.
- 100% No-Bake: From the crust to the topping, you will not need to turn on your oven once. This is a lifesaver during the hot summer months or when your oven is occupied with other dishes during a holiday feast.
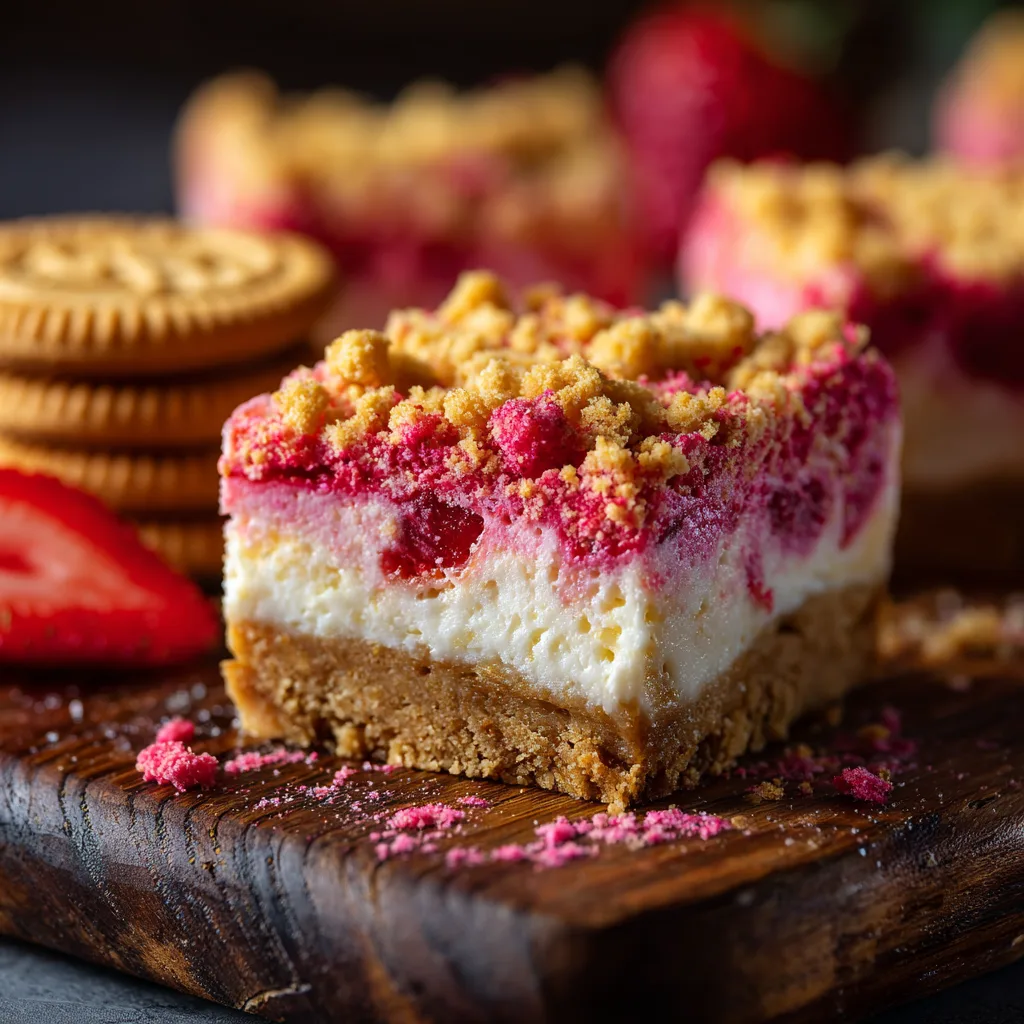
- Incredible Texture Contrast: A great dessert plays with texture. These bars offer the dense, buttery crunch of the bottom crust, the cloud-like, velvety smoothness of the whipped cheesecake filling, and the satisfying, sandy crunch of the strawberry topping.
- Make-Ahead Magic: Because these bars need ample time to chill and set in the refrigerator, they are the ultimate make-ahead dessert. You can prepare them a full day or two in advance of your event, freeing up your time on the actual day of hosting.
- Visually Stunning: The bright, vibrant pink topping contrasting with the pure white cheesecake layer makes these bars an absolute standout on any dessert table. They are practically begging to be photographed.
The Anatomy of the Strawberry Crunch Bar
To master this recipe, it helps to understand the three distinct layers that make up the whole. Each layer plays a vital role in the final taste and texture.
1. The Golden Foundation: The Cookie Crust
Unlike a traditional graham cracker crust, we use golden sandwich cookies (like golden Oreos) for the base. The cream filling in the cookies acts as an extra binder alongside melted butter, creating a dense, sweet, and sturdy foundation that mimics the vanilla cake portion of the original ice cream bar. It holds up beautifully to the moisture of the cheesecake filling without becoming soggy.
2. The Velvety Center: The No-Bake Cheesecake
Traditional baked cheesecakes rely on eggs for structure, but a no-bake cheesecake relies on the magic of chilled fat. By folding freshly whipped heavy cream into softened cream cheese and powdered sugar, we create a filling that is incredibly light and mousse-like, yet rich and tangy. A splash of vanilla extract and a hint of fresh lemon juice brighten the heavy dairy notes, providing perfect balance.
3. The Crowning Glory: The Strawberry Crunch
This is where the magic happens. The iconic topping is surprisingly easy to recreate. We pulse more golden sandwich cookies in a food processor, but this time, we mix them with melted butter and strawberry gelatin powder (like Jell-O). The gelatin provides that intense, artificial-in-the-best-way strawberry flavor and that vibrant pink color. Some recipes use freeze-dried strawberries, which is a fantastic natural alternative, but the gelatin powder truly nails the nostalgic flavor of the ice cream truck classic.
Detailed Ingredient Breakdown
You only need a handful of accessible ingredients to pull off this dessert masterpiece. Here is your shopping list:
- Golden Sandwich Cookies: You will need one standard family-size package of golden Oreos or a similar brand. You will use these for both the bottom crust and the crunchy topping. Do not remove the cream filling; it helps everything stick together!
- Unsalted Butter: Melted butter binds the cookie crumbs together for the crust and helps the strawberry crunch topping crisp up and hold its shape.
- Cream Cheese: You must use full-fat, brick-style cream cheese. Whipped or tub cream cheese contains too much air and water, and your bars will not set properly. Crucially, the cream cheese must be softened to room temperature to avoid lumps in your filling.
- Powdered Sugar: Also known as confectioners’ sugar. It dissolves instantly into the cream cheese, sweetening the filling while keeping the texture perfectly smooth.
- Heavy Whipping Cream: Very cold heavy cream is whipped to stiff peaks and folded into the cream cheese. This is what gives the no-bake cheesecake its height and airy, mousse-like texture.
- Vanilla Extract: A good quality pure vanilla extract enhances the sweet, bakery flavors of the dessert.
- Fresh Lemon Juice: Just a squeeze! It won’t make the filling taste like lemon; rather, the acidity enhances the natural tanginess of the cream cheese, making it taste more like a traditional baked cheesecake.
- Strawberry Gelatin Powder: A standard small box (3 oz) of strawberry Jell-O powder is the secret to the topping. It provides the color and the exact nostalgic flavor you are looking for.
Step-by-Step Instructions for No-Bake Success
Follow these steps carefully, paying special attention to the chilling times, to ensure your bars slice perfectly.
- Prepare your Pan: Line an 8×8-inch or 9×9-inch square baking dish with parchment paper, leaving a slight overhang on two opposite sides. This creates a “sling” that will allow you to easily lift the entire chilled block out of the pan for clean slicing later.
- Make the Cookie Crust: Place about 24 golden sandwich cookies into a food processor and pulse until they become fine crumbs. Pour in 5 tablespoons of melted butter and pulse a few more times until the mixture resembles wet sand. Pour this mixture into your prepared pan and use the bottom of a measuring cup or glass to press it firmly and evenly into the bottom. Place the pan in the freezer to set while you make the filling.
- Whip the Cream: In a medium cold bowl, use an electric hand mixer to beat the cold heavy whipping cream until stiff peaks form. Be careful not to over-beat, or it will turn into butter. Set aside.
- Beat the Cream Cheese: In a separate large bowl, beat the softened cream cheese until perfectly smooth and creamy (about 2 minutes). Add the powdered sugar, vanilla extract, and lemon juice. Beat again until everything is fully combined and there are absolutely no lumps.
- Fold and Fill: Gently fold the whipped cream into the cream cheese mixture using a rubber spatula. Use a sweeping, folding motion to keep the mixture as airy as possible. Do not aggressively stir. Once fully incorporated, pull your crust from the freezer and spread this cheesecake filling evenly over the top. Smooth the surface with an offset spatula.
- Create the Strawberry Crunch: Rinse out your food processor and dry it completely. Add about 12 golden sandwich cookies and pulse into coarse crumbs (you want them a bit chunkier this time). Transfer to a bowl. Add the dry strawberry gelatin powder and 3 tablespoons of melted butter. Toss with a fork until the crumbs are evenly coated and clump together slightly.
- Top and Chill: Sprinkle the strawberry crunch mixture generously and evenly over the top of the cheesecake layer, pressing down very lightly so it adheres to the filling. Cover the pan tightly with plastic wrap and refrigerate for a minimum of 4 hours, though overnight is highly recommended for the cleanest slices.
- Slice and Serve: Once completely chilled and firm, use the parchment paper sling to carefully lift the entire dessert block out of the pan onto a cutting board. Use a large, sharp chef’s knife to cut into squares, wiping the knife clean with a warm, damp towel between each cut.
Pro Tips for Flawless Cheesecake Bars
Ensure your dessert is bakery-perfect with these expert tips:
- The Room Temperature Rule: If your cream cheese is even slightly cold when you start beating it, you will get tiny, stubborn lumps in your filling that will not whip out. Leave it on the counter for at least two hours before starting.
- Clean Slices: The secret to getting those beautiful, distinct layers when slicing is a hot knife. Run your knife under hot tap water, wipe it completely dry with a paper towel, make one cut, and repeat. Do this for every single slice.
- The Natural Alternative: If you are completely opposed to using artificial gelatin powder, you can substitute it with 1/2 cup of freeze-dried strawberries. Pulse them in the food processor with the cookies to create a natural, deeply flavored pink crunch topping.
Frequently Asked Questions (FAQ)
Can I freeze these bars?
Yes, these bars freeze beautifully! In fact, they taste incredible when eaten semi-frozen, much like the original ice cream bar. To freeze, slice them first, then store them in an airtight container with parchment paper between the layers for up to 2 months.
Why is my cheesecake filling runny?
A runny filling usually means one of two things: the heavy cream was not whipped to stiff peaks before being folded in, or the cream cheese was a low-fat or tub variety that contained too much moisture. Always use full-fat brick cream cheese and ensure your whipped cream holds firm peaks.
Can I use a 9×13 inch pan?
This recipe is scaled for an 8×8 or 9×9 inch pan, which yields thick, bakery-style bars. If you use a 9×13 pan, your layers will be extremely thin. If you want to use a 9×13 pan, you should double all the ingredients in the recipe.
Bring a touch of childhood magic to your next gathering with these irresistible No-Bake Strawberry Crunch Cheesecake Bars. They are sweet, tangy, crunchy, and absolutely guaranteed to vanish from the dessert table in record time!
Strawberry Crunch Cheesecake Bars
Ingredients
Equipment
Method
- Line an 8×8-inch square baking pan with parchment paper, leaving an overhang on the sides for easy removal.
- Make the crust: In a food processor, pulse 24 golden sandwich cookies until fine crumbs form. Add 5 tablespoons melted butter and pulse until combined. Press the mixture firmly into the bottom of the prepared pan. Place in the freezer to set while you prepare the filling.
- Make the filling: In a cold bowl, whip the heavy whipping cream until stiff peaks form. Set aside.
- In a separate large bowl, beat the softened cream cheese until completely smooth. Add the powdered sugar, vanilla extract, and lemon juice. Beat until creamy and lump-free.
- Gently fold the whipped cream into the cream cheese mixture until just combined and smooth. Spread this filling evenly over the chilled cookie crust.
- Make the topping: Pulse the remaining 12 golden sandwich cookies into coarse crumbs. Transfer to a bowl and toss with the dry strawberry gelatin powder and 3 tablespoons of melted butter until the crumbs are evenly coated.
- Sprinkle the strawberry crunch topping evenly over the cheesecake layer, pressing down very lightly.
- Cover tightly and refrigerate for at least 4 hours, or overnight, until completely firm.
- Use the parchment paper overhang to lift the dessert out of the pan. Slice cleanly using a warm, sharp knife, wiping it between cuts. Serve cold.