Peanut Butter Earthquake Cake
In this comprehensive guide, we are going to dive deep into the magic of the earthquake cake. We will explore the science behind its signature craters, discuss the absolute best ingredients to use, and provide you with a foolproof step-by-step process to ensure your cake is the gooiest, most decadent dessert you have ever pulled out of your oven.
What is an Earthquake Cake?
To understand the brilliance of the Gooey Peanut Butter Earthquake Cake, you first have to understand what an “earthquake cake” actually is. Traditionally, a standard cake is baked until a toothpick inserted into the center comes out clean. An earthquake cake throws that rule right out the window.
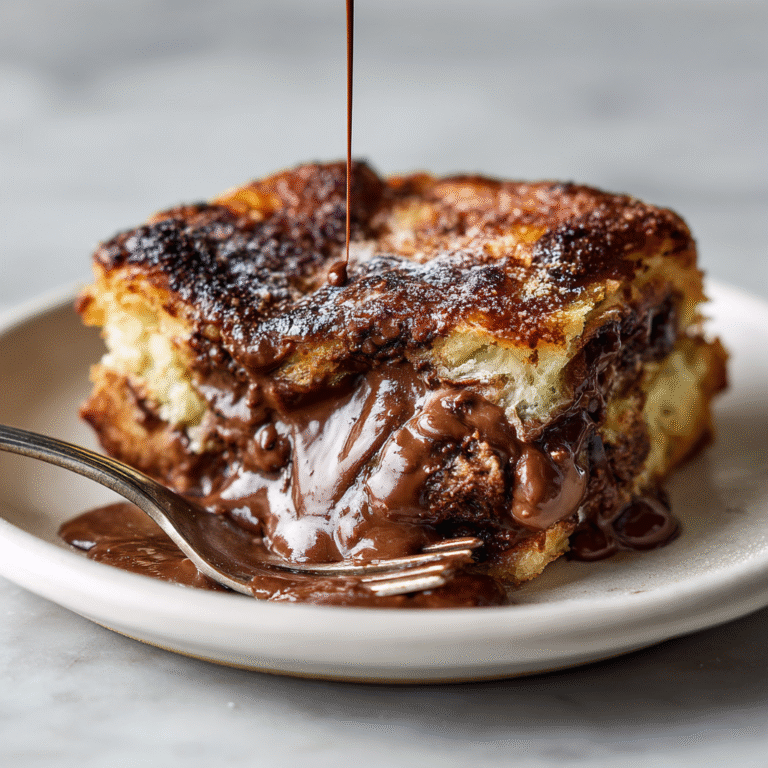
The magic happens in the layering and the baking process. You start with a base of cake batter (typically a German chocolate or dark fudge cake). But instead of just baking it, you dollop a heavy, rich mixture of cream cheese, butter, and powdered sugar—and in this case, creamy peanut butter—directly on top of the raw batter. As the cake bakes in the heat of the oven, the lighter chocolate cake batter rises, while the heavy, dense cream cheese and peanut butter mixture sinks. This opposing movement creates deep fault lines, fissures, and craters across the surface of the cake, making it look as though an earthquake has just rolled through your baking pan.
The result? A cake that is incredibly moist, with pockets of baked-in cheesecake-like peanut butter filling surrounded by tender chocolate crumb, all topped off with melting chocolate chips. It is a textural wonderland.
Why This Peanut Butter Variation is the Ultimate Dessert
The original earthquake cake usually features a plain cream cheese swirl with coconut and pecans. While delicious, swapping out the traditional elements for a heavy dose of peanut butter elevates the dessert to a completely new stratosphere. The slight saltiness of the peanut butter cuts perfectly through the intense sweetness of the powdered sugar and the rich bitterness of the chocolate cake.
Furthermore, peanut butter has a natural affinity for melting and staying soft at room temperature, which guarantees that “gooey” factor we are all chasing. When you bite into a warm slice of this cake, you get the airy lightness of the chocolate sponge instantly contrasted by the dense, fudgy, almost molten peanut butter core. It is the exact flavor profile of a gourmet peanut butter cup, but in a warm, comforting, spoonable cake format.
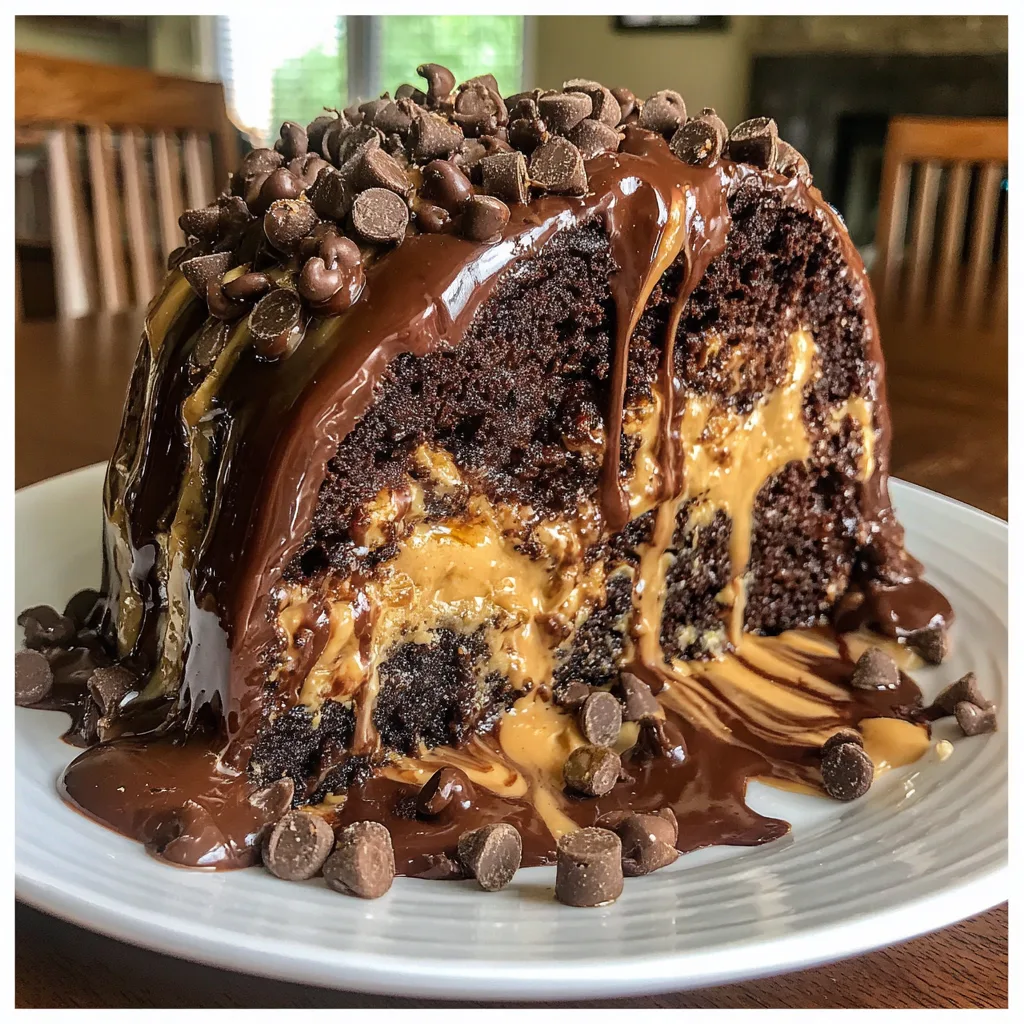
Ingredients for the Gooey Peanut Butter Earthquake Cake
Do not be intimidated by the impressive appearance of this cake; the ingredient list is actually quite simple and relies on some incredibly convenient pantry staples. Here is what you will need:
The Cake Base:
- – 1 box (15.25 oz) Dark Chocolate or Fudge Cake Mix (plus the oil, water, and eggs called for on the box)
The Peanut Butter Cream Cheese Swirl:
- – 1 block (8 oz) Cream Cheese, softened to room temperature
- – 1/2 cup (1 stick) Unsalted Butter, softened to room temperature
- – 1 cup Creamy Peanut Butter (avoid natural/stir varieties for this)
- – 2 and 1/2 cups Powdered Sugar, sifted
- – 1 teaspoon Pure Vanilla Extract
- – A pinch of Salt (to balance the sweetness)
The Toppings:
- – 1 and 1/2 cups Semi-Sweet Chocolate Chips
- – 1/2 cup Peanut Butter Chips (optional, but highly recommended)
Step-by-Step Baking Instructions
Creating this chaotic, beautiful mess of a cake requires a specific layering technique. Follow these steps precisely for the ultimate gooey outcome.
1. Prep Your Equipment
Preheat your oven to 350°F (175°C). Take a standard 9×13 inch baking dish and spray it generously with non-stick baking spray. Do not skip the spray! Because of the high sugar and cream cheese content, this cake loves to stick to the pan.
2. Prepare the Cake Batter
In a large mixing bowl, prepare the chocolate cake batter exactly according to the instructions on the back of the box. Usually, this involves whisking together the dry mix with water, vegetable oil, and eggs until smooth. Once combined, pour the entire batch of chocolate batter into your prepared 9×13 baking dish, spreading it out into an even layer with a spatula.
3. Whip the Peanut Butter Swirl
In a separate bowl, it is time to make the magic filling. Use a hand mixer or a stand mixer to beat the softened cream cheese and softened butter together until perfectly smooth. Add the creamy peanut butter and vanilla extract, beating again until uniform. Gradually lower your mixer speed and carefully add in the sifted powdered sugar and a pinch of salt. Beat this mixture until it is thick, fluffy, and looks like a dense frosting.
4. Assemble the Earthquake
Here is where the magic happens. Take large spoonfuls (or use a cookie scoop) of the peanut butter cream cheese mixture and drop them directly onto the raw chocolate cake batter in the pan. Distribute the dollops evenly, but do not spread them flat. You want big, heavy mounds. If you want a more marbled look, you can take a butter knife and gently drag it through the dollops once or twice, but do not over-mix.
5. Add the Chocolate Chips
Sprinkle the semi-sweet chocolate chips (and peanut butter chips, if using) generously over the entire top of the cake, making sure they cover both the exposed cake batter and the peanut butter mounds.
6. Bake to Perfection
Place the pan in the center rack of your preheated oven. Bake for exactly 45 to 50 minutes. This is the trickiest part: the cake will not look completely done when you take it out. The edges should be puffed, set, and pulling away slightly from the sides of the pan, but the center where the peanut butter mixture is will still look quite jiggly and molten. That is exactly what you want! If you bake it until the center is entirely firm, you will lose the gooey signature texture.
7. Cool and Serve
Remove the cake from the oven and let it cool on a wire rack for at least 30 minutes before serving. It is best served warm, while the chocolate chips are still melty and the peanut butter core is lava-like.
Gooey Peanut Butter Earthquake Cake
Ingredients
Equipment
Method
- Preheat oven to 350°F (175°C) and generously spray a 9×13 inch baking dish with non-stick spray.
- Prepare the chocolate cake batter according to the package directions. Pour into the prepared baking dish.
- In a separate bowl, beat the softened cream cheese and butter until smooth. Mix in the peanut butter and vanilla.
- Gradually beat in the powdered sugar and a pinch of salt until the mixture is thick and fluffy.
- Drop large spoonfuls of the peanut butter mixture directly onto the raw cake batter in the pan. Do not spread it out completely.
- Sprinkle the chocolate chips evenly over the top of the entire cake.
- Bake for 45 to 50 minutes. The edges will be set, but the center should still be slightly jiggly.
- Let cool for at least 30 minutes before slicing to allow the gooey center to set up slightly. Serve warm.
Notes
Expert Tips for the Best Texture
Baking an earthquake cake requires a slight leap of faith, as we are intentionally defying standard baking rules. Here are some expert tips to ensure success:
Use the Right Peanut Butter: Leave the organic, natural, stir-required peanut butter in the pantry. For this recipe, you need conventional, stabilized peanut butter (like Jif or Skippy). Natural peanut butter separates when exposed to high oven heat and will leave you with an oily, greasy mess rather than a fluffy, gooey filling.
Temperature Matters: Ensure your cream cheese and butter are truly at room temperature before you try to mix them. If they are cold, you will end up with unappetizing lumps of cream cheese in your filling that will not melt properly during baking.
Trust the Jiggle: I cannot stress this enough—do not overbake this cake. The toothpick test will fail you here. If you insert a toothpick into a peanut butter pocket, it will come out coated in goo, no matter how long you bake it. Look for set edges and a center that wiggles slightly when you shake the pan.
Variations and Customizations
While this recipe is borderline perfection as written, the earthquake cake format is incredibly forgiving and open to experimentation. Here are some ways to switch it up:
- The Nutty Crunch: If you love texture, add a cup of chopped, roasted peanuts or pecans to the top along with the chocolate chips before baking.
- The Caramel Pretzel: Swirl a half cup of thick caramel sauce into the peanut butter mixture, and top the cake with crushed pretzels in the last 10 minutes of baking for a sweet and salty masterpiece.
- Double Chocolate Extreme: Swap the peanut butter for an equal amount of chocolate hazelnut spread (like Nutella) and use dark chocolate chips.
- Scratch-Made Base: If you are averse to boxed cake mixes, you can absolutely substitute the box mix for your favorite homemade one-bowl chocolate cake recipe. Just ensure it makes enough batter for a 9×13 pan.
Serving and Pairing Suggestions
Because the Gooey Peanut Butter Earthquake Cake is so intensely rich, a little goes a long way. Serve it in modest squares. To truly elevate the experience, serve it warm straight from the pan, topped with a massive scoop of high-quality vanilla bean ice cream. As the cold ice cream melts over the hot, cratered surface of the cake, mingling with the molten peanut butter and chocolate chips, it creates a dessert experience that is quite literally unforgettable.
For beverages, an ice-cold glass of milk is the traditional and arguably best pairing. However, a robust cup of dark roast coffee or an espresso also pairs beautifully, as the bitterness of the coffee cuts through the profound sweetness of the powdered sugar.
Storage and Reheating
If you somehow have leftovers, this cake stores remarkably well. Because of the high fat and moisture content from the cream cheese and peanut butter, it will not dry out as quickly as a standard cake.
Room Temperature: You can keep it covered tightly with foil or plastic wrap on the counter for up to 2 days.
Refrigerator: For longer storage, keep it in the fridge for up to 5 days. The cold will solidify the peanut butter cream cheese mixture, turning it almost into a dense fudge.
Reheating: To recapture that fresh-from-the-oven gooey magic, place a slice on a microwave-safe plate and heat it for 15 to 20 seconds. The chocolate chips will remelt, and the peanut butter core will become molten once again.
Frequently Asked Questions (FAQ)
Can I make this cake ahead of time?
Yes, you can! While it is best served warm, you can bake the entire cake the day before your event. Just let it cool completely, cover it, and store it in the fridge. When you are ready to serve, you can pop individual slices in the microwave, or gently warm the entire pan in a 250°F oven for about 15 minutes.
Why did my cake sink entirely in the middle?
That is the earthquake effect! It is supposed to sink. The heavy filling pushes the cake batter outward and upward, creating a cratered, sunken appearance. It means you did it right.
Can I use a different size pan?
It is highly recommended to stick to a 9×13 inch baking dish. If you use a smaller pan (like a 9×9), the cake will be too thick and the center will remain entirely raw, not just gooey. If you use a larger sheet pan, the layers will be too thin to create the proper “earthquake” craters.
Can I freeze this cake?
Yes. Allow the cake to cool completely, cut it into individual portions, wrap each piece tightly in plastic wrap, and then place them in a freezer-safe bag. They will keep for up to 3 months. Thaw overnight in the fridge and reheat in the microwave.
Conclusion
The Gooey Peanut Butter Earthquake Cake is not a dessert for the faint of heart. It is bold, unapologetically rich, and wonderfully messy. It is the kind of recipe that gets passed down through families and requested at every single potluck and birthday party. By combining the ease of a boxed cake mix with a spectacular, decadent homemade filling, you get maximum reward for minimal effort. So preheat your oven, grab your peanut butter, and get ready to experience the most delicious natural disaster your kitchen has ever seen!