Pickled Onion Deviled Eggs
Pickled Onion Deviled Eggs: A Tangy Twist on a Classic
Deviled eggs are the undisputed champions of potlucks, holiday spreads, and Sunday brunches. They are creamy, savory, and undeniably bite-sized. But sometimes, the classic mustard-and-mayo combination needs a wake-up call. Enter the Pickled Onion Deviled Egg. This stunning variation takes the familiar comfort of the traditional recipe and elevates it with a vibrant pop of color and a sharp, tangy crunch that cuts right through the richness of the yolk.
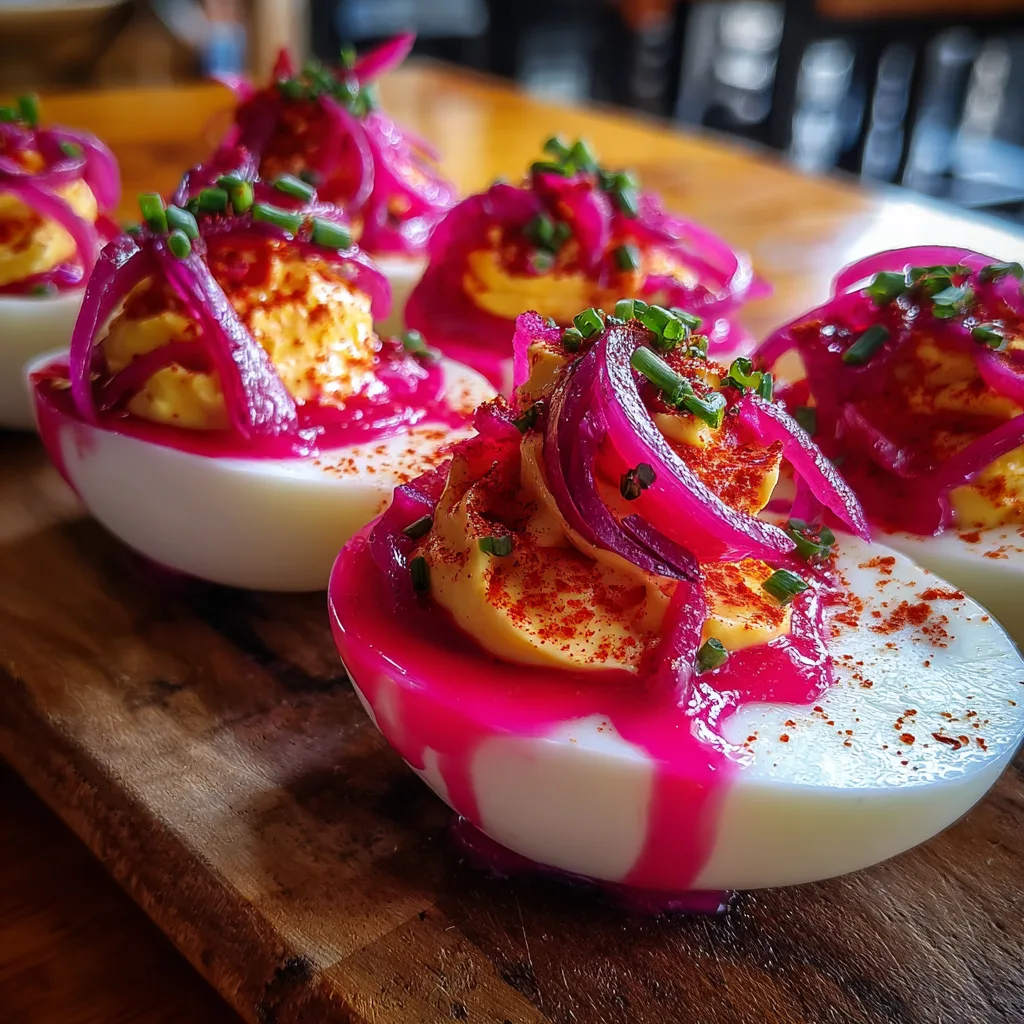
One glance at these beauties, with their shocking pink filling and glistening ribbons of pickled onion on top, and you know you are in for a treat. They are not just food; they are a centerpiece. The secret to that gorgeous magenta hue isn’t artificial dye—it is the natural magic of red onion brine (or a splash of beet juice if you are feeling extra artistic). Whether you are looking for a show-stopping appetizer for Easter, a keto-friendly snack that packs a punch, or simply a new way to use up those hard-boiled eggs, this recipe is a game-changer.
Why You Will Love This Recipe
- Flavor Balance: The acidity of the pickled onions perfectly balances the fatty creaminess of the egg yolks and mayonnaise.
- Visual Appeal: The vibrant pink color makes these eggs look professionally made, yet they are incredibly easy to assemble.
- Texture Contrast: Soft whites, creamy mousse-like filling, and the crisp snap of a pickled onion ribbon create the perfect bite.
- Make-Ahead Friendly: You can boil the eggs and pickle the onions days in advance, making assembly a breeze.
Pickled Onion Deviled Eggs
Ingredients
Equipment
Method
- Place eggs in a single layer in a large pot and cover with water. Bring to a boil.
- Once boiling, cover, turn off heat, and let sit for 10-12 minutes.
- Transfer eggs to an ice bath for 10 minutes to cool completely.
- Peel eggs and slice in half lengthwise. Remove yolks into a mixing bowl.
- Mash yolks with mayonnaise, mustard, pickled onion brine, salt, and pepper until smooth and pink.
- Pipe mixture back into the egg whites.
- Top with pickled red onions, a dusting of paprika, and chopped chives.
- Serve immediately or chill until ready.
Notes
Ingredients
The beauty of this recipe lies in its simplicity. You likely have most of these items in your pantry already.
For the Eggs:
- Eggs: 12 large eggs (older eggs peel easier, making them perfect for boiling).
- Water: Enough to cover the eggs by an inch.
- Ice: For the ice bath to stop the cooking process immediately.
For the Pickled Onions (Quick Method):
- Red Onion: 1 medium, thinly sliced into ribbons or half-moons.
- Vinegar: 1/2 cup apple cider vinegar or red wine vinegar.
- Water: 1/2 cup warm water.
- Sugar: 1 tablespoon (optional, but helps balance the bite).
- Salt: 1 teaspoon sea salt.
- Peppercorns/Mustard Seeds: Optional, for extra flavor in the jar.
For the Filling:
- Mayonnaise: 1/2 cup (use full-fat for the best texture).
- Dijon Mustard: 1 teaspoon (adds a subtle heat and depth).
- Pickle Brine: 2 tablespoons of the pink liquid from your pickled onions jar (this adds flavor and the pink color).
- Salt and Pepper: To taste.
- Paprika: Smoked or sweet, for garnish.
- Fresh Chives: Finely chopped, for a pop of green.
Instructions
Creating these vibrant appetizers is a three-part process: pickling the onions (if you haven’t already), boiling the eggs, and assembling the filling.
- Pickle the Onions (Do this first): In a jar, combine vinegar, warm water, sugar, and salt. Shake until dissolved. Add the thinly sliced red onions, pressing them down so they are submerged. Let them sit at room temperature for at least 30 minutes. They will turn bright pink and soften. (Make these a day ahead for the best color!)
- Boil the Eggs: Place your eggs in a single layer in a large pot and cover with water. Bring to a rolling boil over high heat. Once boiling, cover the pot, turn off the heat, and let them sit for 10-12 minutes.
- The Ice Bath: While the eggs sit, prepare a bowl with cold water and ice. Using a slotted spoon, transfer the hot eggs into the ice bath. Let them cool completely (about 10 minutes). This shrinks the egg slightly inside the shell, making peeling much easier.
- Prep the Whites: Peel the eggs carefully. Slice them in half lengthwise. Gently pop the yolks out into a medium mixing bowl and place the whites on a serving platter.
- Make the Filling: Mash the yolks with a fork until they resemble fine crumbs. Add the mayonnaise, Dijon mustard, salt, pepper, and the star ingredient—2 tablespoons of the pink pickling liquid. Mix until completely smooth. If you want a more vibrant pink color, add a teaspoon of beet juice or more brine.
- Pipe the Filling: Transfer the creamy mixture to a piping bag (or a ziplock bag with the corner snipped off). Pipe a generous swirl of filling into each egg white cavity.
- Garnish: Top each egg with a few ribbons of the pickled red onions. Dust lightly with paprika and sprinkle with chopped fresh chives.
- Serve: Serve immediately or refrigerate until ready to eat.
Tips for the Perfect Deviled Egg
- The Perfect Peel: Use eggs that are 1-2 weeks old rather than fresh from the farm. The pH level in slightly older eggs makes the membrane detach from the shell easier.
- Smooth Filling: For an ultra-silky filling, don’t just use a fork. Use a hand mixer or even a food processor to whip the yolks and mayo together. This eliminates lumps and makes piping easier.
- Mess-Free Filling: If you don’t have a piping bag, a plastic sandwich bag works wonders. Just push the filling to one corner, twist the top, and snip a small piece of the corner off.
- Color Boost: If your pickled onion brine isn’t turning the filling pink enough for your liking, a single drop of red food coloring or a small amount of beet juice will do the trick without altering the flavor.
Variations to Try
Once you master the base recipe, try these fun twists:
- Spicy Kick: Add a teaspoon of Sriracha or chopped jalapeños to the yolk mixture.
- Bacon Lover: Everything is better with bacon. Add crispy crumbled bacon bits on top alongside the onions.
- Avocado Cream: Swap half the mayonnaise for ripe avocado for a green, super-creamy (and healthier) filling.
- Deep Pink Whites: If you want the whites to be pink instead of the filling, steep the peeled hard-boiled eggs in the beet/onion brine for 1 hour before slicing them.
Fun Facts & Cultural Context
Did you know the term “deviled” in food dates back to the 18th century? It was originally used to describe dishes that were cooked with spicy or zesty condiments, usually mustard or pepper. While today’s deviled eggs are often mild and creamy, this pickled onion version harkens back to that original definition by adding a sharp, zesty “devilish” kick.
In the Southern United States, pickled eggs are a staple in delis and bars. This recipe bridges the gap between the bar-snack pickled egg and the Sunday-church-picnic deviled egg, creating a fusion that feels both nostalgic and modern.
Storage Instructions
Refrigerator: Deviled eggs are best eaten the same day they are assembled, but leftovers can be stored in an airtight container in the fridge for up to 2 days. The onions may weep slightly, so you might want to drain any liquid before serving leftovers.
Prep Ahead: You can boil the eggs and make the filling up to 2 days in advance. Store the whites and the filling separately (keep the filling in the piping bag). Assemble just before serving for the freshest taste and appearance.
These Pickled Onion Deviled Eggs are vibrant, tangy, and utterly addictive. Whether you serve them for Easter brunch or a summer BBQ, be prepared for the plate to be licked clean!