Tasty Fig and Cream Cheese Bars
The Ultimate Guide to Tasty Fig and Cream Cheese Bars: A Layered Masterpiece
When the comfort of a buttery shortbread cookie meets the sophistication of a cheesecake and the earthy sweetness of figs, you get a dessert that is truly greater than the sum of its parts. Tasty Fig and Cream Cheese Bars are the unsung heroes of the baking world. They bridge the gap between a casual afternoon snack and an elegant dinner party dessert. If you have ever found yourself torn between baking a fruit crumble, a cheesecake, or a simple cookie, this recipe is your answer.
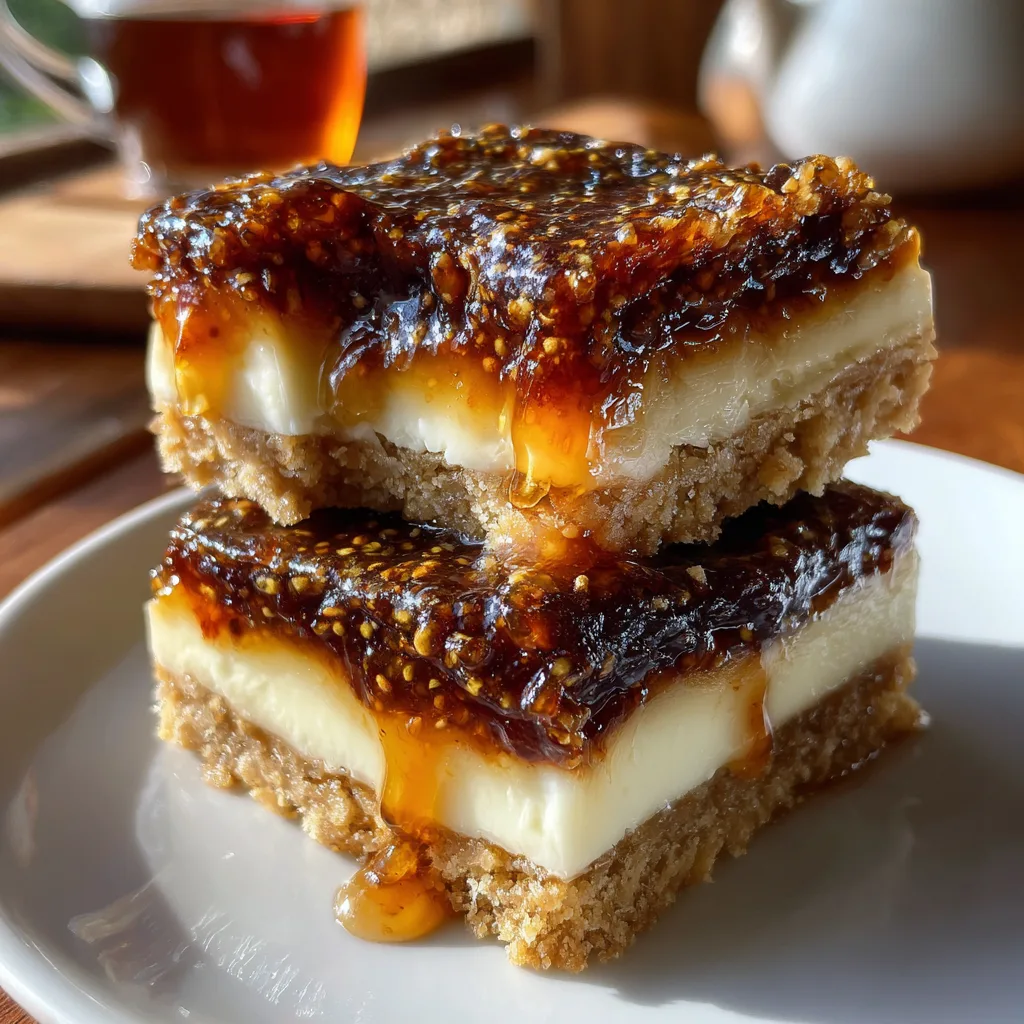
These bars are visually stunning with their distinct tri-color layers: the golden base, the deep mahogany filling, and the snowy white topping. But beyond their looks, they offer a sensory experience that is hard to beat. The crunch of the crust gives way to the sticky, chewy sweetness of the fig filling, which is then immediately mellowed by the cool, tangy cream cheese layer. It is a symphony of textures and flavors that feels nostalgic yet entirely modern.
In this comprehensive guide, we are going to dive deep into the art of making the perfect fig and cream cheese bar. We will cover everything from selecting the right type of dried figs (or jam) to the science of baking cheesecake layers without cracks. Whether you are a seasoned baker or a novice in the kitchen, this guide will ensure your bars come out perfectly sliced, glossy, and delicious every single time.
Why This Recipe Works: The Science of Layering
Creating a multi-layered bar is about moisture control and structural integrity. Here is why this specific combination is a culinary winner:
- The Shortbread Foundation: The base of this recipe is a classic shortbread. It is high in fat (butter) and low in moisture. This creates a sturdy, crisp platform that won’t get soggy when the wet fig filling is placed on top. The salt in the crust is crucial—it acts as a foil to the sweetness of the layers above.
- The Fig Filling Density: Figs are naturally high in pectin and sugar. When cooked down into a paste or thick jam, they create a filling that is “short”—meaning it doesn’t run or ooze excessively when cut. This structural density allows the heavy cream cheese layer to sit on top without sinking into the fruit.
- The Acidic Balance: Figs have a deep, honey-like sweetness that can sometimes feel heavy on the palate. The cream cheese topping provides lactic acid (tanginess), which cuts through that sugar, cleansing the palate and making you ready for the next bite.
Ingredients Checklist
To achieve the perfect bar, quality ingredients are key. Here is what you need:
Tasty Fig and Cream Cheese Bars
Ingredients
Equipment
Method
- Preheat oven to 350°F (175°C). Line an 8×8 inch baking pan with parchment paper.
- For the crust: Cream butter and sugar. Add vanilla, salt, and flour. Mix until crumbly.
- Press dough firmly into the bottom of the prepared pan. Bake for 15-18 minutes until lightly golden. Cool slightly.
- For the filling: Simmer figs, water, and lemon juice in a saucepan for 15 minutes until soft. Blend in a food processor until smooth.
- Spread the fig paste evenly over the baked crust.
- For the topping: Beat cream cheese and sugar until smooth. Add egg and vanilla, mixing just until combined.
- Pour topping over fig layer. Bake for 20-25 minutes until set. Cool completely, then refrigerate for 2 hours before slicing.
Notes
For the Buttery Shortbread Crust
- Unsalted Butter: 1/2 cup (1 stick), softened. Using unsalted allows you to control the salt level.
- Granulated Sugar: 1/4 cup. Just enough to sweeten the dough without making it a sugar cookie.
- Vanilla Extract: 1 teaspoon. Adds aromatic depth.
- All-Purpose Flour: 1 cup. The structural backbone.
- Salt: 1/4 teaspoon. Essential for flavor contrast.
For the Sticky Fig Filling
- Dried Mission Figs: 10-12 oz (stemmed and chopped). Mission figs have a darker, sweeter flavor compared to Golden figs.
- Water: 1 cup (plus more if needed). To rehydrate the fruit.
- Lemon Juice: 1 tablespoon. Adds brightness and helps set the pectin.
- Sugar (Optional): 1-2 tablespoons. Only add if your figs aren’t naturally sweet enough.
For the Cream Cheese Topping
- Cream Cheese: 8 oz (1 block), softened. Do not use tub spread; you need the brick style for structure.
- Sugar: 1/4 cup. Sweetens the tangy cheese.
- Egg: 1 large. The binder that sets the cheesecake layer into a sliceable solid.
- Vanilla Extract: 1/2 teaspoon.
Step-by-Step Instructions
1. Prepare Your Pans and Oven
Preheat your oven to 350°F (175°C). Line an 8×8 inch square baking pan with parchment paper, leaving an overhang on the sides. This “sling” is crucial for lifting the bars out later for clean slicing. If you skip this, you will be digging the first bar out with a spoon!
2. Make the Shortbread Base
In a medium bowl, cream together the softened butter and 1/4 cup sugar until light and fluffy. Mix in the vanilla and salt. Gradually add the flour, mixing on low speed just until a crumbly dough forms. Dump this mixture into your prepared pan. Using the bottom of a measuring cup or your hands, press the dough firmly and evenly into the bottom. Bake for 15-18 minutes, or until the edges are lightly golden. Remove and let cool slightly.
3. Create the Fig Filling
While the crust bakes, remove the hard stems from your dried figs and chop them roughly. Place them in a saucepan with the water and lemon juice. Bring to a boil, then reduce heat and simmer for about 10-15 minutes until the figs are soft and most of the liquid is absorbed. Transfer the mixture to a food processor and pulse until it becomes a thick, sticky paste. It should be spreadable but not runny.
4. Prepare the Cream Cheese Layer
In a clean bowl, beat the softened cream cheese and 1/4 cup sugar until completely smooth and lump-free. Add the egg and vanilla, beating just until combined. Do not overbeat at this stage, or you will incorporate too much air, which can cause the cheesecake layer to puff up and then crack as it cools.
5. Assemble and Bake
Spread the fig paste evenly over the slightly cooled crust. An offset spatula works best here to get into the corners. Next, pour the cream cheese mixture over the fig layer, smoothing the top gently. Return the pan to the oven and bake for 20-25 minutes. The center should be set (it might jiggle slightly like Jell-O, but shouldn’t be liquid).
6. The Hardest Part: Waiting
Remove the pan from the oven and place it on a wire rack. Let it cool completely at room temperature (about an hour). Then, transfer the pan to the refrigerator and chill for at least 2 hours. This chilling step is non-negotiable; it sets the butter in the crust and firms up the cheesecake layer, ensuring clean, sharp cuts.
Expert Tips for Bakery-Quality Bars
The “Clean Cut” Secret:
To get those sharp, professional edges seen in the photos, run a sharp chef’s knife under hot water, wipe it dry, and then make a cut. Repeat the “dip, wipe, cut” process for every single slice. This prevents the sticky fig layer from dragging through the white cream cheese layer.
Fig Selection Matters:
If you can find “Black Mission” figs, buy them. They have an intense, jammy flavor that tastes almost like wine or molasses. “Calimyrna” or “Smyrna” figs are lighter and nuttier but less sticky. If you are in a rush, you can use a high-quality jar of fig jam instead of making the paste, but reduce the sugar in the recipe to compensate.
Room Temperature Ingredients:
Ensure your cream cheese and egg are at room temperature before mixing. Cold cream cheese will result in lumps in your batter that no amount of mixing will remove. If you forgot to take them out, submerge the egg in warm water for 5 minutes and microwave the unwrapped cream cheese for 10-15 seconds.
Creative Variations
Once you have mastered the classic, try these fun twists:
1. The Honey-Walnut Edition
Add 1/2 cup of finely chopped toasted walnuts to the shortbread crust mixture. Drizzle honey over the finished bars just before serving. This leans into the Baklava flavor profile.
2. The Citrus Zest Twist
Add 1 teaspoon of orange zest to the fig filling and 1/2 teaspoon of lemon zest to the cream cheese layer. The citrus oils brighten the heavy flavors and make the dessert feel lighter.
3. The Gluten-Free Option
Swap the all-purpose flour for a 1:1 gluten-free baking flour blend. Since shortbread doesn’t rely heavily on gluten development for structure (unlike bread), this recipe adapts beautifully to gluten-free diets.
Serving and Storage
Serving Suggestions:
These bars are rich, so small squares go a long way. Serve them with a hot cup of black coffee or an Earl Grey tea. The tannins in tea pair wonderfully with the figs. For an extra decadent dessert, serve a bar slightly warmed (just 10 seconds in the microwave) with a scoop of vanilla bean ice cream.
Storage:
Because of the cream cheese, these bars must be stored in the refrigerator. Keep them in an airtight container for up to 5 days. Layer them with parchment paper if stacking to prevent them from sticking together.
Freezing:
Yes, these bars freeze surprisingly well! Cut them into squares, wrap each one individually in plastic wrap, and store in a freezer bag for up to 3 months. Thaw in the fridge overnight before eating.
Conclusion
Tasty Fig and Cream Cheese Bars are a testament to the power of simple, high-quality ingredients. They require a bit of patience with the cooling time, but the actual hands-on effort is minimal compared to the impressive result. They are the perfect addition to a holiday cookie box, a summer picnic, or just a Tuesday night treat.
The combination of the buttery crunch, the jammy fruit, and the creamy top is timeless. Give this recipe a try, and do not be surprised if it becomes the most requested item in your baking repertoire. Happy baking!