The Ultimate Candy Sushi Rolls Recipe: A Fun, Colorful, and Delicious Dessert
Welcome to the whimsical world of dessert illusion! If you are looking for a show-stopping, kid-friendly treat that combines the visual appeal of traditional Japanese sushi with the nostalgic, sugary delight of classic American candies and marshmallow cereal treats, you have found it. Candy Sushi Rolls are the perfect fusion of creativity and flavor. They are an absolute hit at children’s birthday parties, school events, sleepovers, and even as a quirky adult dessert for those who are young at heart.
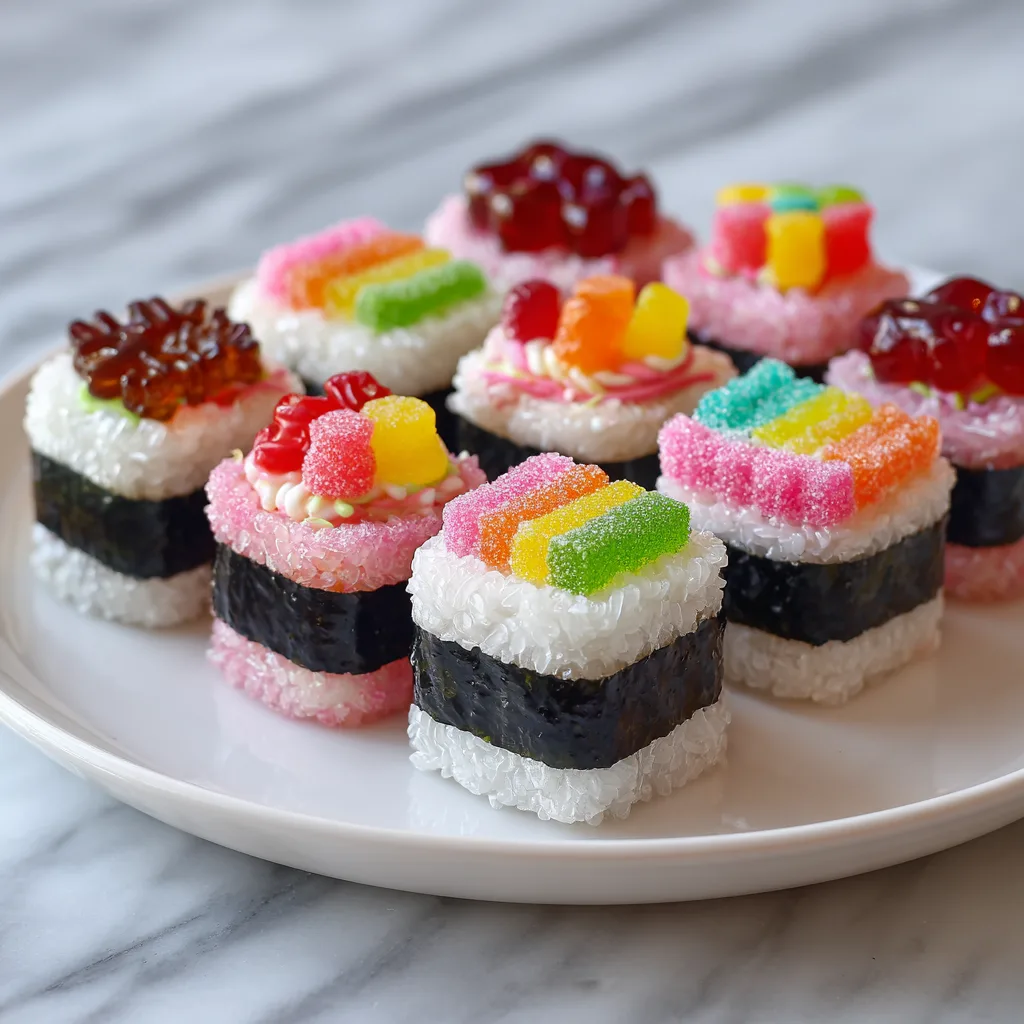
Food that looks like other food—often called trompe l’oeil in the culinary world—has a unique way of sparking joy. The magic of candy sushi lies in its clever substitutions: chewy, sweet fruit leather takes the place of savory nori seaweed; a sticky, buttery Rice Krispie mixture stands in for vinegared sushi rice; bright, tangy gummy worms and candies mimic fresh cuts of tuna, salmon, and cucumber; and a rich chocolate syrup drizzle acts as the perfect faux soy sauce or eel sauce. The result is a bite-sized treat that delights the eyes just as much as it satisfies the sweet tooth.
In this comprehensive guide, we will walk you through everything you need to know to master the art of making Candy Sushi Rolls. From the secrets of achieving the perfect marshmallow-to-cereal ratio, to the best rolling techniques, to creative variations that will make your dessert platter pop, this article has you covered. Get ready to roll up your sleeves and unleash your inner candy sushi chef!
The Magic Behind Candy Sushi: Why You’ll Love This Recipe
There are countless reasons why this recipe deserves a permanent spot in your dessert repertoire. First and foremost, it is incredibly fun to make. Unlike delicate pastries or complex baked goods that require precise measurements and delicate handling, candy sushi is forgiving, playful, and hands-on. It is an excellent recipe for getting kids involved in the kitchen. They can help mix the cereal, choose their favorite gummy fillings, and participate in the rolling process.
Furthermore, this recipe is entirely no-bake. Whether it’s a hot summer day when you refuse to turn on the oven, or you simply need a quick treat without the hassle of baking times and cooling racks, this recipe comes together on the stovetop (or even in the microwave) in mere minutes. The assembly is where the true fun begins, allowing you to channel your creativity into every individual piece.
Lastly, candy sushi is highly customizable. Do you have a favorite sour gummy? Roll it up! Do you prefer a chocolate cereal base over standard crisped rice? Swap it out! The combinations are as limitless as your imagination, making it easy to tailor the recipe to dietary preferences or specific party themes.
Essential Ingredients for Your Candy Sushi Platter
The beauty of this recipe lies in its simple, accessible ingredients. You can find everything you need in the baking and candy aisles of your local grocery store. Here is a detailed breakdown of what you will need to create your candy sushi masterpiece:
- Crisped Rice Cereal: The foundation of your faux sushi rice. You will need standard crisped rice cereal (like Rice Krispies). It provides the perfect crunch and texture.
- Mini Marshmallows: These act as the edible glue that holds your “rice” together. Mini marshmallows melt faster and more evenly than large ones. Use fresh marshmallows for the best texture; stale marshmallows can result in hard, brittle treats.
- Unsalted Butter: Butter adds richness and helps keep the marshmallow mixture soft and pliable. Using unsalted butter allows you to control the flavor profile.
- Fruit Rolls or Sour Belts: This is your “nori” (seaweed). Classic fruit roll-ups work beautifully, providing a smooth, dark exterior. Alternatively, sour rainbow belts add a magnificent pop of color and a tangy flavor contrast to the sweet marshmallow base.
- Gummy Candies: This is your “fish” and “vegetable” filling. Gummy worms, gummy bears, Swedish Fish, sour patch kids, or licorice ropes all work wonderfully. Choose candies with vibrant colors—reds, greens, oranges, and yellows—to mimic salmon, tuna, avocado, and tamago.
- Chocolate Syrup or Fudge Sauce: A drizzle of dark chocolate syrup perfectly replicates the look of soy sauce, teriyaki, or eel sauce, adding a touch of decadent chocolate flavor that pairs surprisingly well with the fruity gummies.
- Non-Stick Cooking Spray: Essential for greasing your hands, spatulas, and work surfaces. The marshmallow mixture is notoriously sticky, and cooking spray will save you from a messy disaster.
Step-by-Step Instructions: How to Roll Candy Sushi
Making candy sushi is a tactile, engaging process. Follow these detailed steps to ensure your rolls turn out tight, beautiful, and delicious.
- Prepare Your Workstation: Before you melt the marshmallows, get everything ready. Lay out a large sheet of wax paper or parchment paper on your counter. Lightly grease it with non-stick cooking spray. Unwrap your fruit rolls or sour belts and have your gummy candies sorted and ready to go.
- Melt the Butter and Marshmallows: In a large, heavy-bottomed saucepan, melt the butter over low heat. Once melted, add the mini marshmallows. Stir continuously with a silicone spatula (lightly greased) until the marshmallows are completely melted and smooth. Remove the pan from the heat immediately to prevent the sugar from burning or seizing.
- Fold in the Cereal: Pour the crisped rice cereal into the melted marshmallow mixture. Gently fold the cereal into the marshmallow until every piece is evenly coated. Do not crush the cereal; use a light hand to maintain that signature crunch.
- Form the Rice Base: Allow the mixture to cool for just a minute or two—enough so you can handle it without burning your hands, but while it is still warm and pliable. Grease your hands thoroughly with cooking spray or a little butter. Take a handful of the cereal mixture and press it flat onto your prepared wax paper. You want to create a thin rectangle, roughly the width of your fruit roll or sour belt, and about 1/4 to 1/2 inch thick. Press firmly so the “rice” holds together.
- Add the “Nori” and Fillings: Place a piece of fruit leather or a sour belt horizontally across the top of your flattened cereal rectangle. Lay your chosen gummy candies in a line across the center of the fruit leather. You can mix and match colors and flavors here.
- The Rolling Process: This is the crucial step. Carefully lift the edge of the wax paper closest to you and use it to help fold the cereal mixture over the gummy candies. Press down firmly to encase the filling. Continue rolling the mixture forward, peeling back the wax paper as you go, until you have a tight, enclosed log. Pinch the seam slightly to seal it.
- Cool and Set: Allow the completed candy sushi logs to cool at room temperature for about 15 to 20 minutes. They need to firm up so they can be sliced cleanly. Do not put them in the refrigerator, as the cold can make the gummies hard and the rice krispies brittle.
- Slice the Rolls: Once set, transfer the logs to a cutting board. Using a sharp, lightly greased knife, slice the logs into 1-inch thick rounds. Use a gentle sawing motion to prevent squishing the delicate rolls.
- Garnish and Serve: Arrange the candy sushi slices beautifully on a platter. Right before serving, drizzle the rolls generously with chocolate syrup to mimic soy sauce. Serve immediately and enjoy the smiles!
Candy Sushi Rolls
Ingredients
Equipment
Method
- Prepare your workstation by laying out wax paper and lightly coating it with non-stick cooking spray. Have your fruit leather and gummies ready.
- In a large saucepan over low heat, melt the butter. Add the mini marshmallows and stir continuously until completely smooth and melted. Remove from heat immediately.
- Gently fold the crisped rice cereal into the melted marshmallows until evenly coated.
- Grease your hands well. Take a handful of the warm cereal mixture and press it flat onto the wax paper to form a thin rectangle, about 1/2 inch thick and the width of your fruit leather.
- Place a strip of fruit leather horizontally across the cereal. Arrange a line of gummy candies down the center of the fruit leather.
- Using the wax paper to help you, carefully roll the cereal mixture over the gummies, pressing firmly to create a tight, enclosed log. Pinch the seam to seal.
- Allow the logs to cool at room temperature for 15-20 minutes until firm.
- Using a greased, sharp knife, slice the logs into 1-inch thick sushi rounds.
- Arrange on a platter and drizzle with chocolate syrup right before serving. Enjoy!
Notes
Pro Tips for Candy Sushi Success
While this recipe is beginner-friendly, a few professional tips can elevate your candy sushi from good to spectacular:
Mastering the Marshmallow: The key to a perfect cereal treat base is fresh marshmallows and gentle heat. Old marshmallows have lost their moisture and will result in a hard, rocky texture. Always melt over low heat; high heat causes the sugar to crystallize, which also leads to rock-hard treats.
The Power of Greasing: We cannot stress this enough: grease everything. Grease your hands, your spatula, your wax paper, and your knife. The marshmallow mixture is incredibly sticky, and cooking spray is your best defense against a frustrating kitchen experience.
Rolling Techniques: If you want truly authentic-looking rolls, consider using a real bamboo sushi mat lined with wax paper. The mat helps apply even pressure, resulting in perfectly cylindrical rolls that slice beautifully.
Slicing Secrets: To get clean, sharp cuts without compressing the roll, wipe your knife with a damp paper towel and lightly re-grease it between every few cuts. This prevents the marshmallow from building up on the blade and tearing the delicate fruit leather.
Delicious Variations to Try
Once you have mastered the basic recipe, the fun really begins. Here are some fantastic variations to customize your candy sushi platter:
- Nigiri Style: Instead of rolling, form small, oval-shaped mounds of the cereal mixture. Top each mound with a single gummy fish (like a Swedish Fish) and wrap a thin strip of fruit leather around the middle to bind it together, just like traditional Tamago or Eel nigiri.
- Chocolate Lover’s Sushi: Use chocolate crisped rice cereal instead of the regular kind. Substitute the gummy candies with chocolate-covered espresso beans, mini peanut butter cups, or chocolate chunks.
- Tropical Fruit Sushi: Mix toasted coconut flakes into your marshmallow-cereal base. Use mango or pineapple flavored fruit leather, and fill the rolls with tropical-flavored gummy candies.
- The “Spicy Tuna” Roll: Roll your sushi using the standard method, but toss your gummy fillings in a tiny pinch of chili powder or Tajin before rolling for a sweet, sour, and slightly spicy kick!
- Sashimi Slices: Skip the cereal altogether for a few pieces. Simply slice different colors of gummy blocks or layered fruit leathers and arrange them on the platter like fresh sashimi.
Serving Suggestions and Presentation
Presentation is half the fun with candy sushi. To really sell the illusion, serve your dessert just like real sushi. Arrange the colorful rolls on a minimalist white or slate platter. Provide small ramekins filled with extra chocolate syrup (your “soy sauce”) for dipping.
For a realistic touch of “wasabi,” take a spoonful of green buttercream frosting or green-tinted marshmallow fondant and shape it into a small dollop on the side of the plate. You can also shred some pink fruit leather to mimic pickled ginger. Don’t forget to provide chopsticks—eating candy sushi with chopsticks makes the experience infinitely more entertaining for both kids and adults!
Storage and Freezing Instructions
Candy sushi is best enjoyed on the day it is made, when the cereal is crunchy and the marshmallows are soft. However, if you have leftovers or need to make them slightly ahead of time, proper storage is crucial.
Room Temperature: Store uncut candy sushi logs or sliced pieces in an airtight container at room temperature for up to 2 days. Place a sheet of wax paper between layers if you must stack them, to prevent sticking. Do not refrigerate, as the cold environment will draw moisture out of the gummy candies making them tough, and will turn the rice cereal rock hard.
Freezing: We do not recommend freezing candy sushi. The freezing and thawing process drastically alters the texture of both the gummy candies and the marshmallow cereal base, often resulting in a soggy, unappealing mess.
Frequently Asked Questions
Can I use a different type of cereal?
Yes! While crisped rice cereal looks the most like actual sushi rice, you can use almost any cereal. Fruity, colorful cereals add a vibrant twist, while puffed wheat or corn cereals offer different textures.
My cereal mixture is too hard to roll. What went wrong?
This usually happens if the marshmallows were old, if the heat was too high during melting, or if the mixture was allowed to cool for too long before rolling. Next time, use fresh marshmallows, low heat, and roll while the mixture is still warm and pliable.
Can I make this dairy-free or vegan?
Absolutely. Substitute the standard butter with a high-quality vegan butter or coconut oil. Swap the regular marshmallows for a vegan marshmallow brand. Be sure to check your gummy candies and fruit leathers, as some contain gelatin (an animal byproduct); look for pectin-based alternatives.
How far in advance can I make this for a party?
For the best texture, make the candy sushi no more than 12-24 hours before your event. Store the unsliced logs in an airtight container at room temperature, and slice them just before serving to prevent the edges from drying out.
Enjoy creating, rolling, and devouring these delightful Candy Sushi Rolls. They are guaranteed to bring a burst of color, a touch of whimsy, and a lot of sweet satisfaction to your next gathering. Happy rolling!