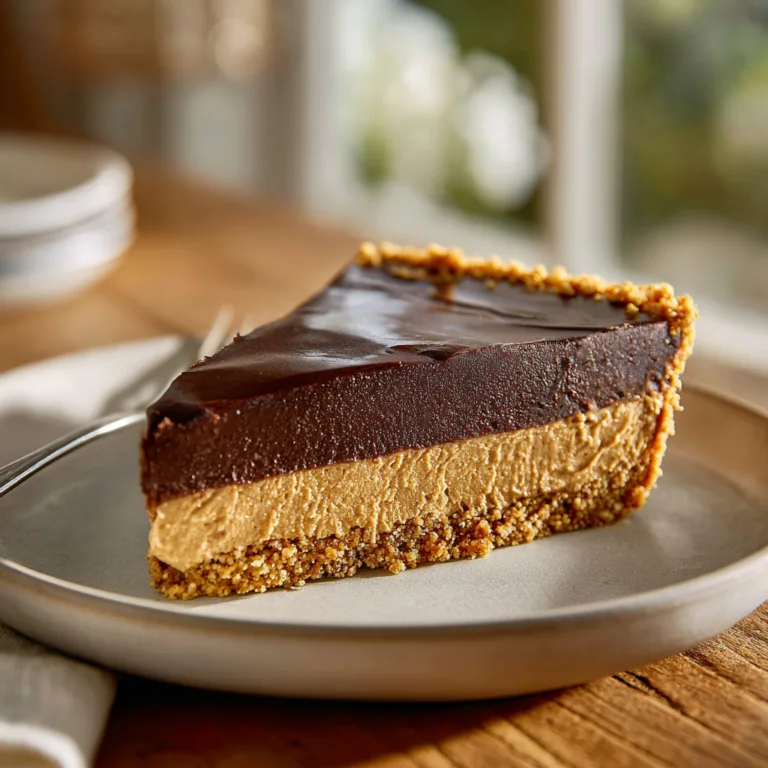
The Ultimate No-Bake Peanut Butter Oreo Pie
There are few flavor combinations in the culinary world as universally adored and inherently comforting as peanut butter and chocolate. It is a pairing that spans generations, uniting sweet tooths across the globe. But when you take that classic duo and elevate it by introducing the iconic, nostalgic crunch of Oreo cookies, you cross the threshold from a simple dessert into the realm of absolute decadence. Welcome to the ultimate dessert experience: the No-Bake Peanut Butter Oreo Pie. This pie is a masterpiece of contrasting textures and complementary flavors, boasting a buttery, dark chocolate cookie crust, a hidden layer of rich chocolate ganache, and a towering, cloud-like peanut butter filling studded with even more cookie goodness. The best part? You do not even need to turn on your oven to create it.
Whether you are preparing for a summer barbecue where the thought of baking is unbearable, hosting a holiday dinner where oven space is at a premium, or simply craving a high-impact, low-effort weekend treat, this pie is the answer. It looks like it came straight out of a gourmet bakery’s display case, yet it comes together with simple, accessible ingredients and straightforward techniques. Prepare to be asked for the recipe every time you serve this show-stopping dessert.
The Magic of the Peanut Butter and Chocolate Pairing
To truly appreciate this pie, we must first understand why peanut butter and chocolate work so harmoniously together. The secret lies in the scientific and sensory contrast between the two ingredients. Chocolate, particularly the dark, slightly bitter cocoa found in Oreo cookies, provides a deep, earthy, and complex flavor profile. It is rich and melts beautifully on the tongue. Peanut butter, on the other hand, brings a roasted, nutty, and slightly salty element to the table.
When combined, the salt in the peanut butter enhances the sweetness of the chocolate, while the fat content in both ingredients creates an incredibly luxurious mouthfeel. The addition of cream cheese and heavy whipping cream in this specific recipe introduces a necessary tang and lightness, preventing the pie from becoming overly heavy or cloying. The resulting filling is reminiscent of a peanut butter mousse or a no-bake cheesecake—rich in flavor, yet astonishingly light in texture.
The Anatomy of the Perfect Peanut Butter Oreo Pie
This dessert is built in distinct, deliberate layers, each contributing a vital texture and flavor to the overall experience. Let’s break down the anatomy of this spectacular pie:
1. The Buttery Oreo Crust
The foundation of any great pie is its crust. For this recipe, we bypass traditional pastry in favor of a simple, sturdy, and intensely chocolatey Oreo cookie crust. By pulsing whole Oreos (filling included!) with melted butter, you create a mixture that easily presses into your pie dish. When chilled, the butter solidifies, creating a firm base that contrasts beautifully with the soft filling above. The filling inside the cookies acts as an additional binder and adds a touch of vanilla sweetness to the crust.
2. The Surprise Chocolate Ganache Layer
Look closely at a slice of this pie, and you will notice a distinct, dark ribbon resting just above the crust and below the peanut butter filling. This is the secret weapon: a thin layer of chocolate ganache. Made simply by melting semi-sweet chocolate chips with a splash of heavy cream, this layer serves two purposes. First, it acts as a moisture barrier, preventing the creamy filling from making the crust soggy. Second, it provides a concentrated punch of dense chocolate flavor that bridges the gap between the crunchy crust and the airy peanut butter mousse.
3. The Fluffy Peanut Butter Mousse Filling
This is the star of the show. The filling is a carefully balanced mixture of softened cream cheese, creamy peanut butter, powdered sugar, vanilla extract, and freshly whipped heavy cream. The cream cheese provides structure and a subtle tang, the peanut butter delivers the dominant flavor, and the whipped cream folds in crucial pockets of air, resulting in a texture that is impossibly light and fluffy. To tie everything together, roughly chopped Oreos are gently folded into this mixture, ensuring a satisfying crunch in every single bite.
4. The Garnishes
A pie this magnificent deserves an aesthetic finish. A piping of extra peanut butter whipped cream around the border not only looks professional but adds extra creaminess. Crowning the pie with mini Oreos and a dusting of cookie crumbs hints at the flavors waiting inside and provides a beautiful, bakery-style presentation.

Detailed Ingredient Breakdown: What You Need and Why
To achieve the perfect texture and flavor, it is crucial to use the right ingredients. Here is a deep dive into what you will need for your shopping list:
- Oreo Cookies: You will need standard Oreos for the crust and the filling. Avoid Double Stuf for the crust, as the extra cream can make the base too greasy and prone to crumbling. Save the mini Oreos purely for the decorative topping.
- Unsalted Butter: Used to bind the crust. We use unsalted butter to control the sodium level, as peanut butter already contains a fair amount of salt.
- Semi-Sweet Chocolate Chips: These will be melted down with cream to create the ganache layer. Semi-sweet is preferred over milk chocolate to balance the overall sweetness of the pie.
- Cream Cheese: You must use full-fat, brick-style cream cheese. Do not use whipped cream cheese or cream cheese spread from a tub, as they contain higher water contents and will prevent your pie from setting properly. It is absolutely vital that the cream cheese is softened to room temperature before mixing to avoid a lumpy filling.
- Creamy Peanut Butter: Stick to commercial, processed peanut butters (like Jif or Skippy) for this recipe. Natural peanut butters, which separate and have oil resting on top, can cause the filling to separate or become grainy due to their unstable oil content.
- Powdered Sugar: Also known as confectioners’ sugar. It sweetens the filling and dissolves instantly without leaving a gritty texture, which is essential for a smooth, no-bake filling.
- Vanilla Extract: Pure vanilla extract enhances the chocolate and peanut butter flavors, adding depth and warmth to the overall profile.
- Heavy Whipping Cream: Used in both the ganache and the filling. It must be very cold when you whip it to achieve stiff peaks, which will provide the necessary volume and structure to hold the pie up.
Step-by-Step Instructions for Flawless Execution
While this is a no-bake recipe, paying attention to temperature and technique is key to success. Follow these comprehensive steps:
- Prepare the Crust: Place the whole Oreos into a food processor and pulse until they form fine crumbs. Alternatively, place them in a heavy-duty ziplock bag and crush them with a rolling pin. Transfer the crumbs to a bowl, pour in the melted butter, and mix until the texture resembles wet sand. Firmly press this mixture into the bottom and up the sides of a 9-inch deep-dish pie plate or springform pan. Use the flat bottom of a measuring cup to pack it down tightly. Place the crust in the freezer to set while you prepare the next layer.
- Create the Ganache: In a microwave-safe bowl, combine the semi-sweet chocolate chips and 3 tablespoons of heavy cream. Microwave in 20-second intervals, stirring vigorously after each, until the mixture is completely smooth and glossy. Pour this ganache over the chilled crust, spreading it into an even layer over the bottom. Return the pan to the freezer for 15 minutes to firm up.
- Whip the Cream: In a chilled metal or glass bowl, use an electric mixer to whip the cold heavy cream until stiff peaks form. Be careful not to over-whip, or it will turn into butter. Set this aside in the refrigerator.
- Beat the Base: In a large mixing bowl, beat the room-temperature cream cheese and peanut butter together on medium speed until completely smooth, creamy, and free of any lumps. Scrape down the sides of the bowl as needed. Add the powdered sugar and vanilla extract, beating again until fully incorporated.
- Fold and Assemble: Remove your whipped cream from the fridge. Take one-third of the whipped cream and gently fold it into the peanut butter mixture to lighten it. Then, fold in the remaining whipped cream very gently, using a sweeping motion from the bottom of the bowl over the top. You want to keep as much air in the mixture as possible. Finally, fold in the chopped Oreos.
- Chill to Set: Spoon the fluffy filling into your prepared pie crust, smoothing the top with a spatula. Cover the pie loosely with plastic wrap and place it in the refrigerator. It must chill for a minimum of 4 to 6 hours, though overnight is highly recommended for the cleanest slices.
- Garnish and Serve: Just before serving, whip a little extra heavy cream with peanut butter and powdered sugar if desired, and pipe it around the edges. Top generously with mini Oreos and extra cookie crumbs. Slice with a sharp knife wiped clean between cuts.
Pro Tips for No-Bake Success
To elevate your pie from good to professional-quality, keep these essential baker’s tips in mind:
- Room Temperature is Non-Negotiable: If your cream cheese is even slightly cold, it will not blend smoothly with the peanut butter, resulting in unappetizing little white lumps throughout your brown pie filling. Leave it on the counter for at least two hours before beginning.
- Chill Your Equipment: When whipping the heavy cream, place your mixing bowl and the beaters in the freezer for 10 minutes beforehand. Cold equipment helps the cream whip up faster and achieve better, more stable volume.
- Clean Slices: Because this pie is rich and sticky, slicing it can be messy. For bakery-worthy, picture-perfect slices, run a large, sharp chef’s knife under very hot water, wipe it completely dry with a towel, and then make your cut. Repeat the hot water and wiping process for every single slice.
Delicious Variations to Try
Once you have mastered the classic recipe, feel free to experiment with these fun flavor twists:
- The Double Peanut Butter: Swap the Oreo cookie crust for a Nutter Butter cookie crust! Simply replace the Oreos gram-for-gram with Nutter Butters and proceed with the melted butter.
- Reese’s Overload: Instead of chopping up Oreos to fold into the filling, chop up Reese’s Peanut Butter Cups. You can also press whole peanut butter cups into the bottom of the crust before pouring in the filling.
- Salted Caramel Drizzle: Right before serving, drizzle the top of the pie generously with a high-quality salted caramel sauce. The salt will perfectly accentuate the peanut butter.
Storage and Freezing Instructions
This pie is an excellent make-ahead dessert because it actually tastes better and sets up firmer after a day in the fridge.
Refrigerator Storage: Keep the pie tightly covered with plastic wrap or stored in an airtight pie carrier in the refrigerator. It will stay fresh and delicious for up to 5 days.
Freezing the Pie: This pie freezes remarkably well, essentially turning into an ice cream pie! To freeze, wrap the entire pie (or individual slices) tightly in a layer of plastic wrap, followed by a layer of aluminum foil to prevent freezer burn. Freeze for up to 3 months. When ready to eat, you can serve it semi-frozen, or let it thaw in the refrigerator overnight before serving.
Frequently Asked Questions (FAQs)
Can I use Cool Whip instead of heavy whipping cream?
Yes, absolutely. If you want to save a step and ensure a very stable pie, you can substitute the freshly whipped cream with an equal amount (about one 8-ounce tub) of thawed Cool Whip. Fold it into the cream cheese mixture exactly as directed.
Why is my filling runny?
A runny filling usually occurs for one of three reasons: the heavy cream was not whipped to stiff enough peaks, the mixture was over-stirred rather than gently folded (which deflates the air), or the pie simply hasn’t chilled long enough. Ensure a minimum of 4 hours in the fridge.
Can I make this gluten-free?
Yes! Simply purchase certified gluten-free Oreo cookies (which are widely available in most major grocery stores) and use them for the crust and the filling. All other ingredients in this recipe are naturally gluten-free.
Prepare to indulge in a dessert that requires minimal effort but delivers maximum flavor. This No-Bake Peanut Butter Oreo Pie is a testament to the fact that sometimes, the most unforgettable treats don’t require an oven at all. Enjoy every creamy, crunchy, peanut-buttery bite!
Peanut Butter Oreo Pie
Ingredients
Equipment
Method
- Pulse 24 Oreo cookies in a food processor until fine crumbs form. Transfer to a bowl, add melted butter, and mix until combined. Press firmly into the bottom and up the sides of a 9-inch pie dish. Freeze for 10 minutes.
- In a small microwave-safe bowl, combine chocolate chips and 3 tablespoons heavy cream. Microwave in 20-second bursts, stirring until smooth. Pour over the chilled crust and spread evenly. Return to freezer.
- In a chilled bowl, use an electric mixer to whip 1 cup of cold heavy cream until stiff peaks form. Set aside.
- In a large bowl, beat the softened cream cheese and peanut butter until completely smooth and creamy. Add the powdered sugar and vanilla extract, and beat until incorporated.
- Gently fold the whipped cream into the peanut butter mixture until no white streaks remain, being careful not to deflate the air. Fold in the 10 roughly chopped Oreos.
- Spread the filling evenly into the pie crust over the ganache layer. Smooth the top.
- Refrigerate the pie for at least 4-6 hours, or overnight, until completely firm and set.
- Before serving, garnish with extra whipped cream, mini Oreos, and cookie crumbs. Slice with a hot, clean knife.