Tiramisu Brownies Recipe
Tiramisu Brownies: The Ultimate Coffee-Lover’s Indulgence
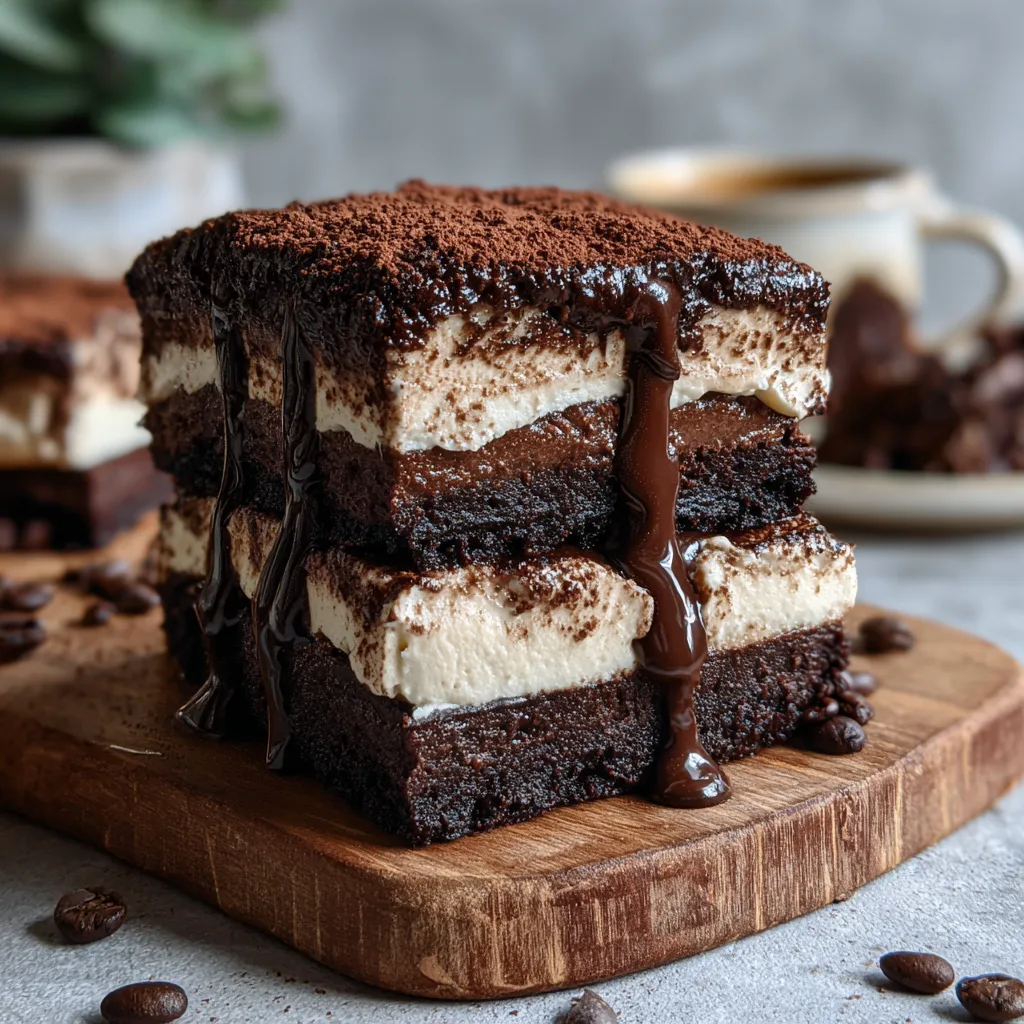
There are days when you want a brownie, and there are days when you want a sophisticated Italian dessert. But what if you didn’t have to choose? Enter the Tiramisu Brownie. This recipe is the culinary equivalent of a warm hug and a shot of espresso. It takes the dense, fudgy, chocolatey goodness of a classic American brownie and tops it with the light, creamy, coffee-kissed elegance of Tiramisu. The result is a layered dessert that is visually stunning, incredibly delicious, and surprisingly simple to make.
The beauty of this dish lies in the contrast. You have the dark, heavy, slightly bitter cocoa base which provides a chewy texture. Then, you hit the layer of cool, sweet mascarpone cream, which lightens the palate. Finally, the dusting of cocoa powder and the kick of espresso tie it all together. It is a dessert that looks like it came from a high-end bakery but is perfectly achievable in your home kitchen. Whether you are hosting a dinner party or just treating yourself on a Friday night, these bars are a guaranteed showstopper.
Why This Mashup Works
Fusion desserts can sometimes feel forced, but Tiramisu and Brownies are natural soulmates. Both rely heavily on high-quality cocoa and fat (butter in brownies, mascarpone in tiramisu) to carry flavor. The coffee enhances the chocolate notes in the brownie, making it taste “more like chocolate” rather than just mocha. Meanwhile, the dense texture of the brownie acts as a much sturdier base than the traditional ladyfingers (savoiardi), making these easy to pick up and eat with your hands—no spoon required.
- Texture Play: The chewiness of the brownie against the fluffiness of the cream is incredibly satisfying.
- Make-Ahead Friendly: These actually taste better after sitting in the fridge for a few hours, making them perfect for meal prep or parties.
- Customizable Strength: You control the caffeine. Want a subtle hint? Use decaf. Want a wake-up call? Use extra espresso powder.
- No Raw Eggs: Unlike traditional Tiramisu which often uses raw eggs in the cream, this topping is egg-free, making it safer and easier to store.
Ingredients Breakdown
To get that perfect “wet” fudge texture and stable cream layer, specific ingredients are key. Do not substitute these if you want the best results!
Tiramisu Brownies
Ingredients
Equipment
Method
- Preheat oven to 350°F (175°C). Line an 8×8 inch pan with parchment paper.
- Melt butter and chopped chocolate together in a microwave-safe bowl. Whisk in espresso powder until smooth.
- In a large bowl, whisk eggs, sugar, and vanilla vigorously for 2 minutes until pale.
- Whisk the chocolate mixture into the egg mixture. Fold in flour, 1/4 cup cocoa powder, and salt until just combined.
- Pour batter into pan and bake for 25-30 minutes. Cool COMPLETELY in the pan (essential).
- In a chilled bowl, beat mascarpone and powdered sugar until smooth. Add heavy cream and vanilla; whip until stiff peaks form.
- Spread cream over cooled brownies. Chill in fridge for at least 2 hours to set.
- Dust generously with cocoa powder before slicing and serving.
Notes
The Fudgy Brownie Base
- Unsalted Butter: Melted butter, rather than creamed butter, is the secret to a dense, fudgy brownie. If you cream it, you add air, making it cakey.
- Dark Chocolate (60-70%): Use a high-quality chocolate bar, not chips. Chips contain stabilizers that prevent them from melting smoothly.
- Espresso Powder: This is non-negotiable for the “Tiramisu” flavor profile. It deepens the chocolate flavor and adds that signature coffee kick.
- Cocoa Powder: Dutch-processed is best for a darker color and smoother flavor.
- Sugars: A mix of white and brown sugar gives you the crackly top (white) and the moist, chewy interior (brown).
The Mascarpone Cream Layer
- Mascarpone Cheese: This Italian cream cheese is richer and less tangy than American cream cheese. It provides that authentic milky, sweet flavor.
- Heavy Whipping Cream: You need high-fat cream to whip up stiff peaks that will hold their shape when sliced.
- Confectioners’ Sugar: Dissolves instantly in the cold cream for a smooth texture.
- Vanilla Extract: Adds aroma. You could also use a splash of Marsala wine or coffee liqueur (like Kahlúa) here for an adult version.
Step-by-Step Instructions
1. Prepare the Brownie Batter
Preheat your oven to 350°F (175°C). Line an 8×8 inch baking pan with parchment paper, leaving an overhang on the sides for easy removal later. In a microwave-safe bowl (or a saucepan), melt the butter and chopped dark chocolate together. Stir until glossy and smooth. Whisk in the espresso powder while the mixture is hot so it dissolves completely.
2. Whisk the Eggs and Sugar
In a separate large bowl, whisk the eggs, granulated sugar, and brown sugar vigorously for about 2-3 minutes. You want the mixture to become pale and slightly thick. This step helps create that shiny, paper-thin crust on top of the brownie layer.
3. Combine and Bake
Pour the melted chocolate mixture into the egg mixture and whisk to combine. Gently fold in the flour, cocoa powder, and salt. Do not overmix—stop as soon as the flour streaks disappear. Pour the batter into your prepared pan and smooth the top. Bake for 25-30 minutes. A toothpick inserted should come out with moist crumbs, not wet batter. Crucial Step: Let the brownies cool completely in the pan. If they are even slightly warm, the cream topping will melt.
4. Make the Mascarpone Filling
In a chilled bowl, beat the cold mascarpone cheese and confectioners’ sugar until smooth. Add the heavy cream and vanilla extract. Switch to a whisk attachment and whip on medium-high speed until stiff peaks form. Be careful not to overbeat, or the mascarpone can curdle and turn into butter.
5. Assemble the Layers
Once the brownies are stone-cold, spread the mascarpone cream evenly over the top using an offset spatula. Create swirls or smooth it out flat depending on your preference. Place the pan in the refrigerator for at least 2 hours to let the cream set.
6. The Final Touch
Just before serving, lift the brownies out of the pan using the parchment paper handles. Dust the top generously with cocoa powder using a fine-mesh sieve. Slice into 9 large squares or 16 smaller bites. For clean cuts, wipe your knife with a warm damp cloth between each slice.
The Science of the Perfect Slice
Getting neat layers requires patience and the right temperature. The brownie layer needs to be dense enough to support the cream but soft enough to bite through easily. Chilling the assembled dessert is vital because it firms up the fats in both the brownie (butter/chocolate) and the topping (mascarpone/cream). When you cut it cold, you get sharp, distinct layers. If you try to cut it at room temperature, the cream might squish out the sides.
Variations and Customizations
Make this recipe your own with these creative twists:
- The Boozy Version: Brush the cooled brownie layer with a tablespoon of coffee liqueur, dark rum, or Marsala wine before adding the cream. This mimics the soaked ladyfingers in traditional Tiramisu.
- The Crunch Factor: Fold chopped chocolate covered espresso beans into the cream layer for a surprising texture contrast.
- Mocha Ripple: Swirl a little bit of chocolate ganache into the mascarpone cream before spreading it for a marbled look.
- Gluten-Free: These brownies are very forgiving. Substitute the all-purpose flour for a 1:1 gluten-free baking blend. The dense texture means you won’t even notice the difference.
Expert Tips for Success
Room Temp vs. Cold: For the brownie batter, room temperature eggs mix better. However, for the topping, your heavy cream and mascarpone must be cold straight from the fridge to whip properly.
Quality Cocoa: Since the dusting on top is the first thing you taste, use a high-quality cocoa powder (like Valrhona or Ghirardelli). Cheap cocoa can taste chalky and overly bitter.
The Coffee Soak: If you want an even stronger coffee flavor, you can brush the brownie with strong brewed espresso, but be careful not to make it soggy. The espresso powder in the batter is usually sufficient.
Serving and Storage
Serving: These are best served slightly chilled. The cold cream against the room-temperature brownie (if you let it sit for 10 minutes) creates a lovely temperature contrast.
Storage: Because of the dairy in the topping, these must be stored in the refrigerator. Keep them in an airtight container for up to 4 days. They actually taste better on day 2 as the flavors meld.
Freezing: You can freeze the brownie base, but mascarpone cream does not freeze well—it tends to separate and become grainy when thawed. It is best to freeze the brownies plain and make the topping fresh when you are ready to serve.
Conclusion
Tiramisu Brownies are the perfect bridge between a casual snack and a fancy dessert. They offer the deep, comforting satisfaction of chocolate with the uplift of coffee and cream. They are easy enough for a novice baker but impressive enough to bring to a celebration. Once you try this combination, you might never go back to plain brownies again. So brew a fresh pot of coffee, grab your mixing bowl, and get ready to bake your new favorite treat.