Fudgy Chocolate Cherry Brownies
The Ultimate Fudgy Chocolate Cherry Brownies: A Decadent Dessert Experience
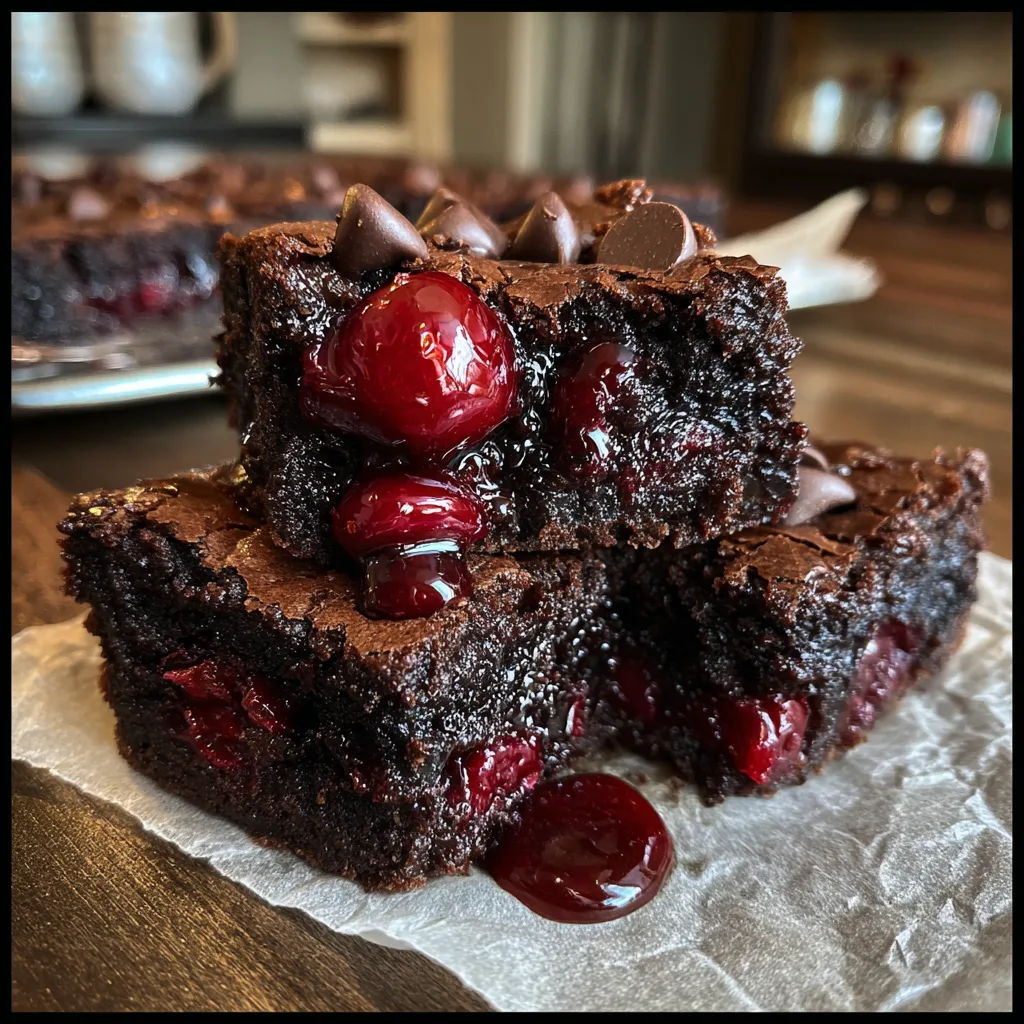
There are few flavor combinations in the culinary world as timeless and seductive as chocolate and cherry. It is a pairing that evokes the classic elegance of a Black Forest cake but delivers it with the comforting, chewy satisfaction of a homemade brownie. These Chocolate Cherry Brownies are not just a dessert; they are an experience. Imagine sinking your teeth into a dense, fudgy chocolate base, only to be met with bursts of sweet, tart cherries and pockets of molten chocolate chips. It is the ultimate treat for bakesales, holiday gatherings, or simply those Tuesday nights when you need a little something special.
In this comprehensive guide, we will walk you through exactly how to achieve that perfect crinkly top, the gooey center, and the ideal distribution of fruit. Whether you are a seasoned baker or a novice in the kitchen, this recipe is designed to be foolproof, yielding results that look like they came straight from a high-end bakery window. We will explore the science behind the fudge factor, the best type of cherries to use, and tips to ensure your brownies stay moist for days.
Why This Recipe Works
Many brownie recipes fall into two camps: cakey or fudgy. This recipe leans unapologetically towards the fudgy side. By using melted butter rather than creamed butter, we reduce the amount of air incorporated into the batter, ensuring a dense texture. The addition of brown sugar adds moisture and a subtle caramel note that complements the deep cocoa flavor. But the real star here is the moisture from the cherries. As they bake, they release their juices into the batter, creating a texture that is impossibly soft and rich. The contrast between the dark, slightly bitter chocolate and the bright, acidic pop of the cherry creates a flavor profile that is balanced and sophisticated, yet utterly comforting.
Ingredients
To make these show-stopping brownies, you will need the following ingredients. Quality matters here, especially with the chocolate, so choose the best you can find.
- Unsalted Butter: 1 cup (2 sticks), melted and slightly cooled. Using unsalted allows you to control the sodium level.
- Granulated Sugar: 1 cup. Essential for the structure and the classic crackly top.
- Brown Sugar: 1 cup, packed. This adds chewiness and moisture.
- Eggs: 4 large eggs, room temperature. These bind the brownies together.
- Vanilla Extract: 1 tablespoon. A generous amount enhances the chocolate flavor.
- All-Purpose Flour: 1 cup. Enough to hold the structure without making them cakey.
- Unsweetened Cocoa Powder: 1 cup. Dutch-processed is recommended for a darker color and smoother flavor.
- Salt: 1/2 teaspoon. To balance the sweetness.
- Semi-Sweet Chocolate Chips: 1 ½ cups. Divided use (some for the batter, some for topping).
- Cherries: 1 ½ cups. You can use pitted fresh cherries (halved), drained jarred cherries, or cherry pie filling (for a gooier top as seen in the photos).
Kitchen Equipment Needed
Before you begin, ensure you have the following tools ready. This mise-en-place will make the baking process smooth and enjoyable.
- 9×9 inch Baking Pan: Metal pans are preferred over glass for brownies as they conduct heat more evenly.
- Parchment Paper: Essential for lifting the brownies out of the pan for clean cuts.
- Mixing Bowls: One large for wet ingredients, one medium for dry.
- Whisk and Spatula: A balloon whisk for the eggs and a silicone spatula for folding.
- Kitchen Scale: Optional, but weighing ingredients yields the most consistent results.
Instructions
Follow these step-by-step instructions to create the perfect batch of Chocolate Cherry Brownies.
Phase 1: Preparation
1. Preheat and Prep:
Preheat your oven to 350°F (175°C). Line your 9×9 inch baking pan with parchment paper, leaving an overhang on two sides to act as handles. Grease the parchment lightly with butter or cooking spray.
2. Melt the Butter:
Melt the butter in a microwave-safe bowl or in a saucepan over low heat. Let it cool slightly so it doesn’t scramble the eggs later. If you want an even deeper flavor, you can brown the butter slightly until it smells nutty.
Phase 2: The Batter
3. Whisk Sugars and Butter:
In a large mixing bowl, combine the melted butter, granulated sugar, and brown sugar. Whisk vigorously for about 1-2 minutes. This step is crucial; dissolving the sugar into the hot fat helps create that shiny, paper-thin crust on top.
4. Add Eggs and Vanilla:
Add the eggs one at a time, whisking well after each addition. Stir in the vanilla extract. The mixture should look glossy and slightly thickened.
5. Combine Dry Ingredients:
Sift the cocoa powder, flour, and salt directly into the wet mixture. Sifting is important here to remove any stubborn lumps of cocoa powder.
6. The Folding Technique:
Switch to a rubber spatula. Gently fold the dry ingredients into the wet ingredients. Do not overmix! Stop when you still see a few streaks of flour. Overmixing develops gluten, which leads to tough brownies.
Phase 3: Assembly and Baking
7. Add Mix-ins:
Fold in 1 cup of the chocolate chips and 1 cup of the cherries gently. Reserve the remaining chips and cherries for the top.
8. Pan and Top:
Pour the batter into the prepared baking pan and smooth the top with your spatula. Scatter the remaining ½ cup of chocolate chips and ½ cup of cherries over the surface. Press them down very lightly.
9. Bake:
Bake for 35-40 minutes. The edges should be set and firm, but the center should still have a slight jiggle. A toothpick inserted into the center should come out with moist crumbs, not wet batter. Note: If you hit a melted chocolate chip, it will look wet, so test a few spots.
10. Cool and Slice:
This is the hardest part: allow the brownies to cool completely in the pan. They continue to set as they cool. If you cut them while hot, they will fall apart. Once cool, lift them out using the parchment paper and slice into 9 large or 16 small squares.
Expert Tips for Perfect Brownies
The “Bloomed” Cocoa Hack
For an intense chocolate flavor, mix your cocoa powder into the melted hot butter before adding the sugar. This process, called “blooming,” releases the flavor compounds in the cocoa, making the brownies taste more chocolatey without adding extra sugar.
Cherry Selection
If you are using fresh cherries, make sure to pit them and pat them dry with a paper towel to avoid adding too much excess water to the batter. If you are using frozen cherries, do not thaw them; use them straight from the freezer, but add 2-3 minutes to the baking time. For the glossy look in the photo, canned cherry pie filling works exceptionally well as a topping swirl.
Cutting Clean Squares
To get those professional sharp edges, chill the brownies in the fridge for an hour after they have cooled to room temperature. Use a large chef’s knife, run it under hot water, wipe it dry, and make one clean cut. Repeat the heating and wiping for every single cut.
Variations to Try
While the classic chocolate cherry combination is divine, you can easily customize this recipe to suit your taste.
- Black Forest Cake Style: Add a tablespoon of Kirsch (cherry brandy) to the batter and top the finished, cooled brownies with a dollop of whipped cream and shaved chocolate.
- White Chocolate Twist: Swap the semi-sweet chocolate chips for high-quality white chocolate chunks. The creamy sweetness pairs beautifully with the tart cherries.
- Almond Crunch: Add ½ cup of sliced almonds or chopped walnuts to the batter. Almond extract can also be swapped for half of the vanilla extract, as almond and cherry are best friends flavor-wise.
- Gluten-Free Option: Substitute the all-purpose flour with a 1:1 gluten-free baking flour blend. Since brownies rely little on gluten for structure, the texture change is minimal.
Serving Suggestions
These brownies are rich enough to stand alone, but they can be elevated into a plated dessert suitable for a dinner party.
Warm and A La Mode: Microwave a brownie for 15 seconds and serve it with a scoop of vanilla bean ice cream. The contrast of hot fudge brownie and cold ice cream is unbeatable.
The Berry Coulis: drizzle a little raspberry or cherry sauce on the plate before placing the brownie. It adds a professional touch and extra tartness to cut through the rich chocolate.
Coffee Companion: Serve these alongside a strong espresso or a cappuccino. The bitterness of the coffee highlights the sweetness of the chocolate and cherries.
Fun Facts & Cultural Context
The Origins of the Brownie
Brownies are a distinctly American invention, originating in the late 19th century. Legends vary, but one popular story involves a housewife in Bangor, Maine, who forgot to add baking powder to her chocolate cake. The resulting flat, dense cake was so delicious she served it anyway. Another story credits the Palmer House Hotel in Chicago with creating a dessert for the 1893 World’s Columbian Exposition that could be easily eaten from a boxed lunch.
Why Cherries?
The combination of cherries and chocolate was popularized globally by the German “Schwarzwälder Kirschtorte” (Black Forest Gâteau). This cake layers chocolate sponge, whipped cream, and cherries soaked in Kirschwasser. Our brownie recipe borrows this iconic flavor profile, condensing the towering cake into a handheld, fudgy delight.
Storage and Freezing
Room Temperature: Store the brownies in an airtight container at room temperature for up to 3 days. If your kitchen is particularly hot, or if you used fresh fruit that is very juicy, you might want to refrigerate them after day 2.
Refrigerator: They will last up to a week in the fridge. Note that cold brownies will be much denser and chewier—almost like candy.
Freezing: These freeze beautifully. Wrap individual squares in plastic wrap and then place them in a zip-top freezer bag. They can be frozen for up to 3 months. Thaw on the counter for an hour before eating.
Conclusion
Baking is an act of love, and these Chocolate Cherry Brownies are a sure way to show it. Whether you are making them for a loved one, a friend, or just treating yourself, the process of melting chocolate and folding in sweet cherries is therapeutic, and the result is nothing short of spectacular. The deep, dark chocolate satisfies the soul, while the bright fruit brings a joyfulness to every bite. So, preheat that oven, grab your favorite mixing bowl, and get ready to bake the best brownies of your life.
Decadent Chocolate Cherry Brownies
Ingredients
Equipment
Method
- Preheat oven to 350°F (175°C). Line a 9×9 inch baking pan with parchment paper and lightly grease.
- In a large bowl, whisk together the melted butter, granulated sugar, and brown sugar until combined and slightly glossy.
- Add the eggs one at a time, whisking well after each addition. Stir in the vanilla extract.
- Sift in the flour, cocoa powder, and salt. Gently fold with a spatula until just combined and few flour streaks remain.
- Fold in 1 cup of chocolate chips and 1 cup of cherries.
- Pour batter into the prepared pan. Top with remaining chocolate chips and cherries.
- Bake for 35-40 minutes until edges are set and a toothpick inserted into the center comes out with moist crumbs.
- Cool completely in the pan before slicing to ensure they set properly.