No-Bake Easter Bunny Coconut Tails: The Ultimate Spring Dessert
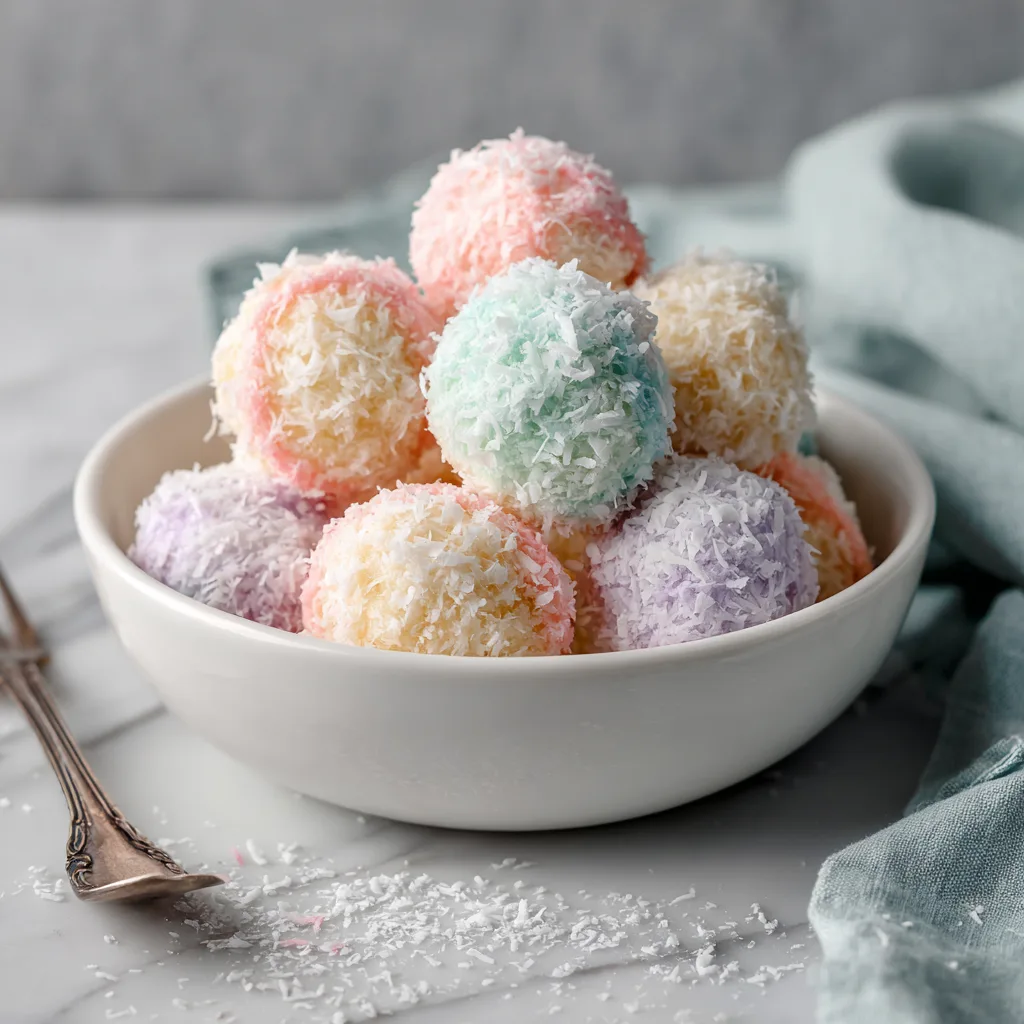
When spring finally arrives, bringing with it a vibrant array of blooming flowers and warmer breezes, our kitchens naturally transition from the heavy, spiced bakes of winter to light, colorful, and joyful treats. Easter, in particular, is a holiday that calls for playful, beautiful, and family-friendly desserts. Enter the delightful, whimsical, and utterly delicious No-Bake Easter Bunny Coconut Tails. These pastel-colored, bite-sized treats are essentially sweet cream cheese and coconut truffles rolled in vibrantly tinted shredded coconut, perfectly mimicking the fluffy tail of the Easter Bunny.
If you have been searching for a show-stopping yet incredibly simple recipe to bring to your spring gatherings, potlucks, or simply to make with your children on a sunny Saturday afternoon, look no further. This recipe checks every single box. It requires absolutely no oven time, utilizes straightforward pantry staples, and allows for a brilliant burst of creativity through customizable pastel colors. In this comprehensive guide, we will dive deep into exactly why these treats are the undisputed champions of Easter desserts, how to make them flawlessly every single time, and how to customize them to suit your family’s unique palate.
7 Reasons Bunny Coconut Tails Are Perfect for Easter
The image that inspired this recipe clearly states there are seven reasons why these bunny tails are the perfect Easter treat. Let’s break down exactly why these little pastel spheres deserve a permanent spot on your holiday menu.
1. They Are Completely No-Bake
Holidays are inherently stressful, and oven space is often at a premium when you are preparing a large Easter ham, scalloped potatoes, or roasted spring vegetables. The beauty of these coconut tails is that they require absolutely zero oven time. You simply mix, roll, chill, and coat. This not only saves you valuable kitchen real estate but also means you won’t be heating up your house on a potentially warm spring day. It’s a stress-free dessert solution that yields high-impact results.
2. Incredibly Kid-Friendly to Make
Easter is a holiday centered around children, from egg hunts to visiting the Easter Bunny. Bringing that magic into the kitchen is a wonderful way to build family traditions. Because there is no raw flour, no raw eggs, and no hot oven involved, children of almost any age can participate in making these. They will absolutely love getting their hands slightly sticky while rolling the dough into balls, and they will be mesmerized by the process of shaking the shredded coconut in bags with food coloring to create magical pastel shades.
3. Visually Stunning Pastel Aesthetic
We eat with our eyes first, and nothing screams “Springtime” quite like a beautifully curated palette of pastel colors. By dividing your shredded coconut and tinting it into soft baby blues, delicate blush pinks, sunshine yellows, mint greens, and lavender purples, you create a dessert that doubles as a centerpiece. Piled high in a beautiful bowl, they look exactly like a collection of dyed Easter eggs, making them an instant conversation starter at any gathering.
4. Perfectly Portion-Controlled
After a heavy holiday meal, many guests are too full for a massive slice of layer cake or a heavy pastry. These bunny tails are bite-sized truffles, offering the perfect, satisfying pop of sweetness without the commitment of a large dessert. Guests can easily grab one or two as they mingle, making them the ultimate finger-food sweet treat for buffets and casual holiday grazing.
5. Make-Ahead Magic
Any recipe that can be prepared days in advance is a massive win for holiday hosts. These coconut tails actually taste better when they have had time to chill and allow their flavors to meld in the refrigerator. You can prepare the entire batch two to three days before Easter Sunday, store them in an airtight container in the fridge, and simply pull them out right before serving. They also freeze exceptionally well, meaning you can prep them weeks in advance if needed.
6. Simple, Accessible Ingredients
There is no need to visit a specialty grocery store or order obscure ingredients online for this recipe. Everything you need is likely already in your pantry or easily accessible at your standard local supermarket. Cream cheese, powdered sugar, vanilla extract, and shredded coconut form the simple, humble base of these extraordinary treats. The affordability of these ingredients also makes this a budget-friendly option for feeding a large crowd.
7. Naturally Gluten-Free (and Easily Adaptable)
Catering to various dietary restrictions can be a headache during the holidays. Thankfully, these bunny coconut tails are naturally gluten-free, provided you check the labels on your specific brand of powdered sugar and food coloring. This makes them a safe and delicious option for guests with Celiac disease or gluten sensitivities. Furthermore, they can easily be made vegan by swapping out the standard cream cheese for a plant-based alternative.
Detailed Ingredient Breakdown
To achieve the perfect texture and flavor, it is crucial to understand the role of each ingredient in this simple recipe. Quality matters, even in no-bake treats.
- Cream Cheese: This acts as the binder and the primary flavor profile of the “dough.” You must use full-fat, brick-style cream cheese. Cream cheese spread from a tub contains too much water and will result in a soggy, sticky mess that refuses to hold its shape. Ensure the cream cheese is softened to room temperature so it blends smoothly without lumps.
- Powdered Sugar (Confectioners’ Sugar): This sweetens the truffles and thickens the cream cheese to create a rollable dough. Do not substitute with granulated sugar, as it will make the texture unpleasantly gritty. For the smoothest consistency, sift your powdered sugar before mixing.
- Vanilla Extract: A crucial background note that elevates the overall flavor. Opt for pure vanilla extract rather than imitation vanilla for the best, most authentic taste. Clear vanilla extract is also a great option if you want to ensure your truffle centers remain perfectly stark white.
- Shredded Coconut (Sweetened): You will need this for both the inside of the truffle and the colorful exterior coating. Sweetened shredded coconut provides the classic, chewy macaroon texture. If you prefer a less sweet treat, you can use unsweetened desiccated coconut, but note that the texture will be slightly drier and finer.
- Liquid or Gel Food Coloring: To achieve those beautiful spring pastels. Liquid food coloring works wonderfully for dyeing shredded coconut, but gel coloring provides a more concentrated hue. Use a very light hand—start with just one tiny drop to ensure you achieve a soft pastel rather than a harsh neon color.
- A Pinch of Salt: A tiny dash of fine sea salt cuts through the sweetness and enhances the coconut and vanilla flavors, balancing the entire flavor profile perfectly.
Step-by-Step Instructions for Perfect Bunny Tails
Follow these precise steps to create a flawless batch of No-Bake Easter Bunny Coconut Tails.
- Prepare the Truffle Base: In a large mixing bowl, use a hand mixer or a stand mixer fitted with the paddle attachment to beat the softened cream cheese until it is completely smooth and creamy. This should take about 1-2 minutes. Scrape down the sides of the bowl with a rubber spatula.
- Add the Sweetness: Gradually add the sifted powdered sugar to the cream cheese, about one cup at a time. Beat on low speed initially to prevent a powdered sugar snowstorm in your kitchen, then increase the speed to medium until fully combined. Add the vanilla extract and the pinch of salt, mixing until incorporated.
- Incorporate the Coconut: Gently fold in the measured shredded coconut into the cream cheese mixture using a spatula. The mixture will be quite thick and slightly sticky. Cover the bowl tightly with plastic wrap and place it in the refrigerator to chill for at least 1 hour. This chilling step is absolutely mandatory; it firms up the mixture so you can actually roll it into spheres.
- Color the Coconut Coating: While the dough is chilling, prepare your pastel coconut coatings. Divide the remaining shredded coconut evenly into small ziplock bags (one bag for each color you want to create). Add 1-2 drops of food coloring and ½ teaspoon of water to each bag. Seal the bags tightly and massage, shake, and rub the bags vigorously until the color is evenly distributed throughout the coconut. Pour each color into its own shallow bowl.
- Roll the Bunny Tails: Remove the chilled dough from the refrigerator. Using a small cookie scoop or a tablespoon, scoop out uniform portions of the dough. Roll them between the palms of your hands to form smooth balls. If the mixture starts sticking to your hands, lightly dust your palms with powdered sugar or dampen them very slightly with water.
- Coat in Pastel Colors: Drop each rolled ball immediately into one of the bowls of colored coconut. Roll the ball around gently, pressing the coconut into the surface so it adheres well and creates a fluffy, “tail-like” appearance.
- Final Chill: Place the coated bunny tails onto a baking sheet lined with parchment paper. Once all the tails are rolled and coated, return the baking sheet to the refrigerator for another 30 minutes to help them set their shape completely before serving.
Pro Tips for Absolute Success
Even though this is a beginner-friendly recipe, a few professional tricks will elevate your bunny tails from good to bakery-quality.
- Manage the Stickiness: Cream cheese dough can quickly become unmanageable if your kitchen is warm. If the dough gets too soft while you are rolling the balls, do not hesitate to pop the bowl back into the fridge or freezer for 10-15 minutes to firm it back up. Working in small batches is highly recommended.
- The Water Trick for Coloring: Adding just a half-teaspoon of water to the ziplock bag with the food coloring and coconut is a game-changer. It helps the color disperse much more evenly and prevents clumping, resulting in a beautifully uniform pastel shade rather than splotchy coconut flakes.
- Flavor Infusions: While vanilla is classic, you can easily change the flavor profile. Add a quarter teaspoon of almond extract for a marzipan-like flavor, or a splash of fresh lemon juice and zest for a bright, citrusy spring twist.
- Hidden Center Surprise: For an extra layer of decadence, press a whole roasted almond, a macadamia nut, or a small white chocolate chip into the center of each dough ball before rolling it into a sphere. It adds a delightful textual contrast when bitten into.
Serving Suggestions and Cultural Context
The tradition of shaping food into animal figures or symbols of spring dates back centuries, rooted in pagan celebrations of the vernal equinox and later adapted into Christian Easter traditions. The bunny, a symbol of fertility and new life, is synonymous with spring. By creating these “bunny tails,” we are participating in a long lineage of culinary celebration honoring the changing of the seasons.
To serve these beautifully, consider finding a shallow, wide, rustic wooden bowl or a vibrant turquoise ceramic platter (as seen in the inspiration image). The contrast of the pastel colors against a natural or brightly colored background makes the treats pop. You can also serve them nestled in a bed of edible green Easter grass made from candy or thinly sliced green apples.
They make extraordinary edible gifts. Purchase small, clear cellophane bags or mini pastry boxes. Place four to five differently colored bunny tails inside, tie the bag with a beautiful pastel ribbon, and attach a cute tag. They are perfect for teacher gifts, neighborly drop-offs, or as personalized favors placed at each seat around your Easter dinner table.
Storage and Freezing Instructions
Proper storage is key to maintaining the texture and freshness of these no-bake treats.
- Refrigerator Storage: Because they contain a significant amount of dairy (cream cheese), these bunny tails must be stored in the refrigerator. Place them in a single layer in an airtight container, or separate layers with wax paper to prevent them from sticking together. They will stay fresh and delicious for up to 7 days in the fridge.
- Freezer Storage: These freeze wonderfully! To freeze, place the finished coconut tails on a parchment-lined baking sheet and put them in the freezer for one hour to flash-freeze them. Once hard, transfer them to a freezer-safe ziplock bag or airtight container. They can be frozen for up to 3 months. Let them thaw in the refrigerator overnight before serving.
Frequently Asked Questions (FAQs)
Can I use low-fat cream cheese to make these healthier?
It is not recommended. Low-fat or Neufchâtel cream cheese has a higher water content than full-fat block cream cheese. This extra moisture will make the dough too soft and sticky, preventing the bunny tails from holding their spherical shape. Stick to full-fat brick cream cheese for the best structural integrity.
My shredded coconut won’t stick to the outside of the balls. What am I doing wrong?
If the dough balls have dried out too much before you roll them in the coating, the coconut won’t adhere. You need to roll them in the colored coconut immediately after rolling them in your hands, while the surface is still slightly tacky. If they have dried, you can lightly mist them with water or rub a tiny drop of milk over the surface to make them sticky again.
Can I make these dairy-free or vegan?
Absolutely! Simply substitute the standard cream cheese with a high-quality, firm, block-style vegan cream cheese alternative. Ensure your powdered sugar is certified vegan (some sugars are processed with bone char) and double-check your food coloring. The rest of the recipe remains exactly the same.
Is there a way to color the coconut without artificial food dyes?
Yes. You can use natural powders to tint your coconut. Freeze-dried strawberry or raspberry powder works beautifully for pinks. A tiny pinch of turmeric will yield a sunny yellow. Matcha powder creates a gorgeous spring green, and a little bit of blueberry powder or spirulina can be used for blues and purples. Just note that these natural powders will impart a slight flavor to the coconut coating.
Can I dip these in chocolate instead of rolling them in coconut?
Yes, you can turn these into traditional coconut truffles! Skip the colored coconut coating entirely. After the dough balls have chilled and firmed up completely, dip them into melted white, milk, or dark chocolate using a fork. Let the excess drip off, place on wax paper, and let the chocolate set. You can then drizzle them with contrasting colored chocolate for a festive look.
No-Bake Easter Bunny Coconut Tails
Ingredients
Equipment
Method
- In a large bowl, beat the softened cream cheese until completely smooth and creamy.
- Gradually add the sifted powdered sugar, beating until well combined. Add the vanilla extract and salt.
- Fold in the 2 cups of shredded coconut until thoroughly mixed. Cover the bowl and chill in the refrigerator for at least 1 hour.
- While dough chills, divide the 1.5 cups of coconut into small ziplock bags (one for each color). Add 1 drop of food coloring and 1/2 tsp water to each bag. Seal and massage until color is even. Pour into shallow bowls.
- Remove chilled dough from fridge. Scoop tablespoon-sized amounts and roll into smooth balls.
- Immediately roll each ball in the colored coconut, pressing gently so it adheres.
- Place coated bunny tails on a parchment-lined baking sheet and chill for another 30 minutes before serving.