Candy Cane Cookies
Easy & Delicious Candy Cane Cookies: A Christmas Classic
When the holiday season rolls around, there is one visual that instantly screams “Christmas”: the iconic red and white stripe of a candy cane. But why stop at hanging them on the tree? These Candy Cane Cookies take that beloved aesthetic and transform it into a buttery, peppermint-infused treat that is as fun to make as it is to eat. Shaped into adorable twisted wreaths (or classic canes) and dusted with sparkling sugar, they are the ultimate addition to any holiday cookie exchange.
Unlike standard sugar cookies that are rolled and cut, these cookies offer a unique texture—crisp on the edges, tender in the middle, with a delightful crunch from the sugar coating. The dough is flavored with vanilla and peppermint, creating a taste that perfectly mimics the season. Whether you are baking for Santa or hosting a festive party, these cookies are a guaranteed showstopper.
The Nostalgia of the Twist
There is something undeniably nostalgic about twisting dough by hand. This recipe harkens back to vintage community cookbooks, where effort and presentation were paramount. The process of dyeing half the dough a vibrant red and twisting it with the white dough is a fantastic activity for kids and adults alike. It turns baking into a craft project.
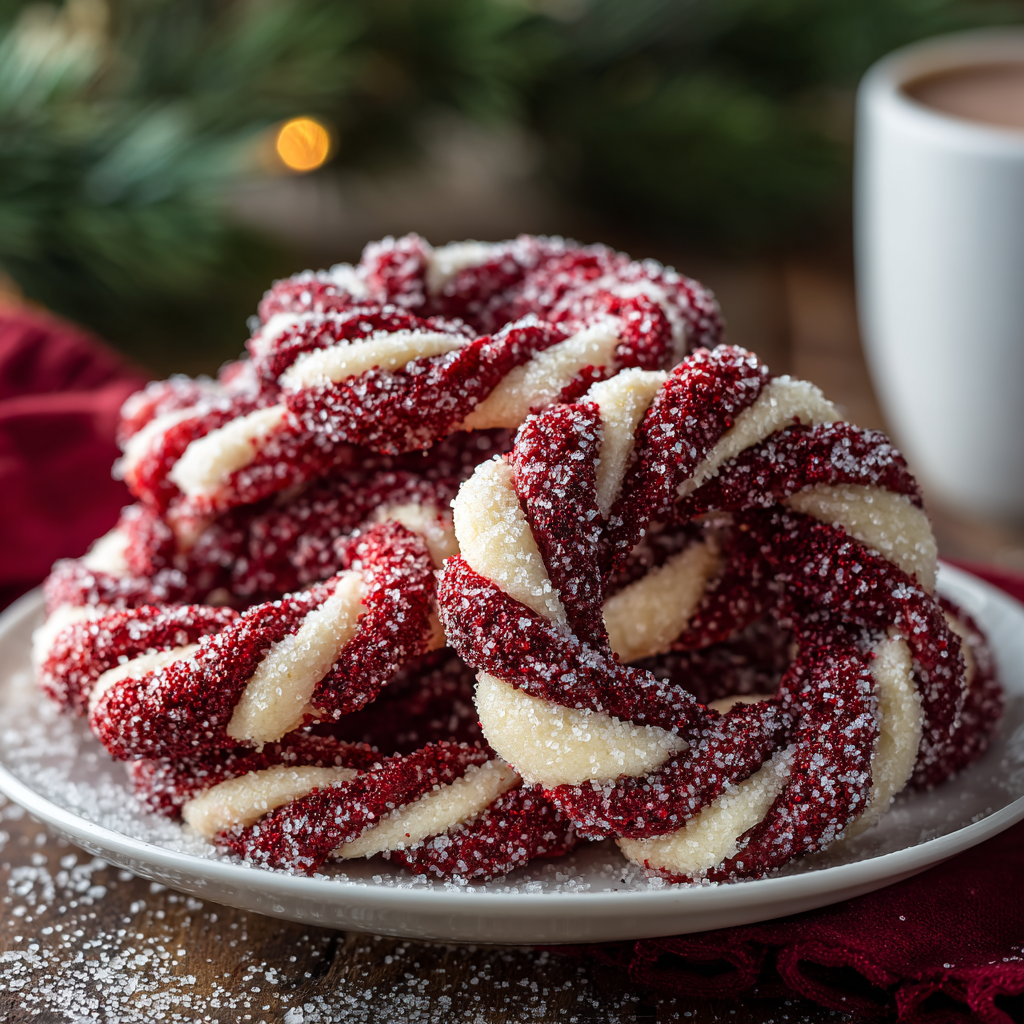
While they look intricate, the technique is surprisingly simple. It just requires a bit of patience and cool hands. The result is a cookie that looks like it came from a professional bakery but tastes like home. The red and white spirals are mesmerizing, and when shaped into a wreath, they look like edible ornaments.
Key Ingredients for Perfect Texture
To achieve that perfect balance of soft and sandy texture, specific ingredients are key:
- Unsalted Butter: This must be softened but not melted. It provides the structure and the rich, buttery flavor that carries the peppermint.
- Powdered Sugar: Unlike granulated sugar, using powdered sugar in the dough creates a “melting moment” texture that is tender and delicate.
- Peppermint Extract: This is the soul of the cookie. Be careful not to use “mint” extract, which often tastes like spearmint (toothpaste). You want pure peppermint.
- Red Food Coloring: Gel food coloring is highly recommended here. Liquid drops can add too much water to the dough, making it sticky. Gel provides intense color without altering the consistency.
- Sparkling Sugar: For the topping. You can use granulated sugar, but coarse sparkling sugar or crushed candy canes adds a beautiful “snowy” crunch.
- Egg: A single large egg binds the dough together.
Ingredients
For the Cookie Dough:
- – 1 cup unsalted butter, softened
- – 1 cup powdered sugar (confectioners’ sugar)
- – 1 large egg
- – 1 teaspoon vanilla extract
- – 1 ½ teaspoons peppermint extract
- – 2 ½ cups all-purpose flour
- – 1 teaspoon salt
- – ½ teaspoon red gel food coloring
For the Topping:
- – ½ cup granulated sugar or coarse sparking sugar
- – 3 tablespoons crushed candy canes (optional)
Instructions
- Cream the Butter and Sugar: In a large mixing bowl (or stand mixer), beat the softened butter and powdered sugar together until the mixture is smooth and creamy. You don’t need to whip it until fluffy like a cake; just ensure it is well combined.
- Add Wet Ingredients: Mix in the egg, vanilla extract, and peppermint extract. Scrape down the sides of the bowl to ensure everything is incorporated.
- Add Dry Ingredients: Gradually add the flour and salt. Mix on low speed just until the dough comes together. It might look crumbly at first, but keep mixing until it forms a ball. Do not overmix, or the cookies will be tough.
- Color the Dough: Divide the dough into two equal halves. Leave one half plain (white). Return the other half to the mixer and add the red food coloring. Mix on low until the color is evenly distributed and vibrant.
- Chill (Crucial Step): Wrap each ball of dough in plastic wrap and refrigerate for at least 1 hour (or up to 2 days). Chilled dough is essential for handling; if it’s too warm, the ropes will break and the colors will bleed.
- Shape the Cookies: Preheat your oven to 375°F (190°C). Take a small piece of white dough and roll it into a 4-inch rope. Do the same with a piece of red dough. Place the ropes side-by-side and twist them together gently.
- Form the Wreath: Curve the twisted rope into a circle and pinch the ends together to seal, forming a wreath shape. Alternatively, you can curve the top to make a traditional candy cane hook.
- Sugar Coat: Gently press the top of the cookie into the granulated sugar (and crushed candy canes, if using) so it sticks to the dough. Place on a baking sheet lined with parchment paper.
- Bake: Bake for 8–10 minutes. You want them to be set, but do not let them brown. The white part should stay white to maintain the candy cane look.
- Cool: Let them cool on the baking sheet for 5 minutes before transferring to a wire rack. They are fragile when hot but firm up as they cool.
Secrets to Success
Keep It Cool
If your kitchen is warm, the dough might become sticky while you are rolling. Keep the portion of dough you aren’t using in the fridge. If the ropes start breaking, the dough is likely too warm—pop it back in the chiller for 10 minutes.
Flour Your Surface Lightly
When rolling the ropes, you might need a tiny dusting of flour on your hands or counter. However, use it sparingly. Too much flour will prevent the two ropes from sticking together when you twist them.
Flavor Variations
Not a fan of peppermint? You can easily swap the extract for almond or orange extract for a different holiday flavor profile. You can also use green food coloring instead of red for a “Grinch” theme or spearmint twist.
Storage and Freezing
These cookies store beautifully, making them perfect for gifting.
- Room Temperature: Store in an airtight container for up to 1 week. Separate layers with wax paper to keep them looking pristine.
- Freezing Dough: You can freeze the dough balls for up to month. Thaw in the fridge overnight before rolling.
- Freezing Baked Cookies: Baked cookies can be frozen for up to 3 months. However, the sugar coating might melt slightly upon thawing, so you may want to sprinkle fresh sugar on them before serving.
Serving Ideas
These Candy Cane Cookies are versatile stars of the holiday table:
- Hot Cocoa Dippers: Serve them alongside a mug of hot chocolate. The peppermint flavor melts into the drink for a mint-chocolate delight.
- Edible Ornaments: If you make the wreath shape, you can loop a ribbon through the hole and hang them on a sturdy branch of your Christmas tree (just make sure pets can’t reach them!).
- Gift Boxes: Their durability makes them excellent for shipping in care packages to loved ones far away.
Get the kids involved, put on some holiday tunes, and enjoy the process of creating these beautiful, twisted treats. Happy Baking!
Candy Cane Cookies
Ingredients
Equipment
Method
- In a large bowl, cream together softened butter and powdered sugar until smooth.
- Mix in the egg, vanilla extract, and peppermint extract until fully combined.
- Gradually add flour and salt. Mix until a soft dough forms. Do not overmix.
- Divide dough in half. Tint one half with red gel food coloring. Wrap both halves in plastic and chill for 1 hour.
- Preheat oven to 375°F (190°C). Line baking sheets with parchment paper.
- Pinch off small pieces of each dough (about 1 tsp each). Roll into 4-inch ropes.
- Twist a red rope and a white rope together. Shape into a circle (wreath) and pinch ends to seal.
- Press the top of the cookie into granulated sugar/crushed candy canes.
- Bake for 8-10 minutes. Cookies should be set but not browned. Cool on wire rack.