Oatmeal Cream Pie Bars
Do you remember the sheer thrill of unzipping your childhood lunchbox to find a crinkly, cellophane-wrapped oatmeal creme pie waiting for you? That iconic combination of deeply spiced, impossibly soft oatmeal cookies sandwiching a layer of sugary, cloud-like marshmallow creme is a flavor profile etched into the memories of millions. But what if you could recreate that exact magic in your own kitchen, using high-quality ingredients, and without the hassle of scooping, rolling, and perfectly matching dozens of individual cookies? Enter the ultimate dessert hack: Oatmeal Cream Pie Bars. This extraordinary recipe takes everything you adore about the classic nostalgic treat and transforms it into a wildly convenient, incredibly decadent, and undeniably crowd-pleasing slab pie format.
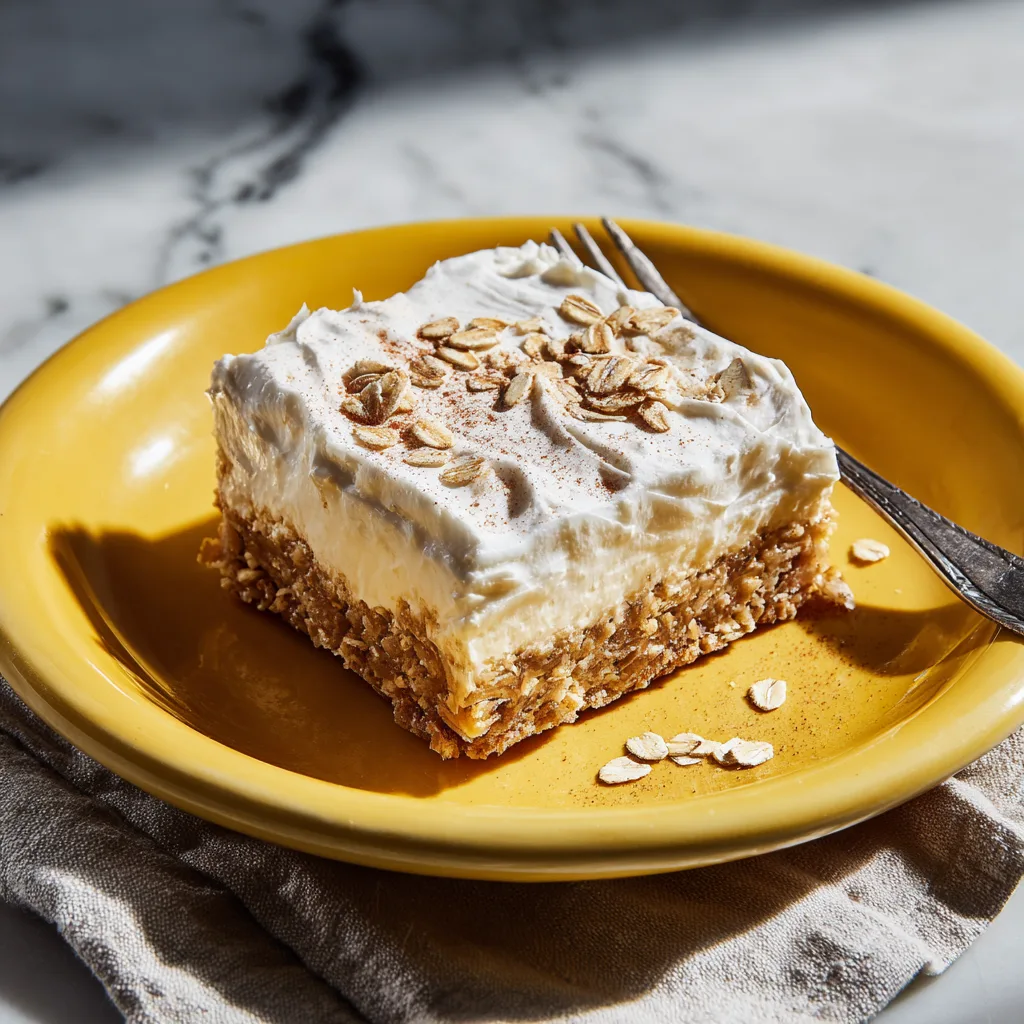
These bars are the epitome of comfort baking. The base is a thick, chewy, and tender oatmeal cookie layer, richly flavored with dark brown sugar, a hint of robust molasses, and warm spices like cinnamon and a touch of nutmeg. It is baked to golden perfection—firm enough to hold its shape when sliced, yet soft enough to melt in your mouth. Then, it is lavishly crowned with a generous, swirling layer of homemade marshmallow buttercream. This frosting isn’t just your standard vanilla icing; it is specifically formulated with real marshmallow fluff to perfectly mimic the sticky, airy, melt-in-your-mouth texture of the original childhood favorite. Whether you are baking for a neighborhood potluck, a school bake sale, a holiday gathering, or simply answering a persistent Tuesday night sweet tooth craving, this comprehensive guide will walk you through every single step to achieve oatmeal cream pie perfection. Get ready to fall in love with your new favorite dessert.
Why You Will Completely Obsess Over This Recipe
There is a multitude of reasons why these Oatmeal Cream Pie Bars are destined to become a permanent fixture in your baking rotation. First and foremost is the undeniable factor of convenience. Traditional sandwich cookies are a labor of love. They require chilling the dough, painstakingly rolling out uniformly sized balls, monitoring the oven closely to prevent spreading, and then meticulously pairing up matching cookies before piping the filling. By transforming this concept into a bar dessert, you eliminate almost all of the tedious prep work. You simply press the glorious, spiced oatmeal dough into a single baking pan, bake it all at once, frost the entire slab, and slice. It is a massive time-saver that does not sacrifice a single ounce of flavor or texture.
Furthermore, the bar format allows for a superior frosting-to-cookie ratio. With a traditional sandwich cookie, biting into it often causes the filling to squish out the sides, creating a sticky mess. With a bar, the frosting sits proudly on top, ensuring that every single bite delivers the perfect, harmonious balance of chewy, spiced oat base and fluffy, sweet vanilla cream. Finally, the ingredient list relies heavily on pantry staples. Aside from perhaps picking up a jar of marshmallow fluff, you likely already have the butter, oats, flour, and spices sitting in your kitchen, making this a fantastic last-minute dessert option for unexpected guests or spontaneous weekend baking projects.
The Anatomy of the Perfect Chewy Oatmeal Base
The foundation of any great Oatmeal Cream Pie Bar is, unsurprisingly, the oatmeal cookie base. Achieving the correct texture is paramount. It cannot be crunchy like a granola bar, nor can it be cakey like a breakfast muffin. It must be dense, highly chewable, and intensely moist. Achieving this requires a specific balance of ingredients and techniques.
The Role of Rolled Oats versus Quick Oats
In the world of oatmeal baking, the type of oat you select dictates the final texture of your dessert. For these bars, we employ a crucial trick: using quick-cooking oats. While old-fashioned rolled oats are fantastic for hearty textures, they can be a bit too rustic and chewy for a delicate cream pie bar. Quick oats are simply rolled oats that have been chopped into smaller pieces. Because they are smaller, they integrate more seamlessly into the dough, absorbing the moisture from the butter and eggs more rapidly. This results in a tighter, more uniform crumb that closely mirrors the soft, processed texture of the commercial inspiration, while still providing that distinct, home-baked oat flavor.
The Magic of Molasses and Dark Brown Sugar
To capture the authentic, slightly earthy, and deeply caramelized flavor of a true oatmeal creme pie, white sugar alone simply will not suffice. This recipe relies heavily on dark brown sugar, which contains a higher percentage of molasses than light brown sugar. The extra molasses not only contributes to a richer, toffee-like flavor profile but also drastically increases the moisture content of the dough, guaranteeing a soft, chewy bite. To amplify this effect even further, we add a tablespoon of pure, unsulfured molasses. This secret ingredient is the key to unlocking that signature, old-fashioned bakery taste and gives the bars their beautifully warm, golden-brown hue.
Decoding the Iconic Marshmallow Cream Filling
The frosting on an oatmeal cream pie is just as important as the cookie itself. If you were to top these bars with a standard American buttercream (just butter and powdered sugar), it would be far too heavy, dense, and rich. The quintessential cream pie filling is distinctively light, airy, slightly sticky, and almost perfectly white. To achieve this, we have to turn to a very specific ingredient.
Why Marshmallow Fluff is Absolutely Non-Negotiable
The secret weapon in recreating childhood magic is marshmallow fluff (also known as marshmallow creme). By blending a generous scoop of marshmallow fluff into beaten butter and powdered sugar, you completely transform the texture of the frosting. The fluff introduces aeration and a distinct, sticky elasticity that regular buttercream lacks. It lightens the frosting, cuts through the overwhelming sweetness of the powdered sugar, and provides that signature “pull” when you take a bite. It is the exact textural component that bridges the gap between a simple frosted cookie bar and an authentic, nostalgic oatmeal cream pie experience.
Ingredients You Will Need
Before you begin, gather your ingredients. Ensuring everything, particularly the butter and eggs, is at room temperature will yield the best, most uniform results.
For the Chewy Oatmeal Cookie Base:
- 1 cup (2 sticks) Unsalted Butter: Softened to room temperature.
- 1 cup Dark Brown Sugar: Packed firmly. Dark is preferred for depth of flavor, but light brown will work in a pinch.
- ½ cup Granulated White Sugar: For balanced sweetness and a slight crispness at the edges.
- 1 tablespoon Unsulfured Molasses: The secret ingredient for that classic flavor.
- 2 large Eggs: Must be at room temperature to emulsify properly into the butter.
- 2 teaspoons Pure Vanilla Extract: Do not use imitation vanilla.
- 1 ½ cups All-Purpose Flour: Spooned and leveled, not scooped directly from the bag.
- 3 cups Quick-Cooking Oats: Do not use old-fashioned or steel-cut oats.
- 1 teaspoon Baking Soda: For a gentle lift.
- 1 ½ teaspoons Ground Cinnamon: For that warm, comforting spice.
- ¼ teaspoon Ground Nutmeg: Adds a subtle, bakery-style complexity.
- ½ teaspoon Kosher Salt: To balance the immense sweetness.
For the Marshmallow Cream Frosting:
- ¾ cup (1 ½ sticks) Unsalted Butter: Softened to room temperature.
- 1 ½ cups Powdered Confectioners’ Sugar: Sifted to prevent any unappealing lumps in your smooth frosting.
- 1 cup Marshmallow Fluff (Marshmallow Creme): Usually found in the baking aisle near the regular marshmallows.
- 1 teaspoon Pure Vanilla Extract: For flavor.
- 1-2 tablespoons Heavy Cream or Milk: Only if needed to thin the frosting to a spreadable consistency.
- Pinch of Salt: Crucial for cutting the sweetness of the fluff and sugar.
Step-by-Step Instructions for Baking Success
Follow these detailed steps to ensure your Oatmeal Cream Pie Bars turn out absolutely flawless every single time.
- Preheat and Prepare: Begin by preheating your oven to 350°F (175°C). Take a 9×13 inch rectangular baking pan and line it with parchment paper, leaving an overhang on the longer sides. This overhang acts as a sling, allowing you to easily lift the entire slab of bars out of the pan later for perfectly clean slicing. Lightly spray the parchment and any exposed pan sides with non-stick baking spray.
- Whisk the Dry Ingredients: In a medium-sized mixing bowl, combine the all-purpose flour, quick-cooking oats, baking soda, ground cinnamon, ground nutmeg, and kosher salt. Use a whisk to toss everything together until the spices are evenly distributed throughout the flour and oats. Set this bowl aside.
- Cream the Butter and Sugars: In the large bowl of a stand mixer fitted with the paddle attachment (or using a hand mixer), combine the softened unsalted butter, packed dark brown sugar, and granulated sugar. Beat on medium-high speed for about 2 to 3 minutes, or until the mixture is visibly lighter in color and incredibly fluffy. Scrape down the sides and bottom of the bowl with a rubber spatula.
- Add Wet Ingredients: To the creamed butter mixture, add the molasses and the pure vanilla extract. Mix on medium speed until just combined. Next, add the room temperature eggs one at a time, beating well after each addition until fully incorporated. Scrape down the bowl once more to ensure no butter is hiding at the bottom.
- Incorporate the Dry Mixture: Turn your mixer to its lowest speed setting. Gradually add the dry flour and oat mixture to the wet ingredients. Mix only until you no longer see any dry streaks of flour. Do not overmix! Overmixing will develop the gluten in the flour and result in tough, dense bars instead of soft, chewy ones.
- Press and Bake: Transfer the thick oatmeal cookie dough to your prepared 9×13 inch baking pan. Using your hands (lightly dampening them with water helps prevent sticking) or a rubber spatula, press the dough into an even layer, making sure it reaches all four corners. Bake in the preheated oven for 18 to 22 minutes. The edges should be golden brown and the center should look just barely set. Do not overbake, or you will lose that signature chewy texture.
- Cool Completely: Remove the pan from the oven and place it on a wire cooling rack. Allow the oatmeal base to cool completely in the pan. Do not attempt to frost the bars while they are even slightly warm, or the buttercream will melt into a greasy puddle.
- Whip the Frosting: While the base cools, prepare the marshmallow frosting. In a clean mixing bowl, beat the softened butter on medium-high speed until pale and creamy (about 2 minutes). Reduce the speed to low and slowly add the sifted powdered sugar. Once incorporated, add the marshmallow fluff, vanilla extract, and a pinch of salt. Increase the speed to medium-high and whip for an additional 2 to 3 minutes until the frosting is incredibly light, fluffy, and cloud-like. If it seems too stiff, beat in a tablespoon of heavy cream.
- Frost and Serve: Once the oatmeal slab is entirely cool to the touch, use the parchment paper sling to lift it out of the pan and place it on a cutting board. Dollop the marshmallow frosting all over the top. Use an offset spatula or the back of a spoon to spread the frosting into a thick, even layer, creating appealing decorative swirls. Cut into squares using a large, sharp knife, wiping the blade clean between cuts for neat edges. Serve and enjoy the nostalgic bliss!
Pro Tips for Flawless Dessert Bars
Baking is a science, and a few expert tips can elevate your bars from good to spectacular.
- The Room Temperature Rule: Never underestimate the importance of room temperature ingredients. Cold eggs added to creamed butter will cause the butter to seize and curdle, resulting in a greasy, unevenly baked bar. If you forgot to take your eggs out, place them in a bowl of warm water for 10 minutes before using.
- Do Not Overbake: The secret to a truly chewy oatmeal bar is pulling it from the oven just before you think it’s completely done. The residual heat from the pan will continue to bake the center as it cools on the counter. If you wait until a toothpick comes out completely clean and dry from the center, the edges will likely be too hard.
- Clean Cuts: For bakery-style presentation, chill the frosted slab in the refrigerator for 30 minutes before cutting. Use a large, sharp chef’s knife, press straight down (do not saw back and forth), and wipe the knife with a warm, damp paper towel between every single cut.
Creative Variations and Customizations
While the classic vanilla marshmallow filling is iconic, this recipe is a brilliant canvas for your culinary creativity. Try these fun twists:
- Brown Butter Base: For an incredibly sophisticated, nutty, and gourmet flavor profile, try browning your butter before making the oatmeal cookie dough. Allow the browned butter to cool back to a semi-solid room temperature state before creaming it with the sugars.
- Spiced Apple Filling: Give these bars a cozy, autumnal twist by folding half a cup of very finely diced, sautéed apples into the oatmeal cookie dough, and adding a pinch of apple pie spice to the marshmallow frosting.
- Chocolate Drizzle: If you are a chocoholic, melt some high-quality semi-sweet chocolate chips and drizzle it lavishly over the top of the swirled marshmallow frosting before cutting into bars.
- Maple Pecan: Substitute the vanilla extract in the frosting with maple extract, and gently fold half a cup of finely chopped, toasted pecans into the oatmeal dough for a Southern-inspired treat.
Storing and Freezing Your Masterpieces
Proper storage is key to maintaining that fresh-baked, chewy texture.
Room Temperature Storage: These bars are best stored in an airtight container at room temperature. They will remain incredibly soft and delicious for up to 3 to 4 days. Storing them in the refrigerator is generally not recommended, as the cold air can dry out the oatmeal cookie base and cause the marshmallow frosting to harden, drastically altering the desired texture.
Freezing Instructions: Yes, these freeze beautifully! For long-term storage, you can freeze the bars either frosted or unfrosted. To freeze frosted bars, place the cut squares on a baking sheet and freeze until the frosting is solid (about 1 hour). Then, individually wrap each bar tightly in plastic wrap and place them all in a freezer-safe zip-top bag. They will keep for up to 3 months. When the craving strikes, simply unwrap a bar and let it thaw at room temperature for an hour before enjoying.
Frequently Asked Questions (FAQs)
Can I use old-fashioned rolled oats instead of quick oats?
While you technically can, it is highly discouraged for this specific recipe. Old-fashioned oats are whole, thick, and require more liquid and time to soften. If you use them, your bars will be much chewier, denser, and will lack the tender, cohesive texture of a classic oatmeal cream pie. If you only have old-fashioned oats, pulse them in a food processor a few times until they resemble the smaller texture of quick oats before using.
Why did my frosting turn out runny?
Runny frosting is almost always the result of adding the frosting to bars that are still warm, which melts the butter in the buttercream. Alternatively, your butter may have been too soft (melted) when you began beating it, or you may have added too much milk or cream. If your frosting is runny before applying it, place the bowl in the refrigerator for 15 minutes, then beat it again to firm it up.
Is the molasses absolutely necessary?
While you can omit it if you must, the molasses is the primary ingredient responsible for the authentic “Little Debbie” flavor profile. It provides a depth, moisture, and slight bitterness that balances the immense sweetness of the dessert. If you do not have molasses, substitute an equal amount of dark corn syrup or maple syrup, though the flavor will not be quite as traditional.
Can I make these gluten-free?
Yes! To make gluten-free Oatmeal Cream Pie Bars, ensure your quick oats are certified gluten-free, and swap the all-purpose flour for a high-quality, 1-to-1 gluten-free baking flour blend that contains xanthan gum. The rest of the ingredients and instructions remain exactly the same.
Conclusion
Oatmeal Cream Pie Bars are the ultimate testament to the fact that sometimes, the best desserts are the ones that transport us back to simpler times. By combining the rich, spiced, and chewy perfection of a homemade oatmeal cookie with the airy, sugary delight of marshmallow buttercream, you create a dessert that appeals to both children and adults alike. Plus, with the sheer convenience of the bar format, you can enjoy all the nostalgic flavor without any of the traditional fuss. Bake a batch of these this weekend, share them with friends and family, and prepare to be asked for the recipe over and over again. Happy baking!
Oatmeal Cream Pie Bars
Ingredients
Equipment
Method
- Preheat oven to 350°F (175°C). Line a 9×13 inch baking pan with parchment paper, leaving an overhang for easy removal. Spray lightly with non-stick spray.
- In a medium bowl, whisk together the flour, quick oats, baking soda, cinnamon, nutmeg, and kosher salt. Set aside.
- In a large bowl, beat 1 cup softened butter, dark brown sugar, and granulated sugar until light and fluffy (about 2-3 minutes).
- Add the molasses and vanilla extract, mixing until combined. Beat in the eggs one at a time, scraping down the bowl as needed.
- Gradually add the dry oat mixture to the wet ingredients on low speed. Mix just until combined. Do not overmix.
- Press the dough evenly into the prepared baking pan. Bake for 18-22 minutes until edges are golden and the center is set. Do not overbake.
- Place the pan on a wire rack and let the bars cool completely before frosting.
- To make the frosting: Beat 3/4 cup softened butter until creamy. Slowly add powdered sugar and beat until smooth. Add marshmallow fluff, vanilla, and a pinch of salt. Beat on medium-high for 2-3 minutes until light and fluffy.
- Spread the frosting evenly over the completely cooled oatmeal bars. Use the parchment sling to remove from the pan, slice into squares, and serve.