Cheesecake Topped Chocolate Covered Strawberries
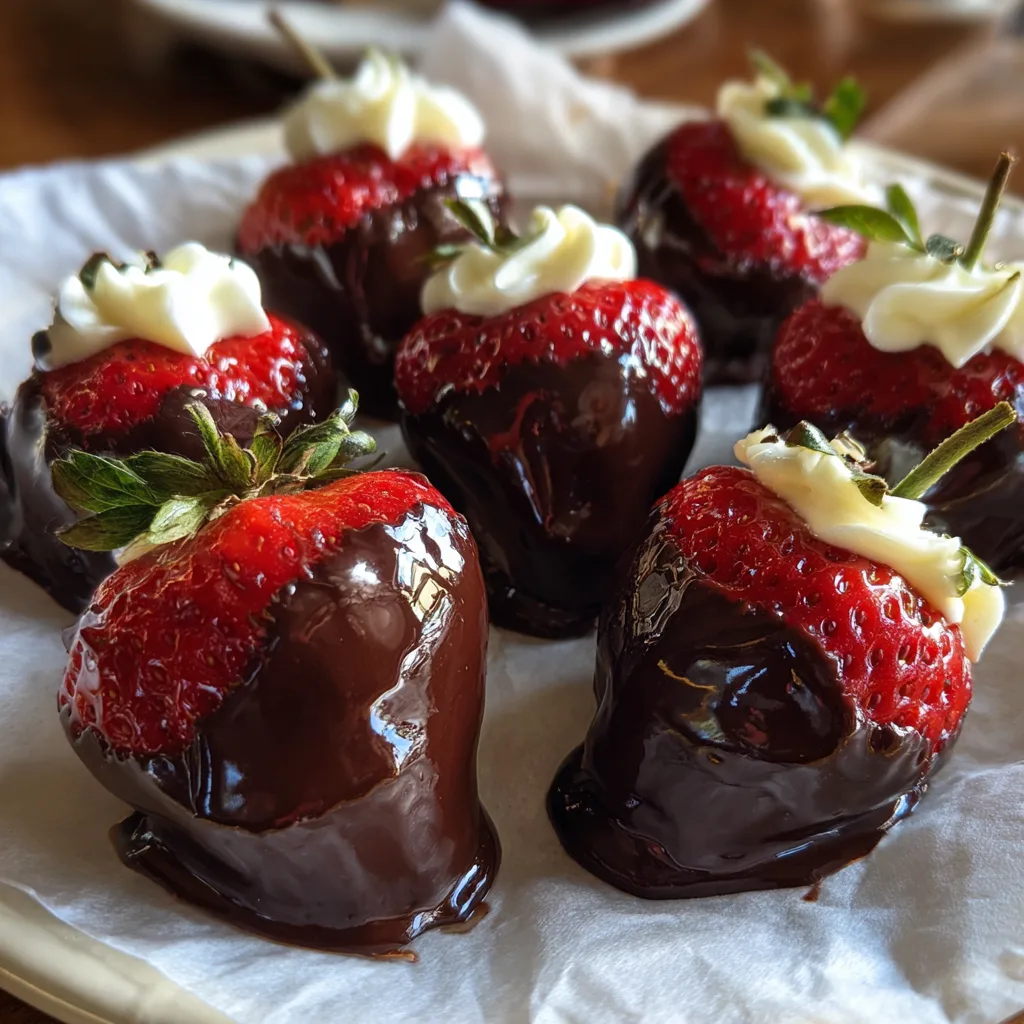
There are few flavor combinations in the culinary world as universally beloved and instantly recognizable as chocolate and strawberries. The tart, juicy burst of a ripe red strawberry paired with the rich, slightly bitter snap of dark chocolate creates a symphony of textures and tastes that feels both incredibly luxurious and wonderfully simple. But today, we are taking this classic, romantic confection and elevating it to a completely new level of gourmet indulgence. Introducing the Cheesecake-Topped Dark Chocolate Covered Strawberry.
This dessert is a masterful blend of three distinct flavor profiles: the refreshing fruitiness of the berry, the deep decadence of dark chocolate, and the tangy, sweet richness of a whipped cheesecake topping. It is the perfect bite-sized treat for a romantic date night, an elegant dinner party, a bridal shower, or simply a Tuesday evening when you want to treat yourself to something extraordinary. In this comprehensive guide, we will explore the nuances of selecting the best ingredients, the science behind melting chocolate perfectly, and the secrets to piping that irresistible cream topping.
🍓 Selecting and Preparing the Perfect Strawberries
The foundation of any phenomenal chocolate-covered strawberry is, undeniably, the strawberry itself. Because this recipe relies on so few ingredients, the quality of your produce will dictate the ultimate success of your dessert. You cannot hide a bruised, mushy, or flavorless berry beneath a layer of chocolate.
Size and Shape: When shopping for your berries, look for the largest, plumpest ones you can find. Large strawberries provide more surface area for the chocolate to cling to and offer a better ratio of fruit to chocolate. Look for berries with vibrant, bright red skin that goes all the way up to the stem. If the top of the strawberry is white or green, it was picked before it was fully ripe and will lack that essential, sweet strawberry flavor. Furthermore, inspect the leaves (the calyx). The leaves should be a bright, healthy green and look perky. Wilted, brown leaves are a sign that the fruit is past its prime.
The Crucial Washing and Drying Process: This is arguably the most important step in the entire recipe. Chocolate and water are mortal enemies. If even a microscopic drop of water gets into your melted chocolate, it will “seize,” turning from a silky, pourable liquid into a grainy, dull, unusable paste. Therefore, your strawberries must be bone-dry before dipping.
Wash your strawberries gently under cold running water, being careful not to bruise the flesh. Immediately transfer them to a surface lined with multiple layers of paper towels. Gently pat each berry completely dry. Do not skip the area directly under the green leaves, as water loves to hide there. For the best results, leave the strawberries sitting on the paper towels at room temperature for at least 30 minutes to an hour to air dry completely. Ensuring your berries are perfectly dry guarantees that the chocolate will adhere smoothly and set with a beautiful, professional-looking snap.
🍫 The Art and Science of Melting Chocolate
While you can use standard chocolate chips for this recipe, upgrading your chocolate will significantly improve the final product. Chocolate chips are manufactured with stabilizers designed to help them hold their shape in the oven. While they will melt, they often result in a thicker, slightly duller coating. For that glossy, bakery-style finish, we highly recommend using high-quality chocolate baking bars (couverture chocolate) or chocolate melting wafers.
Choosing Your Chocolate: We suggest using a high-quality dark chocolate, somewhere between 60% and 70% cacao. The natural bitterness of dark chocolate provides a necessary contrast to the intensely sweet, ripe strawberry and the sugary cheesecake topping. If you prefer a sweeter dessert, semi-sweet chocolate is an excellent alternative. Milk chocolate can be used, but be aware that it makes for a much sweeter overall bite.
The Melting Method: There are two primary ways to melt your chocolate: the microwave method and the double boiler method.
If using a microwave, place your finely chopped chocolate in a microwave-safe bowl. Heat it on 50% power in 30-second increments. After every 30 seconds, remove the bowl and stir the chocolate thoroughly, even if it doesn’t look melted yet. The residual heat of the bowl and the melted chocolate will help melt the rest. Never blast chocolate on high heat, or it will burn and become bitter.
The double boiler method is much safer and provides more control. Place a heatproof bowl over a saucepan of barely simmering water. Ensure the bottom of the bowl does not touch the water. Place your chopped chocolate in the bowl and stir gently and continuously until perfectly smooth. Once melted, remove the bowl from the heat immediately. Adding a tiny teaspoon of coconut oil to your chocolate as it melts can thin it out slightly, making dipping easier and creating a glossier, thinner shell.
🧁 The Crowning Glory: Crafting the Cream Topping
What sets this recipe apart from the standard dipped strawberry is the luscious, piped cream topping. This tiny dollop of joy mimics the flavor of a rich New York cheesecake, providing a creamy, tangy contrast to the crisp chocolate shell.
The base of this topping is full-fat cream cheese. It is absolutely vital that your cream cheese is softened to room temperature before you begin. If it is cold, your mixture will be lumpy, and no amount of beating will smooth it out. We blend this softened cream cheese with a touch of powdered sugar for sweetness, a dash of pure vanilla extract for floral warmth, and a splash of heavy whipping cream to lighten the texture.
By whipping these ingredients together, you create a sturdy, pipeable frosting that holds its shape beautifully. Transfer this mixture into a piping bag fitted with a star tip (like a Wilton 1M). Once your chocolate-dipped strawberries have completely set and hardened, you will pipe a delicate, beautiful swirl of this cheesecake cream right at the top of the berry, nestled against the green leaves.
🛒 Ingredients for Success
Gather these high-quality ingredients to begin your culinary creation. Notice we use dashes to clearly outline what you need:
– 1 lb large fresh strawberries (with stems and leaves intact)
– 10 oz high-quality dark chocolate bars (chopped) or melting wafers
– 1 teaspoon coconut oil (optional, for a smoother chocolate finish)
– 4 oz full-fat cream cheese (softened to room temperature)
– 3 tablespoons powdered sugar (sifted)
– 1/2 teaspoon pure vanilla extract
– 2 tablespoons heavy whipping cream
👩🍳 Step-by-Step Instructions
Follow these meticulously detailed steps to ensure dessert perfection:
Cheesecake-Topped Chocolate Strawberries
Ingredients
Equipment
Method
- Wash strawberries and pat them completely dry with paper towels. Let air dry for 30 minutes. Line a tray with parchment paper.
- Melt the chopped dark chocolate and coconut oil in the microwave in 30-second bursts at 50% power, stirring until smooth.
- Holding the green stem, dip each strawberry into the melted chocolate. Let excess drip off, then place on the parchment paper.
- Place the tray in the refrigerator for 15-20 minutes to allow the chocolate to harden completely.
- In a bowl, beat the softened cream cheese, powdered sugar, and vanilla until smooth.
- Add the heavy whipping cream and beat until the mixture is fluffy and holds stiff peaks.
- Transfer the cream to a piping bag with a star tip. Pipe a swirl of cream onto the top of each hardened chocolate strawberry.
- Serve immediately or store in an airtight container in the fridge for up to 24 hours.
Notes
- Wash and Dry the Berries: Gently rinse the strawberries under cold water. Transfer them to a paper towel-lined tray and pat them completely dry. Pay special attention to drying the area underneath the leaves. Let them air dry at room temperature for at least 30 minutes.
- Prepare Your Station: Line a large baking sheet with parchment paper or wax paper. This is where your dipped strawberries will set.
- Melt the Chocolate: In a microwave-safe bowl, combine the chopped dark chocolate and coconut oil. Microwave at 50% power in 30-second increments, stirring well after each interval, until the chocolate is completely melted, smooth, and glossy. (Alternatively, use a double boiler over gently simmering water).
- Dip the Strawberries: Hold a strawberry by the green leafy stem. Dip it directly into the melted chocolate, turning it to coat all sides evenly. Lift the berry out of the chocolate and let the excess drip off back into the bowl. You can gently scrape the bottom of the strawberry against the lip of the bowl to remove excess pooling chocolate.
- Set the Chocolate: Place the dipped strawberry onto the prepared parchment-lined baking sheet. Repeat with all remaining strawberries. Allow the chocolate to set completely. You can speed up this process by placing the baking sheet in the refrigerator for 15-20 minutes.
- Whip the Cheesecake Topping: While the chocolate sets, prepare the topping. In a medium bowl, use a hand mixer to beat the softened cream cheese, powdered sugar, and vanilla extract until smooth and creamy.
- Lighten the Cream: Add the heavy whipping cream to the cream cheese mixture and beat on medium-high speed for another 1-2 minutes until the mixture is light, fluffy, and holds stiff peaks.
- Pipe the Garnish: Transfer the cheesecake cream into a piping bag fitted with a star tip. Once the chocolate on the strawberries is completely hardened, pipe a small, decorative swirl of the cream onto the top of each strawberry, right next to the green stem.
- Chill and Serve: Serve immediately, or place back in the refrigerator until ready to enjoy.
❄️ Storage and Serving Secrets
Chocolate-covered strawberries are generally best enjoyed the same day they are made. The fresh fruit begins to break down and release moisture once it is encased in chocolate, which can lead to a soggy texture after a day or two.
If you must make them ahead of time, store them in an airtight container in the refrigerator for up to 24 hours. To prevent condensation from ruining the chocolate’s finish, place a layer of paper towels at the bottom of the container, put the strawberries on top, and then drape another paper towel lightly over the top of the berries before sealing the lid. This absorbs excess moisture in the air.
We recommend pulling the strawberries out of the refrigerator about 15 minutes before serving. Eating them slightly chilled is delicious, but taking the extreme chill off allows the flavor of the dark chocolate and the fragrant sweetness of the strawberry to truly shine on the palate.
✨ Conclusion: A Bite-Sized Taste of Heaven
Creating these Cheesecake-Topped Dark Chocolate Covered Strawberries is an exercise in culinary joy. It takes a familiar, beloved treat and transforms it into a multi-layered gourmet dessert that looks as though it came straight out of a high-end bakery window. The glossy snap of the dark chocolate, the burst of sweet berry juice, and the velvety, tangy finish of the cheesecake cream create a remarkably balanced and utterly addictive dessert.
Whether you are crafting them as a gift for a loved one, a centerpiece for a dessert table, or a midnight snack, these elegant little treats prove that you don’t need complicated techniques or hours in the kitchen to produce something truly spectacular. Enjoy the process of dipping, piping, and, most importantly, savoring every single bite!
There are few flavor combinations in the culinary world as universally beloved and instantly recognizable as chocolate and strawberries. The tart, juicy burst of a ripe red strawberry paired with the rich, slightly bitter snap of dark chocolate creates a symphony of textures and tastes that feels both incredibly luxurious and wonderfully simple. But today, we are taking this classic, romantic confection and elevating it to a completely new level of gourmet indulgence. Introducing the Cheesecake-Topped Dark Chocolate Covered Strawberry.
This dessert is a masterful blend of three distinct flavor profiles: the refreshing fruitiness of the berry, the deep decadence of dark chocolate, and the tangy, sweet richness of a whipped cheesecake topping. It is the perfect bite-sized treat for a romantic date night, an elegant dinner party, a bridal shower, or simply a Tuesday evening when you want to treat yourself to something extraordinary. In this comprehensive guide, we will explore the nuances of selecting the best ingredients, the science behind melting chocolate perfectly, and the secrets to piping that irresistible cream topping.
🍓 Selecting and Preparing the Perfect Strawberries
The foundation of any phenomenal chocolate-covered strawberry is, undeniably, the strawberry itself. Because this recipe relies on so few ingredients, the quality of your produce will dictate the ultimate success of your dessert. You cannot hide a bruised, mushy, or flavorless berry beneath a layer of chocolate.
Size and Shape: When shopping for your berries, look for the largest, plumpest ones you can find. Large strawberries provide more surface area for the chocolate to cling to and offer a better ratio of fruit to chocolate. Look for berries with vibrant, bright red skin that goes all the way up to the stem. If the top of the strawberry is white or green, it was picked before it was fully ripe and will lack that essential, sweet strawberry flavor. Furthermore, inspect the leaves (the calyx). The leaves should be a bright, healthy green and look perky. Wilted, brown leaves are a sign that the fruit is past its prime.
The Crucial Washing and Drying Process: This is arguably the most important step in the entire recipe. Chocolate and water are mortal enemies. If even a microscopic drop of water gets into your melted chocolate, it will “seize,” turning from a silky, pourable liquid into a grainy, dull, unusable paste. Therefore, your strawberries must be bone-dry before dipping.
Wash your strawberries gently under cold running water, being careful not to bruise the flesh. Immediately transfer them to a surface lined with multiple layers of paper towels. Gently pat each berry completely dry. Do not skip the area directly under the green leaves, as water loves to hide there. For the best results, leave the strawberries sitting on the paper towels at room temperature for at least 30 minutes to an hour to air dry completely. Ensuring your berries are perfectly dry guarantees that the chocolate will adhere smoothly and set with a beautiful, professional-looking snap.
🍫 The Art and Science of Melting Chocolate
While you can use standard chocolate chips for this recipe, upgrading your chocolate will significantly improve the final product. Chocolate chips are manufactured with stabilizers designed to help them hold their shape in the oven. While they will melt, they often result in a thicker, slightly duller coating. For that glossy, bakery-style finish, we highly recommend using high-quality chocolate baking bars (couverture chocolate) or chocolate melting wafers.
Choosing Your Chocolate: We suggest using a high-quality dark chocolate, somewhere between 60% and 70% cacao. The natural bitterness of dark chocolate provides a necessary contrast to the intensely sweet, ripe strawberry and the sugary cheesecake topping. If you prefer a sweeter dessert, semi-sweet chocolate is an excellent alternative. Milk chocolate can be used, but be aware that it makes for a much sweeter overall bite.
The Melting Method: There are two primary ways to melt your chocolate: the microwave method and the double boiler method.
If using a microwave, place your finely chopped chocolate in a microwave-safe bowl. Heat it on 50% power in 30-second increments. After every 30 seconds, remove the bowl and stir the chocolate thoroughly, even if it doesn’t look melted yet. The residual heat of the bowl and the melted chocolate will help melt the rest. Never blast chocolate on high heat, or it will burn and become bitter.
The double boiler method is much safer and provides more control. Place a heatproof bowl over a saucepan of barely simmering water. Ensure the bottom of the bowl does not touch the water. Place your chopped chocolate in the bowl and stir gently and continuously until perfectly smooth. Once melted, remove the bowl from the heat immediately. Adding a tiny teaspoon of coconut oil to your chocolate as it melts can thin it out slightly, making dipping easier and creating a glossier, thinner shell.
🧁 The Crowning Glory: Crafting the Cream Topping
What sets this recipe apart from the standard dipped strawberry is the luscious, piped cream topping. This tiny dollop of joy mimics the flavor of a rich New York cheesecake, providing a creamy, tangy contrast to the crisp chocolate shell.
The base of this topping is full-fat cream cheese. It is absolutely vital that your cream cheese is softened to room temperature before you begin. If it is cold, your mixture will be lumpy, and no amount of beating will smooth it out. We blend this softened cream cheese with a touch of powdered sugar for sweetness, a dash of pure vanilla extract for floral warmth, and a splash of heavy whipping cream to lighten the texture.
By whipping these ingredients together, you create a sturdy, pipeable frosting that holds its shape beautifully. Transfer this mixture into a piping bag fitted with a star tip (like a Wilton 1M). Once your chocolate-dipped strawberries have completely set and hardened, you will pipe a delicate, beautiful swirl of this cheesecake cream right at the top of the berry, nestled against the green leaves.
🛒 Ingredients for Success
Gather these high-quality ingredients to begin your culinary creation. Notice we use dashes to clearly outline what you need:
– 1 lb large fresh strawberries (with stems and leaves intact)
– 10 oz high-quality dark chocolate bars (chopped) or melting wafers
– 1 teaspoon coconut oil (optional, for a smoother chocolate finish)
– 4 oz full-fat cream cheese (softened to room temperature)
– 3 tablespoons powdered sugar (sifted)
– 1/2 teaspoon pure vanilla extract
– 2 tablespoons heavy whipping cream
👩🍳 Step-by-Step Instructions
Follow these meticulously detailed steps to ensure dessert perfection:
- Wash and Dry the Berries: Gently rinse the strawberries under cold water. Transfer them to a paper towel-lined tray and pat them completely dry. Pay special attention to drying the area underneath the leaves. Let them air dry at room temperature for at least 30 minutes.
- Prepare Your Station: Line a large baking sheet with parchment paper or wax paper. This is where your dipped strawberries will set.
- Melt the Chocolate: In a microwave-safe bowl, combine the chopped dark chocolate and coconut oil. Microwave at 50% power in 30-second increments, stirring well after each interval, until the chocolate is completely melted, smooth, and glossy. (Alternatively, use a double boiler over gently simmering water).
- Dip the Strawberries: Hold a strawberry by the green leafy stem. Dip it directly into the melted chocolate, turning it to coat all sides evenly. Lift the berry out of the chocolate and let the excess drip off back into the bowl. You can gently scrape the bottom of the strawberry against the lip of the bowl to remove excess pooling chocolate.
- Set the Chocolate: Place the dipped strawberry onto the prepared parchment-lined baking sheet. Repeat with all remaining strawberries. Allow the chocolate to set completely. You can speed up this process by placing the baking sheet in the refrigerator for 15-20 minutes.
- Whip the Cheesecake Topping: While the chocolate sets, prepare the topping. In a medium bowl, use a hand mixer to beat the softened cream cheese, powdered sugar, and vanilla extract until smooth and creamy.
- Lighten the Cream: Add the heavy whipping cream to the cream cheese mixture and beat on medium-high speed for another 1-2 minutes until the mixture is light, fluffy, and holds stiff peaks.
- Pipe the Garnish: Transfer the cheesecake cream into a piping bag fitted with a star tip. Once the chocolate on the strawberries is completely hardened, pipe a small, decorative swirl of the cream onto the top of each strawberry, right next to the green stem.
- Chill and Serve: Serve immediately, or place back in the refrigerator until ready to enjoy.
❄️ Storage and Serving Secrets
Chocolate-covered strawberries are generally best enjoyed the same day they are made. The fresh fruit begins to break down and release moisture once it is encased in chocolate, which can lead to a soggy texture after a day or two.
If you must make them ahead of time, store them in an airtight container in the refrigerator for up to 24 hours. To prevent condensation from ruining the chocolate’s finish, place a layer of paper towels at the bottom of the container, put the strawberries on top, and then drape another paper towel lightly over the top of the berries before sealing the lid. This absorbs excess moisture in the air.
We recommend pulling the strawberries out of the refrigerator about 15 minutes before serving. Eating them slightly chilled is delicious, but taking the extreme chill off allows the flavor of the dark chocolate and the fragrant sweetness of the strawberry to truly shine on the palate.
✨ Conclusion: A Bite-Sized Taste of Heaven
Creating these Cheesecake-Topped Dark Chocolate Covered Strawberries is an exercise in culinary joy. It takes a familiar, beloved treat and transforms it into a multi-layered gourmet dessert that looks as though it came straight out of a high-end bakery window. The glossy snap of the dark chocolate, the burst of sweet berry juice, and the velvety, tangy finish of the cheesecake cream create a remarkably balanced and utterly addictive dessert.
Whether you are crafting them as a gift for a loved one, a centerpiece for a dessert table, or a midnight snack, these elegant little treats prove that you don’t need complicated techniques or hours in the kitchen to produce something truly spectacular. Enjoy the process of dipping, piping, and, most importantly, savoring every single bite!