Chicago-Style Bakery Apple Slices
The Ultimate Guide to Authentic Chicago-Style Bakery Apple Slices
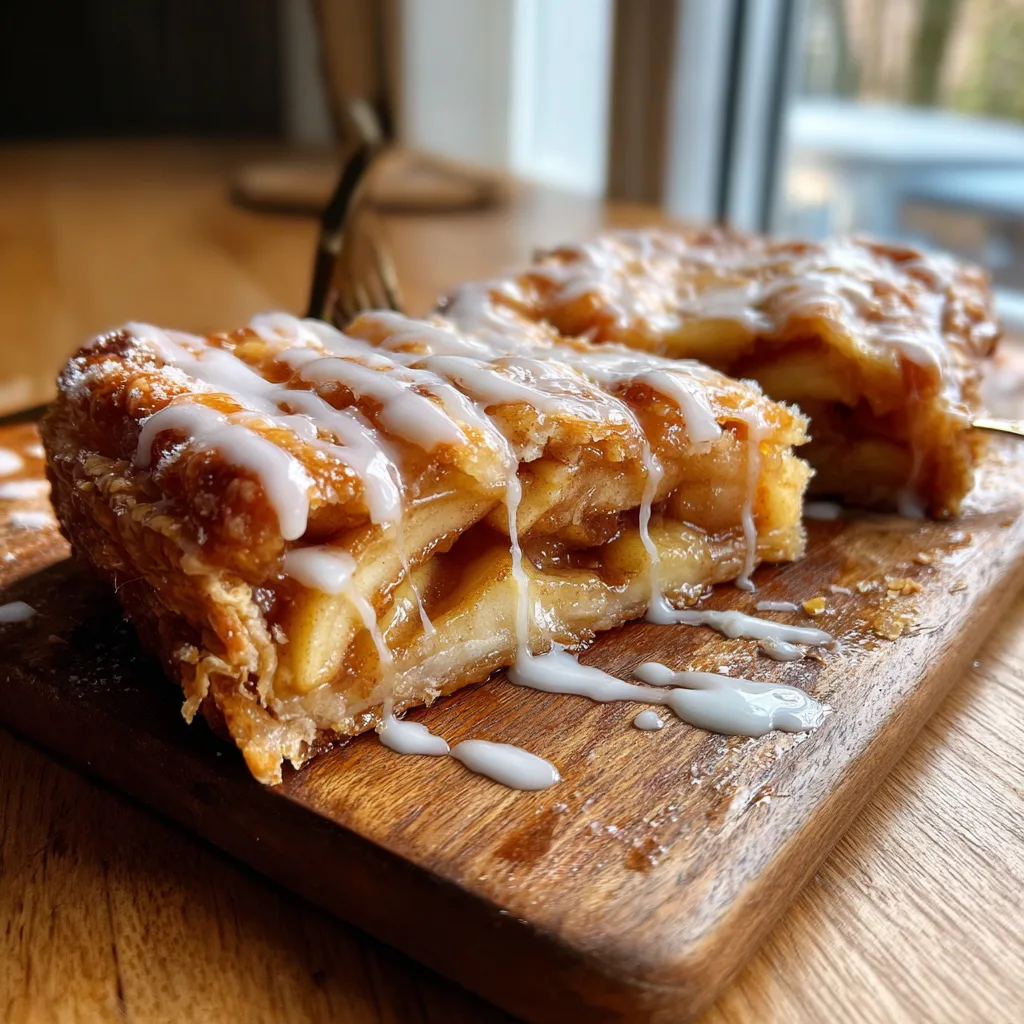
If you grew up in or around Chicago, you know that the “apple slice” is not just a piece of fruit—it is a bakery institution. Distinct from a traditional round apple pie, the Chicago-Style Bakery Apple Slice is a hefty, rectangular slab of flaky pastry, packed with spiced apples and slathered in a generous layer of sweet, white icing. It is a dessert that demands a napkin and often, a fork. It is the kind of treat you used to find wrapped in white wax paper at corner bakeries, heavy in your hand and promising pure comfort.
This recipe recreates that magic at home. We aren’t making a delicate French tart here; we are making a robust, sticky, sweet, and satisfying slab pie that feeds a crowd. The key lies in the balance between the sturdy but tender crust, the firmness of the apples which shouldn’t turn to applesauce, and the iconic glaze that hardens just enough to crackle when you bite into it. Whether you are prepping for a potluck, a family gathering, or just missing the taste of the Midwest, this guide will walk you through every step to achieve bakery-quality results in your own kitchen.
Why This Recipe Works
Many apple pie recipes suffer from a “soggy bottom” or a gap between the filling and the top crust. This recipe addresses those issues with a few bakery secrets. First, we use a higher ratio of shortening to butter in the crust. While butter provides flavor, shortening ensures the flakiness and structural integrity needed to hold the heavy fruit filling without collapsing. Second, we toss the apples with a specific blend of thickeners that turns the fruit juices into a glossy sauce rather than a watery mess.
Furthermore, this recipe is designed for a standard jelly roll pan or a 9×13 inch baking pan, depending on how thick you like your slices. This “slab” method means more crust-to-filling ratio in every bite, which is the hallmark of the Chicago style. The glaze creates a moisture seal, keeping the pastry fresh for days—if it lasts that long!
Choosing the Right Apples
The success of your Chicago-Style Bakery Apple Slices hinges entirely on your choice of apple. You need an apple that holds its shape under high heat. If you use a softer eating apple like a Red Delicious or a Gala, you will end up with mush inside your crust. We want distinct slices that offer a slight resistance when bitten.
- Granny Smith: The gold standard. They are tart, firm, and balance the sweetness of the heavy glaze perfectly.
- Jonathan or Jonagold: These are traditional Midwest favorites often used in old-school Chicago bakeries. They have a great sweet-tart balance.
- Braeburn: Excellent texture retention and a spicy flavor profile.
- The Mix: For the best depth of flavor, try using a mix of Granny Smith and Braeburn.
Ingredients
Here is everything you will need to assemble this masterpiece. Ensure your ingredients, especially fats, are at the correct temperature before starting.
Chicago-Style Bakery Apple Slices
Ingredients
Equipment
Method
- Preheat oven to 400°F (200°C).
- Mix flour, sugar, and salt. Cut in shortening and butter until coarse crumbs form.
- Whisk egg, vinegar, and ice water. Add to flour mixture and form dough. Divide into two discs (one slightly larger) and chill.
- Peel and slice apples. Toss with lemon juice. In a separate bowl, mix sugars, spices, and cornstarch. Toss apples in sugar mixture.
- Roll out larger dough disc to line a jelly roll pan. Sprinkle crushed cornflakes over the bottom.
- Layer apples over the crust. Roll out top crust and place over apples. Seal edges and cut steam vents.
- Bake 45-55 minutes until golden brown. Cool on wire rack.
- Whisk glaze ingredients until smooth. Drizzle over warm pastry. Let set before slicing.
Notes
For the Flaky Crust
- – 4 cups all-purpose flour (plus extra for rolling)
- – 2 tbsp granulated sugar
- – 1 ½ tsp salt
- – 1 ½ cups vegetable shortening (chilled)
- – ½ cup unsalted butter (cold, cubed)
- – 1 egg (large)
- – ½ cup ice water (approximate amount, use as needed)
- – 1 tbsp white vinegar (helps tenderize the gluten)
For the Apple Filling
- – 8-10 large Granny Smith apples (peeled, cored, and sliced ¼ inch thick)
- – 1 cup granulated sugar
- – ½ cup brown sugar, packed
- – 2 tsp ground cinnamon
- – ½ tsp ground nutmeg
- – ¼ tsp ground cloves (optional, for extra warmth)
- – 2 tbsp lemon juice (freshly squeezed)
- – 3 tbsp cornstarch (to thicken the juices)
- – ½ cup crushed cornflakes or breadcrumbs (bakery secret: sprinkled on the bottom crust to absorb moisture)
For the Iconic Glaze
- – 2 cups powdered sugar (sifted)
- – 3-4 tbsp whole milk or heavy cream
- – 1 tsp vanilla extract
- – 1 tbsp melted butter (gives the glaze a nice sheen)
Instructions
Step 1: Prepare the Dough
1. In a very large mixing bowl, whisk together the flour, sugar, and salt.
2. Cut in the chilled shortening and cold butter using a pastry blender or two forks. You want the mixture to look like coarse crumbs with some pea-sized bits of butter remaining. Do not overwork it; those fat pockets create the flakes.
3. In a small measuring cup, beat the egg with the vinegar and ice water. Drizzle this liquid over the flour mixture gradually, tossing with a fork until the dough just starts to cling together. If it is too dry, add cold water one teaspoon at a time.
4. Divide the dough into two portions: one slightly larger (about 60% of the dough) for the bottom crust, and the rest for the top. Disc them, wrap in plastic, and refrigerate for at least 30 minutes. Cold dough is essential!
Step 2: Prepare the Filling
5. While the dough chills, peel, core, and slice your apples. Place them in a large bowl and toss with the lemon juice immediately to prevent browning.
6. In a separate small bowl, mix the granulated sugar, brown sugar, cinnamon, nutmeg, cloves, and cornstarch. Pour this over the apples and toss until every slice is evenly coated. Let this sit for 10 minutes so the apples release some juice.
Step 3: Assemble the Slab
7. Preheat your oven to 400°F (200°C).
8. On a generously floured surface, roll out the larger disc of dough into a rectangle large enough to cover the bottom and sides of a 10×15 inch jelly roll pan (or a 9×13 pan for thicker slices). Carefully transfer the dough to the pan.
9. Bakery Trick: Sprinkle the crushed cornflakes or breadcrumbs evenly over the bottom crust. This layer will absorb the apple juices during baking, preventing the dreaded soggy bottom.
10. Arrange the apple slices over the cornflakes in an even layer. If there is a lot of liquid in the bottom of the apple bowl, pour half of it over the apples, but discard the rest if it seems excessive.
11. Roll out the second disc of dough to fit over the top. Place it over the apples. Fold the overhang of the bottom crust over the top crust and pinch or crimp the edges tightly to seal.
12. Cut several slits in the top crust to allow steam to escape. This is crucial—if the steam can’t get out, the crust will balloon.
Step 4: Bake to Perfection
13. Place the pan in the preheated oven and bake for 45 to 55 minutes. You are looking for a deep golden brown crust and the filling should be bubbling through the vents.
14. If the edges start browning too quickly, cover them with foil strips after about 30 minutes.
15. Remove from the oven and place on a wire rack. Let it cool for at least 20 minutes before glazing. You want it warm, but not piping hot, or the glaze will just evaporate.
Step 5: The Glaze
16. Whisk together the powdered sugar, melted butter, vanilla, and enough milk to create a pourable but thick glaze. It should be the consistency of honey.
17. Drizzle or brush the glaze generously over the warm pastry. Let it spread and pool in the dips of the crust. Allow the glaze to set for at least an hour before slicing.
Tips for the Perfect Slice
Don’t Skip the Vinegar: You might wonder why vinegar is in the crust recipe. The acid inhibits the formation of gluten, which keeps the dough tender rather than tough. You won’t taste it in the final product, but you will feel the difference in texture.
The Cooling Period: It is incredibly tempting to cut into these Bakery Apple Slices right when they come out of the oven. However, apple fillings need time to set. If you cut it too hot, the filling will run out, and you will lose that distinct “slice” structure. Patience is a key ingredient here.
Storage: Unlike cream pies, these apple slices store beautifully at room temperature for up to 2 days, covered loosely with foil. If you want to keep them longer, refrigerate them, but be aware the crust may lose a bit of its crispness. To refresh, pop a slice in the toaster oven for 5 minutes.
Serving Suggestions and Variations
While the classic Chicago style is eaten out of hand or with a fork as is, there are ways to elevate this dessert for a dinner party.
- À la Mode: Serve a warm slice with a scoop of cinnamon or vanilla bean ice cream. The cold cream melting into the warm spiced apples is heavenly.
- Caramel Drizzle: For an extra indulgent treat, drizzle salted caramel sauce over the white icing.
- Cheddar Cheese: It sounds strange to the uninitiated, but a slice of sharp cheddar cheese served alongside warm apple pie is a classic Midwest tradition. The salty sharpness cuts through the sweetness beautifully.
- Walnuts: If you like a crunch, add ½ cup of chopped toasted walnuts to the apple mixture before filling the pie.
The History of the Apple Slice
The “Apple Slice” is a staple of mid-century American baking, particularly prominent in the Midwest. Bakeries needed a way to serve apple pie that was portable, easy to portion, and visually appealing in a long display case. The rectangular shape allowed for efficient cutting and less waste compared to round pies.
In Chicago, these were often breakfast items as much as desserts. Commuters would grab a slice wrapped in wax paper to go with their morning coffee. The heavy glaze was a practical addition as well as a tasty one—it acted as a preservative, sealing the moisture inside the pastry so it didn’t dry out in the display case throughout the day.
Conclusion
Making Chicago-Style Bakery Apple Slices is a labor of love that pays off in nostalgia and flavor. It is a rustic, hearty dessert that feels like home. The smell of cinnamon and baking apples filling your kitchen is arguably as good as the taste of the pie itself. Whether you are an experienced baker or trying your hand at pastry for the first time, this recipe is forgiving and rewarding.
So, clear off your counter, dust some flour, and get ready to bake the best apple dessert you have ever had. Don’t forget to brew a strong pot of coffee to go with your first slice!