Easy No-Bake Petit Fours
Petit fours are the epitome of elegant, bite-sized desserts. Historically, they were a complex confection, requiring delicate cake baking, precise filling layering, and a perfectly cooked poured fondant glaze. But who has hours to spend in the kitchen when you can achieve stunning, professional-looking results in a fraction of the time? This recipe for Easy No-Bake Petit Fours is a game-changer. By skipping the baking and simplify the glazing process, you can create a beautiful, custom array of these treats in just 30 minutes! Perfect for high tea, baby showers, or any celebration where you want to impress without the stress.
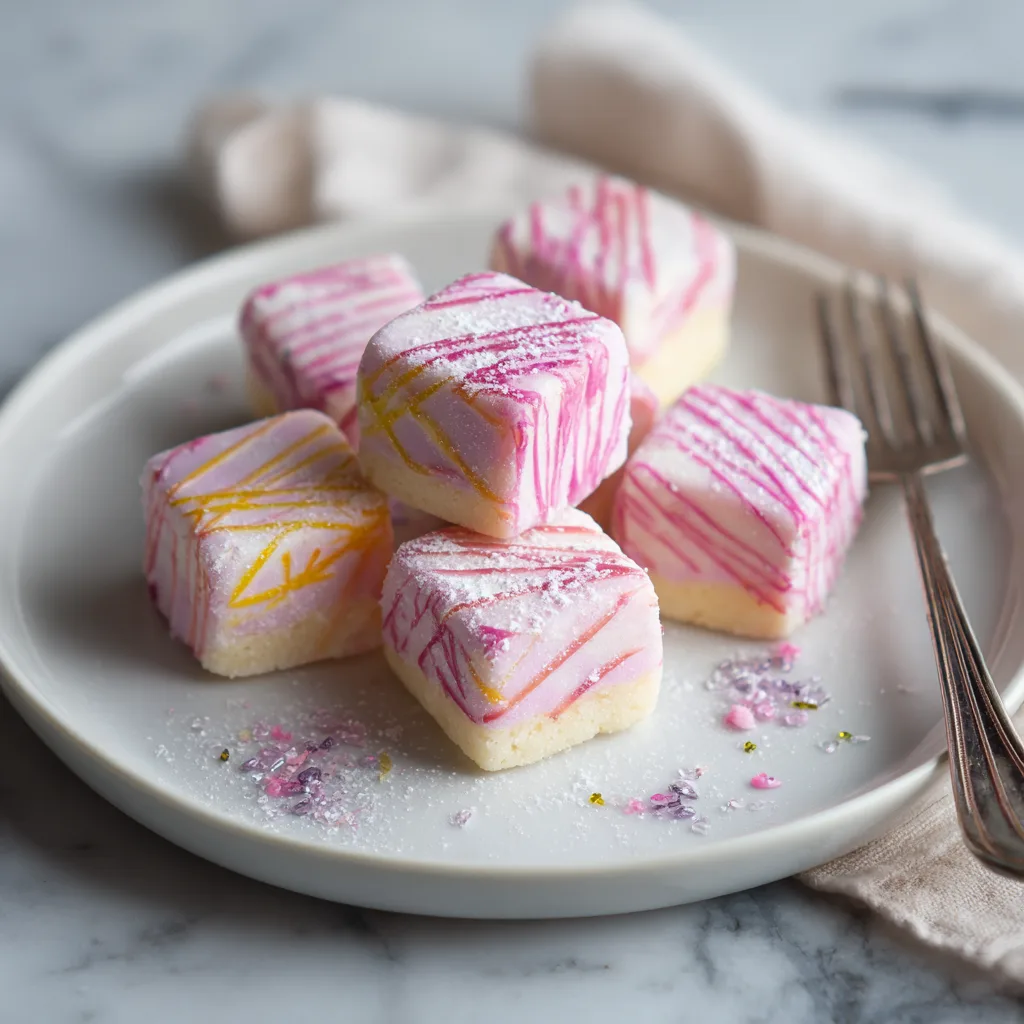
The beauty of this recipe lies in its simplicity and versatility. We’ll show you how to transform a humble store-bought cake into a masterpiece of various designs. From elegant line art to shimmering sugar crusts, this tutorial covers the core decoration techniques shown in our featured image, making you a dessert decorator pro in no time.
Why You’ll Love These No-Bake Petit Fours
These petite fours are a true lifesaver. Here’s why you’ll make them again and again:
- Zero Baking: That’s right. No oven needed. This is the ultimate “last-minute” impressive dessert.
- Incredible Speed: Ready in just 30 minutes of hands-on time, plus chilling time.
- Stunning Visuals: They look professional and expensive. Your guests will be convinced you spent hours.
- Customizable: With different glaze colors and toppings, you can tailor them for any holiday or party theme.
- Kid-Friendly Project: Once the glazes are set, kids can help with the decorations!
The Core Concept: Store-Bought Made Elegant
The secret to this recipe is starting with a dense, store-bought pound cake loaf. Brand names like Sara Lee or Entenmann’s work perfectly. The key is a dense, smooth crumb that won’t fall apart when cut and will stand up to the weight of the glaze. If you use a light, airy cake, it will absorb the glaze like a sponge and lose its shape.
We’ll provide you with a simplified glaze recipe that behaves beautifully and sets up smoothly, creating that perfect, glossy canvas for our intricate decorations. Then, the fun begins with our breakdown of four distinct decorative finishes.
Ingredients for Easy No-Bake Petit Fours
Below is a list of everything you need. Ensure you have the proper food coloring for vibrant colors, as liquid colors can alter the glaze consistency.
No-Bake Petit Four Base
– 1 dense, high-quality store-bought pound cake loaf (sliced)
– 1/4 cup apricot or raspberry jam (optional, for a thin layer filling)
Quick Set Poured Glaze
– 3 cups powdered sugar, sifted
– 1/3 cup whole milk or heavy cream
– 1 tsp vanilla extract
– Gel food coloring (Pink, Lavender, etc.)
– Optional: White food coloring for extra opaque glazes
– 1 tsp coconut oil (optional, for extra shine)
Decorations & Piping
– 1/2 cup powdered sugar (for piping paste)
– 1 tbsp milk (for piping paste)
– Small piping bags with very fine round tips (or ziploc bags with small corner snip)
– Various sanding sugars (pink, clear, purple)
– Small sprinkles or jimmies (purple, pink)
– Edible glitter (optional)
Instructions for the Perfect Petit Four
Part 1: Preparation and Cutting
- Prepare the Cake: If your pound cake is uncut, slice the entire loaf horizontally into three or four thin layers, about 1/2 inch thick. Try to make them as even as possible. If it’s pre-sliced, you’re ahead!
- Stack with Jam (Optional): If using jam, spread a very thin, even layer of jam over the top surface of all but one layer of cake. Then, re-stack the layers precisely. This will create a tiny burst of flavor in the center. Chill the stack for 10 minutes to help it set.
- Cut into Squares: Using a sharp serrated knife, cut the stack carefully into small, precise 1-inch or 1.25-inch squares. Keep them small for a true petit four feel. Discard or snack on any uneven edges. Place the cut squares onto a wire rack set over a baking sheet or parchment paper to catch the glaze drips. Chill the squares for another 10 minutes; cold cake holds its shape better during dipping.
Part 2: Glaze and First Coat
- Prepare the Glazes: In a medium, heat-safe bowl, whisk together the sifted powdered sugar, milk (or cream), and vanilla extract until smooth. You want a thick, pourable consistency. If it’s too thick, add a teaspoon more milk. If too thin, add more powdered sugar. Add a drop of white food coloring if you want a more opaque base glaze, and the optional coconut oil for shine.
- Divide and Color: Divide the warm base glaze into multiple small bowls, as many as you have color variations for. In our image, we need white, pink, and lavender. Use a tiny toothpick-tip amount of gel food coloring to achieve your desired shade. Start small; you can always add more. Stir gently to avoid creating air bubbles. (Keep the bowls over a pot of gently simmering water, or pop them in the microwave for 5-10 seconds periodically, to keep them pourable.)
- Dip the Cakes: One by one, use a small fork to carefully dip each chilled cake square into its respective glaze. Ensure all sides and the top are fully coated. Gently lift it out, letting the excess glaze drip back into the bowl. Carefully place the glazed square back onto the wire rack to set.
- Initial Set: Let the glazed petit fours sit undisturbed at room temperature for 15-20 minutes, or pop them in the refrigerator for 5-10 minutes, until the surface is no longer sticky to the touch.
Part 3: Decorative Mastery (The Breakdown)
Now, let’s look at the four specific finishes from our image:
1. Classic Contrast Line Art (Top Left, Second Row Center)
Method: After your petit fours are fully glazed and set, prepare your contrasting piping icings. In small bowls, mix the extra powdered sugar and milk until you have a thick, smooth paste. Load a white paste and a pink paste into two small piping bags with tiny round tips. Using a steady, controlled motion, pipe thin, parallel zig-zag lines across the surface of the petit fours, in a color that contrasts with the base glaze (e.g., white lines on pink, pink lines on white). Focus on consistent pressure for even lines. Let the piping set for 10-15 minutes.
2. Shimmering Sanding Sugar Crust (Top Row Center, Second Row Left, Third Row Center)
Method: This technique is best done before the base glaze fully sets! While the base glaze is still slightly wet and tacky, hold the petit four carefully and dip only the top surface into a small bowl filled with fine sanding sugar. For our image, use pink sanding sugar for a pink base, clear sanding sugar for a white base, and clear/purple for the lavender base. The sugar will adhere only to the tacky surface, creating a beautiful, sparkling crust. Place it back on the rack and let it set completely.
3. Textured Toppings with Sprinkles (Bottom Row Left, Bottom Row Right)
Method: Similar to the sugar crust, this is done when the glaze is tacky. For the pink base with sprinkles, lightly press small, matching pink sprinkles or jimmies into the tacky glaze on the top surface. For the lavender base with purple sprinkles, use purple jimmies. Avoid overloading to maintain elegance. Let it set.
4. Solid Base with Mixed Shimmer (Not specifically in image, but a variation)
Method: For a simple, elegant variation, glaze the petit four and then, while wet, lightly sprinkle the top surface with a pinch of clear sanding sugar and maybe a touch of edible glitter, for a more subtle shimmer without a full crust. Let it set.
Top Tips for No-Bake Success
- Glaze Consistency is Everything: If the glaze is too thin, it will look watery and see-through on the cake. If it’s too thick, you’ll have a lumpy, uneven coat that takes too long to set. Aim for a texture similar to warm honey. Keep it warm to maintain this consistency.
- Cold Cake: Keeping the cut cake squares chilled before dipping is critical. Warm cake is soft and will fall apart during dipping, and a cold cake will make the warm glaze set slightly faster on contact.
- Clean Cuts: For professional-looking squares, use a very sharp serrated knife and wipe the blade clean after every few cuts. Cutting through multiple layers requires precision. Chill the cake stack well before cutting.
- A Wire Rack is Your Best Friend: This allows the excess glaze to drip away, preventing messy, rounded edges and pooled glaze at the bottom of your petit fours.
- Avoid Over-Coloring: Gel colors are concentrated. A tiny bit goes a long way. Use a clean toothpick to add color incrementally. Excessive coloring can also affect the flavor.
- Sift the Sugar: Do not skip sifting your powdered sugar. Lumpy glaze is the fastest way to make your petit fours look amateur.
Variations to Keep Things Exciting
Once you’ve mastered the basic technique, the possibilities are endless!
- Different Cake Bases: Instead of traditional pound cake, try a dense angel food cake or even a flavored store-bought sponge cake (like lemon or marble pound cake).
- Gourmet Glazes: Replace vanilla extract with other flavors like almond, peppermint, or even a teaspoon of coconut cream. Add a tiny pinch of salt to balance the sweetness. A white chocolate glaze is also a fantastic alternative.
- Hidden Fillings: Spread a thin layer of Nutella, chocolate ganache, or a high-quality fruit curd (like lemon or orange) between your cake layers.
- Elegant Toppings: Finely chop pistachios or other nuts and sprinkle them over the top. A tiny edible gold leaf flake is the ultimate sophisticated touch. Fresh, small edible flowers (like violas) look stunning.
- Chocolate Drizzle: Swap the white or pink piping icing for a thin chocolate glaze (made with melted chocolate and a bit of oil) for a rich contrast.
Serving Suggestions for Your Petit Four Platter
Petit fours are special and deserve a beautiful presentation. Here are a few ideas:
- Tea Time Treats: Arrange them on a tiered cake stand alongside miniature scones with clotted cream and assorted loose-leaf teas for an authentic afternoon tea experience.
- Party Favors: Place three or four varied petit fours in a small, clear box tied with a satin ribbon as a memorable wedding or baby shower favor.
- Holiday Centerpiece: For a holiday dessert, use seasonal glaze colors (e.g., green, red, and white) and toppings (crushed candy canes, snowflake sprinkles). Arrange them in a tree or wreath shape.
- Decadent Dessert Flight: Serve a small plate of three with a tiny scoop of vanilla bean ice cream and a warm berry compote.
The Fascinating (and Sweet) History of Petit Fours
The name “petit four” is French, literally translating to “small oven.” This name refers back to the traditional method of baking in large, intense bread ovens. After the major baking was done and the ovens were cooling down, bakers would utilize the remaining, lower heat (“petit four”) to slow-bake delicate, intricate confections. This low temperature was perfect for creating items with thin layers and fine glazes that couldn’t withstand the initial blazing heat. Over centuries, these confections became synonymous with luxury and meticulous detail.
While we aren’t using a “small oven” for this particular no-bake recipe, the dedication to small, intricate, beautifully decorated treats is the same. We are just using modern efficiency to enjoy this luxury every day.
Conclusion: Elegant Treats Made Simple
Creating these no-bake petit fours is a delightful, creative process. The image of the beautiful, varied treats on that white tray isn’t a complex, unattainable dream. With a store-bought cake and a simple set of techniques, you can bring this vision to life. So, skip the oven, get your glazes ready, and enjoy the elegant simplicity of these little squares. They are as tasty as they are beautiful. Enjoy every bite!
Easy No-Bake Petit Fours in 30 Minutes
Ingredients
Equipment
Method
- If cake is uncut, slice into thin 1/2-inch horizontal layers. Spread a very thin layer of jam between all but the top layer (optional). Re-stack, wrap in plastic, and chill for 10 minutes.
- Using a serrated knife, cut the chilled cake stack precisely into 1-inch squares. Arrange squares on a wire rack set over a baking sheet to catch glaze. Chill squares for another 10 minutes.
- Prepare the base glaze by whisking sifted powdered sugar, milk (or cream), vanilla, and optional coconut oil until smooth. Divide the glaze into separate small, warm bowls. Color each bowl with gel food coloring to desired shades (white, pink, lavender, etc.)
- One by one, use a small fork to dip each chilled cake square into its respective glaze, ensuring full coverage. Let excess glaze drip off, then place back on the wire rack to set. Repeat for all squares.
- Let the glazes set completely at room temperature (15-20 min) or in the fridge (5-10 min) before decorating.
- For line art: Mix extra powdered sugar and milk into thick paste. Load into contrasting small piping bags. Pipe thin, parallel zig-zag lines across set petit fours (e.g., white on pink, pink on white). Let set.
- For sugar crust: While a second glaze coat is still wet and tacky, dip the top surface into fine sanding sugar (pink, clear, or purple). Let set.
- For sprinkled: While the second glaze coat is still tacky, lightly press sprinkles into the top surface. Let set.
- Ensure all decorations are set before serving or storing in an airtight container at room temperature for up to 2 days.