Homemade Chocolate Peanut Butter Crunch Bars
The Ultimate Guide to Homemade Chocolate Peanut Butter Crunch Bars
There is something undeniably nostalgic about the combination of chocolate and crispy puffed rice. It takes many of us back to childhood afternoons, unwrapping a crinkly blue foil wrapper to reveal a Nestle Crunch bar. However, as our palates mature, we often crave something a bit more elevated—something with deeper flavor profiles, better quality chocolate, and that perfect balance of sweet and salty. Enter the Homemade Chocolate Peanut Butter Crunch Bar.
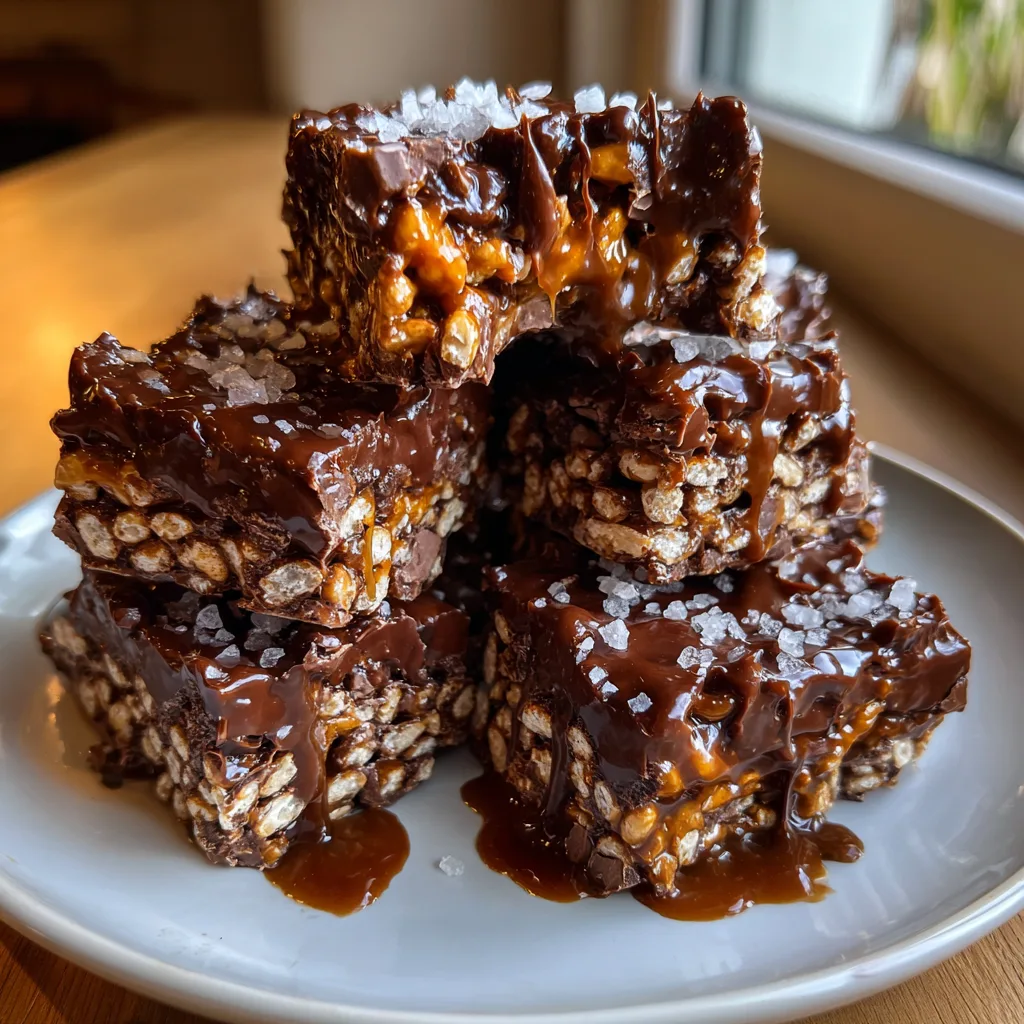
This recipe is not just a copycat; it is a massive upgrade. By introducing creamy peanut butter into the chocolate base and finishing with artisanal flaked sea salt, we transform a basic candy aisle snack into a gourmet treat. The best part? It requires only four ingredients and absolutely zero baking. It is the perfect recipe for busy parents, novice cooks, or anyone needing a chocolate fix in a hurry.
In this comprehensive guide, we will explore everything you need to know about making these bars, from selecting the right chocolate to mastering the melting process, and even how to store them for maximum freshness. Whether you are making these for a holiday cookie box, a potluck, or just a midnight snack, this guide has you covered.
Why You Will Love This Recipe
Before we dive into the nitty-gritty of the ingredients, let’s talk about why this recipe deserves a permanent spot in your repertoire. First and foremost, the simplicity is unbeatable. With only four pantry staples, you can whip this up without a grocery run. Secondly, the texture is phenomenal. Store-bought bars often have a waxy texture due to stabilizers and preservatives. When you make this at home, you get the snap of real chocolate, the creamy mouthfeel of peanut butter, and the undiluted crunch of fresh cereal.
Furthermore, this recipe is naturally gluten-free (provided you double-check your cereal choice) and can easily be made vegan by choosing dairy-free chocolate. It is a chameleon of a dessert that fits almost any dietary requirement while feeling entirely indulgent.
Ingredients
The beauty of this recipe lies in its minimalism. However, with so few ingredients, the quality of each one matters significantly.
- Chocolate Chips (1 ½ cups): This is the backbone of the recipe. You can use semi-sweet, milk, or dark chocolate. Semi-sweet is the traditional choice as it provides a balance that isn’t too cloying. If you prefer a more sophisticated, less sweet bar, opt for 60% or 70% dark chocolate. High-quality brands like Guittard or Ghirardelli melt smoother than generic store brands.
- Peanut Butter (⅓ cup): Creamy peanut butter is essential here. It acts as a binder and softens the chocolate slightly, giving the bars a softer bite than pure chocolate would have. While natural peanut butter (the kind with oil separation) tastes great, standard commercial peanut butter (like Jif or Skippy) often provides a more stable emulsion for no-bake treats. If using natural, ensure it is stirred very well.
- Rice Krispies (1 cup): Also known as crisp rice cereal. This provides the signature “crunch.” Ensure your cereal is fresh; stale cereal will result in a chewy, tough bar rather than a crispy one. For a gluten-free version, make sure the box explicitly states “Gluten-Free,” as standard Rice Krispies can contain malt flavoring derived from barley.
- Flaked Sea Salt: This is the secret weapon. A sprinkle of Maldon or fleur de sel on top cuts through the richness of the chocolate and peanut butter, elevating the flavor from “candy” to “dessert.” Do not use table salt for the topping; the crystals are too small and salty.
Instructions
Follow these step-by-step instructions to achieve the perfect glossy, crunchy bar.
- Prepare the Pan: Start by lining a standard loaf pan (9×5 inch) or a small square baking dish (8×8 inch) with parchment paper. Leave an overhang on the sides—this will act as a “sling” to help you lift the bars out easily once they are set. If you skip this step, getting the hardened chocolate out of the pan can be a nightmare.
- Melt the Chocolate and Peanut Butter: In a large microwave-safe bowl, combine the 1 ½ cups of chocolate chips and ⅓ cup of peanut butter. Microwave in 30-second intervals. After each interval, remove the bowl and stir vigorously. It usually takes about 60 to 90 seconds total. Do not overheat, or the chocolate can seize and become grainy.
Alternative Method: You can also use a double boiler on the stovetop. Place a heatproof bowl over a pot of simmering water (ensure the water doesn’t touch the bowl) and stir until melted. - Mix the Batter: Once the chocolate and peanut butter are completely smooth and combined, remove from heat. Immediately pour in the 1 cup of Rice Krispies. Using a rubber spatula, fold the cereal into the chocolate mixture. Ensure every single grain of rice is coated in the chocolate. You don’t want any dry pockets.
- Spread and Shape: Pour the mixture into your prepared parchment-lined pan. Use the back of your spatula or a spoon to spread it evenly into the corners. Press down slightly to compact the bars, which ensures they hold together when cut, but don’t crush the cereal completely.
- The Salt Finish: While the chocolate is still wet and glossy, sprinkle the flaked sea salt over the top. The amount is up to your preference, but a generous pinch usually does the trick.
- Chill to Set: Place the pan in the refrigerator for at least 30 minutes to 1 hour, or until the block is completely firm. If you are in a rush, the freezer works in about 15-20 minutes.
- Slice and Serve: Once set, use the parchment overhang to lift the block out of the pan. Place it on a cutting board. Using a sharp chef’s knife, cut into bars or squares. If the chocolate is very hard, let it sit at room temperature for 5 minutes before cutting to prevent cracking.
The Science of Melting Chocolate
Understanding how chocolate behaves is key to this recipe. Chocolate is a crystal structure. When you melt it with peanut butter, you are essentially creating a ganache-style fat mixture. The fat in the peanut butter lowers the melting point of the chocolate slightly, which is why these bars have a softer, more pleasant “bite” than a solid block of chocolate. This is often referred to by confectioners as “meltaway” texture.
If your chocolate seizes (turns into a hard, grainy lump) while melting, it usually means a tiny amount of water got into the bowl, or it was overheated. Unfortunately, seized chocolate is hard to fix for this specific recipe, so it is best to be careful. Ensure your bowl and utensils are completely dry before starting.
Variations and Customizations
While the classic 4-ingredient version is perfection, there is plenty of room for creativity.
1. The Nutty Crunch
If you love texture, add ¼ cup of chopped roasted peanuts or almonds along with the Rice Krispies. This amplifies the nutty flavor profile and adds a heavier crunch.
2. The “S’mores” Profile
Fold in ¼ cup of mini marshmallows with the cereal. The marshmallows will soften slightly in the warm chocolate, creating chewy pockets throughout the bar.
3. White Chocolate & Cranberry
Swap the semi-sweet chocolate for white chocolate chips and add a handful of dried cranberries or dried cherries. The tartness of the fruit cuts through the intense sweetness of the white chocolate.
4. Cookie Butter Swap
Allergic to peanuts? Or just love Speculoos? Swap the peanut butter for Biscoff cookie butter or almond butter. The ratio remains the same (⅓ cup).
Storage and Shelf Life
Because these bars contain no dairy cream or eggs, they have a remarkably long shelf life.
Room Temperature: You can store these in an airtight container at room temperature for up to 5 days, provided your kitchen isn’t too hot. If it’s summer, they might get a bit messy.
Refrigerator: This is the ideal storage method. Kept in the fridge, they stay crisp and firm for up to 2 weeks. The cold snap of the chocolate is particularly refreshing.
Freezer: These freeze beautifully. Wrap the cut bars individually in parchment paper and place them in a freezer bag. They can be stored for up to 3 months. You can eat them straight from the freezer for a rock-hard treat, or let them thaw for 10 minutes.
Serving Suggestions
These bars are versatile. Here are a few ways to serve them:
- The Coffee Companion: Serve a small square alongside a hot espresso. The bitterness of the coffee pairs perfectly with the sweet, salty chocolate.
- Ice Cream Topper: Chop the bars into small chunks and use them as a topping for vanilla bean ice cream.
- Gift Giving: Because they are sturdy, these bars make excellent edible gifts. Stack three bars, wrap them in clear cellophane, and tie with a rustic twine bow. It looks professional and artisanal.
Troubleshooting Common Issues
My bars are crumbling when I cut them.
This usually means the ratio of cereal to chocolate was too high, or you didn’t press the mixture down firmly enough into the pan. Next time, try adding an extra tablespoon of peanut butter or reducing the cereal slightly.
The chocolate looks dull or has white streaks.
This is called “bloom.” It happens if the chocolate got too hot or cooled down too slowly. While it affects the appearance, it is perfectly safe to eat and won’t impact the taste much.
The bars are too hard to bite.
If you used very dark chocolate and chilled them deeply, they can be quite firm. Let them sit on the counter for 10 minutes before eating, or increase the peanut butter amount slightly in the next batch to soften the texture.
Nutritional Context
While these are a dessert, they do offer some redeeming qualities thanks to the peanut butter. You get a small boost of protein and healthy fats. However, portion control is key. Cutting the block into smaller, bite-sized squares (miniatures) is a great way to satisfy a craving without overindulging. Using dark chocolate also increases the antioxidant content of the treat.
In conclusion, the Homemade Chocolate Peanut Butter Crunch Bar is the ultimate high-reward, low-effort recipe. It respects your time while delivering a product that tastes like it came from a boutique chocolatier. So, grab that bag of chocolate chips from the back of your pantry and get melting!
Homemade Chocolate Peanut Butter Crunch Bars
Ingredients
Equipment
Method
- Line an 8×8 inch square baking pan or a standard loaf pan with parchment paper, leaving overhang on the sides for easy removal.
- In a large microwave-safe bowl, combine the chocolate chips and peanut butter.
- Microwave in 30-second intervals, stirring vigorously in between, until completely melted and smooth (about 60-90 seconds total).
- Pour the Rice Krispies cereal into the melted chocolate mixture.
- Fold gently with a spatula until every piece of cereal is coated in chocolate.
- Transfer the mixture to the prepared baking pan. Spread evenly and press down slightly to compact.
- Immediately sprinkle the flaked sea salt over the top while the chocolate is still wet.
- Refrigerate for at least 30 minutes until set firm.
- Lift out of the pan using the parchment paper and cut into bars or squares.