No Bake Grinch Cheesecake
No Bake Grinch Cheesecake: The Ultimate Holiday Heart-Grower 🎄💚🍰
The holiday season is officially upon us, and with it comes the chaotic, joyful, and often stressful rush to get everything done. Between wrapping gifts, decorating the tree, and attending parties, oven space becomes the most valuable real estate in the house. That is exactly why you need this No Bake Grinch Cheesecake in your repertoire. It is vibrant, fun, incredibly delicious, and best of all, it requires zero baking time.
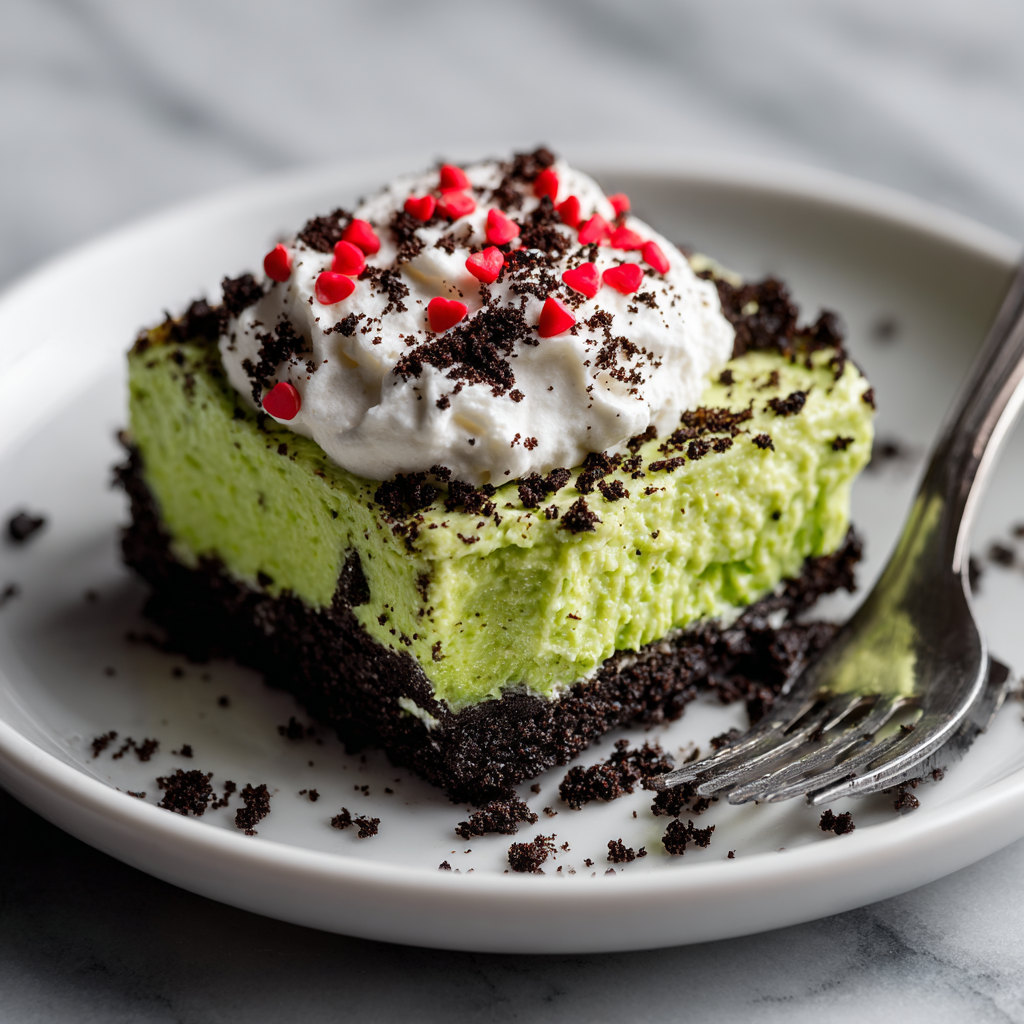
This dessert is a playful nod to everyone’s favorite holiday curmudgeon. With its neon green filling and a sweet little red heart sprinkle on top, it’s guaranteed to make even the smallest heart grow three sizes. But beyond the cute aesthetics, this is a seriously tasty dessert. The tangy, rich cream cheese filling is perfectly balanced by the sweet, crunchy, dark chocolate Oreo crust. It’s creamy, it’s dreamy, and it’s the easiest thing you will make all December.
Why “No Bake” is the Holiday Hero 🦸♂️
Let’s be honest: baking a traditional water-bath cheesecake is a labor of love. It requires precision, time, and a lot of worrying about cracks. A no-bake cheesecake, however, is the laid-back cousin that brings the fun without the drama.
- Oven Freedom: When the turkey or ham is hogging the oven, this cheesecake chills happily in the fridge.
- Texture Perfection: No-bake cheesecakes have a texture more akin to a mousse or a firm mousse-cake. They are lighter and airier than their baked counterparts because there are no eggs to weigh them down.
- Foolproof: There is no risk of overbaking, no risk of the top cracking, and no need for a water bath. If you can whip cream and crush cookies, you can make this cake.
The Architecture of a Grinch Cheesecake 🏗️
To build this festive masterpiece, we rely on two distinct layers that contrast in both color and texture.
The Foundation: Oreo Crust
We swap the traditional graham cracker crust for a crushed Oreo crust. Why? First, the color contrast between the black cookie crust and the green filling is striking and very “Grinch-like.” Second, the bitter cocoa notes in the Oreos cut through the sweetness of the filling, providing a much-needed flavor balance. You use the whole cookie here—cream filling and all—which acts as a binder along with the melted butter.
The Filling: Creamy Green Goodness
The filling is a mixture of softened cream cheese, sugar, vanilla, and whipped heavy cream. The heavy cream is whipped to stiff peaks and then gently folded into the sweetened cream cheese. This creates stability without using gelatin (though you can use gelatin if you want a rubberier texture, this recipe prefers the creamy mousse texture). The green color comes from gel food coloring. It is crucial to use gel rather than liquid drops, as liquid can water down the batter and prevent it from setting properly.
Ingredients Breakdown 🛒
Here is what you need to grab from the store.
- Oreos: You’ll need about 24-30 standard cookies. Generic chocolate sandwich cookies work just as well.
- Unsalted Butter: Melted, to bind the crust.
- Cream Cheese: Full-fat brick style is non-negotiable. The tub variety has too much air and water content and won’t set firmly.
- Heavy Whipping Cream: This must be cold to whip properly.
- Powdered Sugar: Dissolves easier than granulated sugar, ensuring a smooth, grit-free texture.
- Vanilla Extract: For that classic cheesecake flavor.
- Green Gel Food Coloring: “Leaf Green” or “Electric Green” give the best Grinch vibes.
- Red Heart Sprinkles: The essential garnish to represent the heart growing three sizes!
Customizing Your Grinch ✨
While the classic recipe is vanilla-flavored, you can easily twist this recipe to fit your taste preferences.
- Mint Chocolate: Add 1/2 teaspoon of peppermint extract to the green filling. Mint and chocolate are a classic holiday pairing.
- The “Max” Twist: Drizzle chocolate ganache over the top to represent the Grinch’s dog, Max.
- Individual Cups: Instead of a square pan, pipe the filling into small clear jars or shot glasses over a layer of crushed Oreos for adorable mini parfaits.
Ingredients 📝
For the Crust:
- 24 Oreo cookies (whole, with filling)
- 5 tbsp unsalted butter, melted
For the Filling:
- 16 oz (2 blocks) cream cheese, softened to room temperature
- 1 cup powdered sugar
- 1 tsp vanilla extract
- 1 1/4 cups heavy whipping cream, cold
- Green gel food coloring (as needed for desired shade)
For the Topping:
- Whipped cream (homemade or store-bought)
- Red heart sprinkles
- Green sprinkles (optional)
Instructions 👩🍳
- Prep the Pan: Line an 8×8 or 9×9 inch square baking pan with aluminum foil or parchment paper, leaving an overhang on the sides for easy lifting later. Spray lightly with non-stick cooking spray.
- Make the Crust: Place the Oreos in a food processor and pulse until they are fine crumbs. Pour in the melted butter and pulse again until the mixture resembles wet sand.
- Press the Crust: Dump the moist crumbs into the prepared pan. Using the bottom of a measuring cup or a glass, press the crumbs down firmly and evenly into the bottom of the pan. Place the pan in the freezer while you make the filling (at least 10 minutes).
- Whip the Cream: In a medium bowl, beat the cold heavy whipping cream with a hand mixer on high speed until stiff peaks form. Set this aside.
- Cream the Cheese: In a large bowl, beat the softened cream cheese and powdered sugar together until completely smooth and creamy. There should be no lumps. Add the vanilla extract and mix to combine.
- Color it Green: Add a small amount of green gel food coloring to the cream cheese mixture. Beat until the color is evenly distributed. Add more coloring gradually until you reach that vibrant “Grinchy” green.
- Fold: Gently fold the whipped cream into the green cream cheese mixture using a rubber spatula. Do not over-mix or you will deflate the air in the whipped cream. Fold just until combined and no white streaks remain.
- Assemble: Remove the crust from the freezer. Spread the green cheesecake filling evenly over the crust, smoothing the top with an offset spatula or the back of a spoon.
- Chill: Cover the pan with plastic wrap and refrigerate for at least 4-6 hours, or preferably overnight. The longer it chills, the cleaner the slices will be.
- Serve: Once set, use the foil/parchment overhang to lift the cheesecake out of the pan. Slice into squares. Top each square with a dollop of whipped cream and a red heart sprinkle.
Common Mistakes to Avoid 🚫
- Using Cold Cream Cheese: If your cream cheese is cold, it will be lumpy. It must be completely room temperature to blend smoothly with the sugar.
- Over-whipping the Cream: Stop beating the heavy cream once stiff peaks form. If you go too far, you’ll end up with butter.
- Using Liquid Food Coloring: As mentioned, liquid dye adds moisture. Stick to gel or paste colors for vibrant results without changing the consistency.
- Rushing the Chill Time: No-bake cheesecakes need time to firm up. If you cut it too soon, it will be a delicious pudding, but it won’t hold its shape as a bar.
Storage Tips 🥡
- Fridge: Store leftover cheesecake bars in an airtight container in the refrigerator for up to 4-5 days.
- Freezer: You can freeze these bars! Wrap them individually in plastic wrap and store in a freezer bag for up to 2 months. Thaw in the fridge before serving. Note that the texture might change slightly after freezing, becoming a bit more ice-cream-like.
- Decorating: Wait to add the whipped cream and sprinkles until just before serving, as the red sprinkles may bleed into the white cream if left sitting too long.
Conclusion
This No Bake Grinch Cheesecake is more than just a sugar rush; it’s a festive activity and a delicious treat rolled into one. It captures the whimsy of the season without adding to the stress of holiday baking. Whether you are making it for a school party, a movie night marathon, or just because you love the combination of chocolate and cream cheese, this recipe is a winner. So turn on the movie, grab your mixer, and let’s make a dessert that even the Grinch couldn’t resist! 🎄💚
No Bake Grinch Cheesecake
Ingredients
Equipment
Method
- Line an 8×8 inch baking pan with foil or parchment paper.
- Crush Oreos into fine crumbs using a food processor. Mix with melted butter.
- Press crumb mixture firmly into the bottom of the pan. Freeze for 10 minutes.
- Whip cold heavy cream in a bowl until stiff peaks form. Set aside.
- Beat softened cream cheese and powdered sugar until smooth. Mix in vanilla and green food coloring.
- Gently fold the whipped cream into the cheese mixture until combined and uniform in color.
- Spread filling over the crust. Cover and refrigerate for at least 4 hours or overnight.
- Slice into bars and top with whipped cream and a red heart sprinkle before serving.