No-Bake Robin Egg Easter Bark
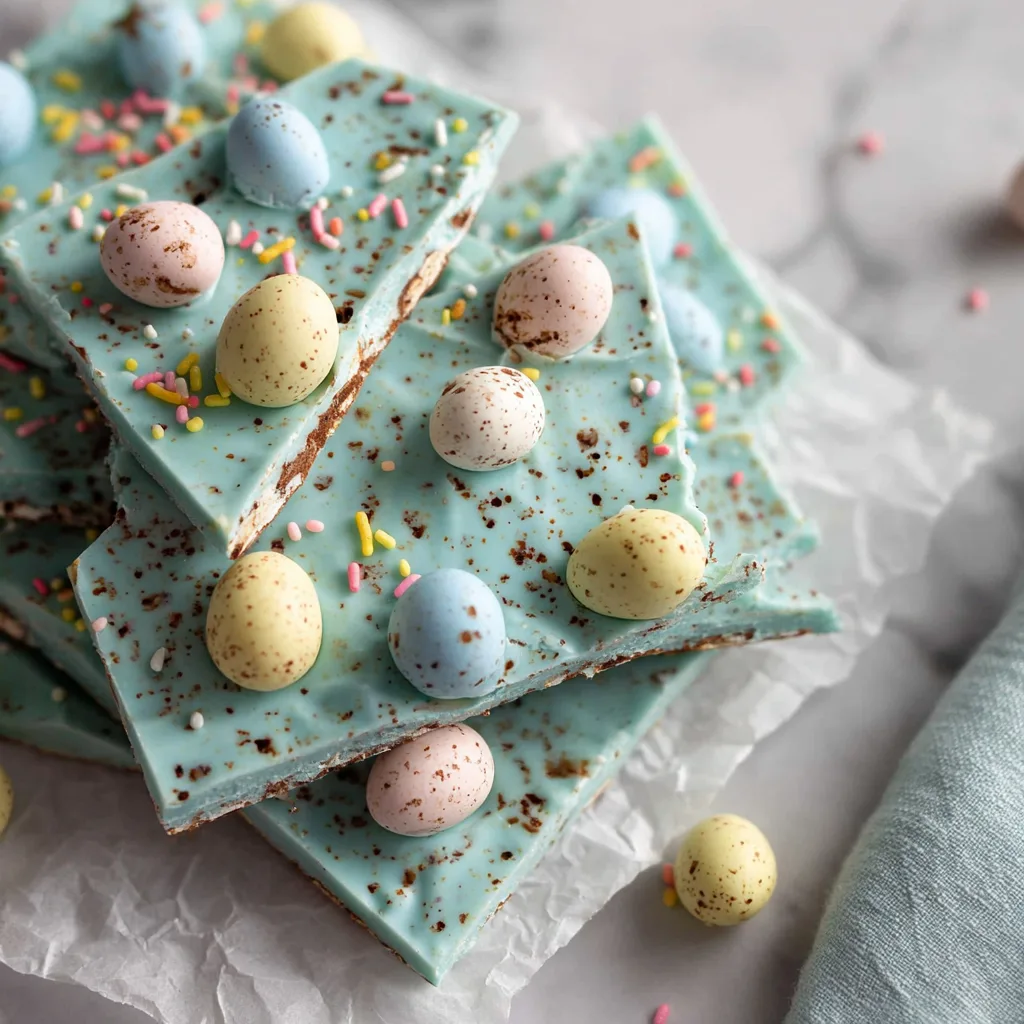
As the winter frost melts away and the first signs of spring begin to bloom, our culinary cravings shift from heavy, warm stews to bright, cheerful, and colorful treats. If you are looking for a show-stopping yet remarkably simple dessert to celebrate the season, this Robin Egg Easter Bark is exactly what you need. Inspired by the delicate and iconic appearance of real robin eggs, this vibrant blue chocolate bark is generously studded with pastel candies, sprinkles, and a delightful, authentic-looking cocoa speckle. It is a feast for the eyes and the palate, perfectly capturing the joy and renewal of springtime.
Chocolate bark is one of the most forgiving and versatile treats you can make in your kitchen. It requires no baking, no complex pastry skills, and only a handful of ingredients. Yet, the result looks like it came straight from a high-end artisanal candy shop. Whether you are hosting an elaborate Easter brunch, looking for a fun kitchen activity to do with the kids, or searching for the perfect homemade gift to tuck into Easter baskets, this visually stunning Robin Egg Easter Bark checks every single box. Let’s dive into the details of making this magical spring confection.
Why This Robin Egg Bark Will Be Your New Spring Tradition
There is a myriad of reasons why this specific recipe will earn a permanent spot in your springtime culinary repertoire. Foremost is its absolute simplicity. In under twenty minutes of active kitchen time, you can create a masterpiece. It relies entirely on melting, mixing, spreading, and decorating—tasks that are inherently fun and stress-free. Secondly, it is visually breathtaking. The soft, pastel blue base contrasts beautifully with the colorful, speckled malted milk eggs and the tiny bursts of color from the sprinkles.
Furthermore, this recipe is incredibly kid-friendly. Children love participating in the decorating process. Dropping the candy eggs onto the wet chocolate and adding the sprinkles allows them to express their creativity. But the real magic lies in the “speckling” technique, which we will discuss in detail below. Finally, the flavor profile is a guaranteed crowd-pleaser. The creamy, sweet white chocolate serves as the perfect canvas for the satisfying crunch of malted milk candies. It is a delightful textural contrast that makes every broken shard utterly irresistible.
The Secret to the Perfect “Speckle”
What elevates this bark from standard melted chocolate to a true “Robin Egg” masterpiece is the speckling effect. It is a simple technique that yields professional-looking results. To achieve this, we create a food-safe “paint” using just two ingredients: unsweetened cocoa powder and a tiny splash of vanilla extract (or water). By mixing these together, you create a thin, dark liquid.
Once your blue chocolate is spread out and decorated with candies, you take a clean, stiff-bristled brush (a pastry brush or even a brand-new, thoroughly washed toothbrush works wonders), dip it into the cocoa mixture, and pull your thumb back across the bristles to flick tiny splatters onto the chocolate. This creates an organic, random pattern of dark specks that perfectly mimics the natural pigmentation found on the shells of wild robin eggs. It’s a fun, slightly messy, and highly rewarding step that brings the entire visual concept together.
Mastering the Chocolate Melt: Tips for Success
While making bark is easy, the most critical step is melting the chocolate correctly. White chocolate, in particular, can be temperamental. It burns easily and can seize (turn into a hard, grainy clump) if it comes into contact with even a single drop of water. For the best taste and texture, you have two primary options: high-quality white chocolate chips/bars, or white candy melts (also known as almond bark or coating chocolate).
Candy melts are the most foolproof option. They are formulated to melt smoothly and set up quickly at room temperature. If you choose real white chocolate, ensure it contains cocoa butter. To melt it, always use a double boiler over gently simmering (not boiling) water, or use the microwave on 50% power, stirring vigorously every 30 seconds. Crucial Tip: When tinting white chocolate, you must use an oil-based candy coloring. Standard water-based or gel food colorings will cause the chocolate to seize instantly, ruining your batch.
Creative Variations to Customize Your Bark
The beauty of this Robin Egg Easter Bark is that it serves as a wonderful blank canvas. While the classic blue with speckled malted eggs is iconic, you can easily adapt this recipe to suit your tastes or the ingredients you have on hand. Here are a few delightful variations to try:
- Flavor Infusions: While the chocolate is melting, stir in a half teaspoon of almond extract, coconut extract, or even a drop of culinary peppermint oil for a surprising flavor twist.
- Different Candies: If you aren’t a fan of malted milk eggs, substitute them with pastel-colored M&Ms, miniature peanut butter cups, crushed cream-filled chocolate sandwich cookies, or the wildly popular Cadbury Mini Eggs with their crisp sugar shells.
- The Marbled Effect: Instead of making the entire base blue, melt two separate bowls of white chocolate. Tint one bowl blue and leave the other white. Dollop spoonfuls of both colors onto your parchment paper and swirl them together with a butter knife before adding your toppings for a beautiful, clouded sky effect.
- Salty-Sweet Combo: To cut through the sweetness of the white chocolate, press lightly salted pretzel pieces or crushed potato chips into the wet chocolate alongside your pastel candies.
Ingredients Section
For the Bark Base and Decor:
- 16 ounces (1 lb) high-quality white chocolate chips, white chocolate baking bars (chopped), or white candy melts
- Oil-based blue candy coloring (do not use water-based gel or liquid food coloring)
- 1 1/2 cups speckled malted milk egg candies (like Whoppers Robin Eggs), some whole and some carefully chopped in half
- 3 tablespoons pastel-colored spring sprinkles or nonpareils
For the Authentic Speckle Effect:
- 1 teaspoon unsweetened cocoa powder
- 1 to 2 teaspoons vanilla extract (or water)
Instructions Section
- Prepare Your Workspace: Line a large rimmed baking sheet (half sheet pan size) with a piece of parchment paper or a silicone baking mat. Set it aside. Prepare your toppings by chopping some of the malted milk eggs in half, leaving others whole for texture variation.
- Melt the Chocolate: Place the white chocolate or candy melts in a microwave-safe bowl. Microwave on 50% power in 30-second increments. After each 30 seconds, remove the bowl and stir vigorously. Continue this process until the chocolate is completely smooth and melted. Be careful not to overheat. (Alternatively, melt over a double boiler).
- Tint the Chocolate: Once the chocolate is smooth, add 1-2 drops of the blue oil-based candy coloring. Stir well. Add more coloring, one drop at a time, until you reach your desired shade of pale, robin’s egg blue.
- Spread the Base: Pour the tinted blue chocolate onto the center of your prepared baking sheet. Using an offset spatula or the back of a spoon, spread the chocolate out into an even layer, about 1/4-inch thick. It does not need to perfectly reach the edges or be a perfect rectangle; rustic edges look wonderful.
- Add the Toppings: While the chocolate is still warm and wet, immediately scatter the whole and halved malted milk egg candies evenly across the surface, pressing them very lightly so they adhere. Follow up by generously sprinkling the pastel sprinkles all over the empty blue spaces.
- Create the Speckle: In a tiny bowl, mix the cocoa powder and vanilla extract together until it forms a thin, watery paste. Dip a clean, stiff-bristled brush (like a pastry brush) lightly into the mixture. Hold the brush over the bark and use your thumb to pull back the bristles and let them snap forward, flicking tiny specks of the dark liquid all over the bark and candies.
- Chill and Break: Place the baking sheet in the refrigerator for 30 to 45 minutes, or until the chocolate is completely firm and set. Once solid, remove from the fridge. Use your hands to carefully break the bark into jagged, irregular pieces. Serve and enjoy!
Gifting and Storing Your Spring Masterpiece
This Robin Egg Easter Bark makes a phenomenal homemade gift. Because it is visually striking and travels relatively well, it is perfect for sharing. To gift it, break the bark into large, impressive shards. Place several pieces into clear cellophane treat bags. Tie the bags tightly with pastel-colored ribbons—think soft pinks, yellows, and lavenders to match the sprinkles. You can drop these bags into children’s Easter baskets, hand them out to neighbors, or use them as sweet party favors for a spring brunch.
When it comes to storage, this bark is very low maintenance. It can be stored in an airtight container at room temperature for up to two weeks (keep it out of direct sunlight or hot kitchens to prevent melting). If your home runs warm, or if you prefer a crispier snap to your chocolate, you can store it in the refrigerator. However, note that extreme temperature changes might cause slight condensation on the candy eggs, dulling their matte finish slightly, though it will still taste incredible.
Fun Facts: The Science and History Behind the Bark
Have you ever wondered why real robin eggs are that specific, beautiful shade of blue? The color is due to a pigment called biliverdin, which is deposited on the eggshell when the female robin lays the eggs. Higher biliverdin levels, and thus bluer eggs, are actually a sign of a healthy female robin! By recreating this color in our kitchens, we are paying homage to nature’s beautiful springtime indicators.
As for chocolate bark itself, the concept originated from traditional “mendiants”—a French confection consisting of a chocolate disk studded with nuts and dried fruits representing the four mendicant monastic orders. Over time, this concept evolved into the large, broken sheets of decorated chocolate we know as “bark” today. It gained massive popularity in America during the holidays (like Peppermint Bark) because it is a brilliant way to stretch expensive chocolate by bulking it up with fun, flavorful, and crunchy inclusions. Today, we adapt that brilliant, historic technique to celebrate the bright, hopeful colors of Easter.
Robin Egg Easter Bark
Ingredients
Equipment
Method
- Line a large baking sheet with parchment paper. Chop some of the malted milk eggs in half.
- Place white chocolate in a microwave-safe bowl. Microwave on 50% power in 30-second increments, stirring vigorously after each, until smooth.
- Add oil-based blue candy coloring one drop at a time to the melted chocolate, stirring until you achieve a pale robin’s egg blue color.
- Pour the blue chocolate onto the parchment paper and spread into an even 1/4-inch thick layer using an offset spatula.
- Immediately press the whole and halved malted milk eggs into the wet chocolate, then scatter the pastel sprinkles evenly across the surface.
- In a small bowl, mix cocoa powder and vanilla extract to create a thin paste. Dip a stiff brush into the paste and flick the bristles to splatter ‘speckles’ all over the bark.
- Refrigerate the bark for 30-45 minutes until completely firm.
- Remove from the fridge and use your hands to break the bark into irregular, jagged pieces. Serve or package for gifting.