Easy One-Pan Cranberry Crumble Bars Recipe
The Ultimate Guide to Easy One-Pan Cranberry Crumble Bars
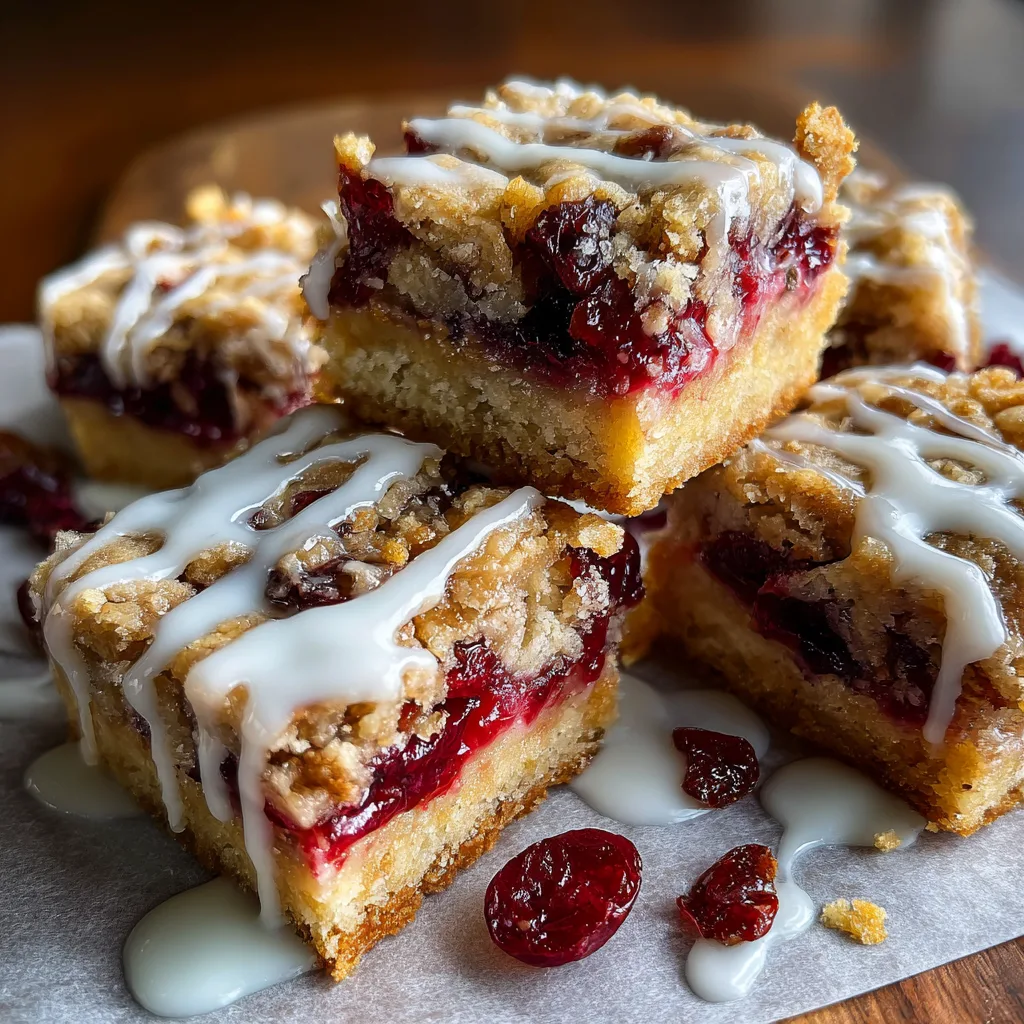
When the holiday season rolls around, or simply when the craving for something tart and sweet strikes, there is nothing quite like a tray of warm Cranberry Crumble Bars. These bars are the unsung heroes of the baking world. They offer all the satisfaction of a complex pie or a meticulously decorated cake, but with a fraction of the effort. Imagine a buttery, melt-in-your-mouth shortbread crust that doubles as a golden crumble topping, sandwiching a vibrant, jammy layer of bursting cranberries. Topped with a sweet, glossy vanilla drizzle, these bars are a texture lover’s dream.
In this comprehensive guide, we will walk you through everything you need to know to create the perfect batch of Cranberry Crumble Bars. From selecting the right fruit to mastering the “crumble” technique, this article covers it all. Whether you are a seasoned baker looking for a quick win or a novice stepping into the kitchen for the first time, this recipe is fail-proof and guaranteed to impress.
Why You Will Fall in Love With This Recipe
There are countless reasons why these bars deserve a permanent spot in your recipe box. First and foremost, they are an easy, one-pan wonder. Unlike cookies that require multiple batches or cakes that need precise leveling, this recipe comes together in a single 9×13 or 8×8 pan. The cleanup is minimal, and the payoff is huge.
Secondly, the flavor profile is perfectly balanced. The natural tartness of fresh cranberries cuts through the richness of the buttery dough and the sweetness of the glaze. It is not cloyingly sweet, making it suitable for dessert, a midday snack, or even a decadent breakfast with coffee. The versatility of this dish is unmatched—serve it warm with a scoop of vanilla ice cream, or chill it for a firm, chewy bar that packs perfectly for lunchboxes or holiday cookie exchanges.
Ingredients Overview
Great baking starts with great ingredients. This recipe relies on pantry staples, but knowing the role of each component ensures success.
Cranberry Crumble Bars
Ingredients
Equipment
Method
- Preheat oven to 350°F (175°C). Line a 9×9 inch baking pan with parchment paper, leaving an overhang on the sides for easy removal.
- In a medium bowl, combine cranberries, granulated sugar, cornstarch, orange zest, and orange juice. Toss well to coat and set aside.
- In a large bowl, mix melted butter and brown sugar until smooth. Add flour, oats, baking powder, and salt. Stir until a crumbly dough forms.
- Reserve 1 cup of the oat mixture for the topping. Press the remaining mixture firmly into the bottom of the prepared pan to form an even crust.
- Spread the cranberry mixture evenly over the crust. Sprinkle the reserved crumble topping over the fruit layer.
- Bake for 40-50 minutes, or until the fruit is bubbling and the topping is golden brown.
- Remove from oven and cool completely on a wire rack.
- Whisk together powdered sugar, vanilla, and cream to make the glaze. Drizzle over cooled bars before cutting into squares.
Notes
For the Crust and Crumble
- Unsalted Butter: This is the backbone of the recipe. It provides flavor and the necessary structure for the shortbread-like texture. Using unsalted allows you to control the sodium level.
- All-Purpose Flour: The structural element. It binds the butter and sugar together to create a sturdy base and a tender crumb.
- Old-Fashioned Rolled Oats: These add a wonderful chewiness and nutty flavor to the crust and topping. Do not use instant oats, as they can become mushy.
- Brown Sugar: Packed with molasses, brown sugar adds moisture and a deep caramel flavor that pairs beautifully with oats and fruit.
- Baking Powder: A small amount helps the dough rise slightly, ensuring the bars aren’t rock hard.
- Salt: Essential for balancing the sugar and enhancing the buttery flavor.
For the Cranberry Filling
- Fresh or Frozen Cranberries: You can use either. Fresh berries burst beautifully, while frozen ones are convenient year-round. No need to thaw them first!
- Granulated Sugar: Sweetens the tart berries and helps create a jammy consistency as they bake.
- Orange Zest and Juice: Cranberry and orange are a classic pairing. The zest adds aromatic oils, while the juice adds acidity and liquid to help the berries cook down.
- Cornstarch: This thickener ensures the filling isn’t too runny, allowing you to cut clean squares.
For the Glaze
- Powdered Sugar: Dissolves instantly to create a smooth icing.
- Heavy Cream or Milk: The liquid vehicle for the glaze. Cream makes it richer and more opaque.
- Vanilla Extract: Adds a floral, aromatic finish that ties the whole dish together.
Step-by-Step Instructions
Follow these steps closely to achieve that perfect balance of crispy topping, soft crust, and gooey filling.
1. Prepare the Oven and Pan
Preheat your oven to 350°F (175°C). Line a square 8×8 or 9×9 inch baking pan with parchment paper. Leave an overhang on the sides—this “sling” will make it incredibly easy to lift the bars out of the pan once they have cooled.
2. Make the Cranberry Filling
In a medium bowl, toss the cranberries with granulated sugar, cornstarch, and orange zest. Stir until the berries are well coated. If you are using frozen berries, let them sit for 5 minutes so the sugar begins to draw out some moisture. Set this aside.
3. Create the Dough
In a large mixing bowl (or the bowl of a stand mixer), combine the melted butter, brown sugar, and granulated sugar. Whisk until smooth. Add the flour, oats, baking powder, and salt. Mix until a crumbly dough forms. It should stick together when pressed between your fingers but look loose in the bowl.
4. Assemble the Layers
Reserve about one cup of the dough mixture for the topping. Dump the remaining dough into your prepared baking pan. Using the bottom of a measuring cup or your hands, press the dough firmly and evenly into the bottom of the pan to form a solid crust. Pour the cranberry mixture over the crust, spreading it out to the edges. Finally, sprinkle the reserved dough crumbs evenly over the top of the fruit layer.
5. Bake to Perfection
Bake in the preheated oven for 40 to 50 minutes. You are looking for the fruit filling to be bubbling (especially in the center) and the crumble topping to turn a light golden brown. If the topping browns too quickly, tent the pan loosely with aluminum foil.
6. Cool and Glaze
Remove the pan from the oven and place it on a wire rack. It is crucial to let the bars cool completely in the pan. This allows the filling to set. Once cool, whisk together the powdered sugar, vanilla, and milk/cream until smooth. Drizzle generously over the bars.
Expert Tips for Success
Don’t Skip the Cornstarch: Cranberries release a lot of water when they burst. Without cornstarch, your bottom crust will get soggy. Ensure the cornstarch is tossed thoroughly with the sugar before adding to the fruit to avoid clumps.
Press Firmly: When making the bottom crust, really pack it down. A loose base will crumble apart when you try to pick up the bar. The bottom of a stainless steel measuring cup is the perfect tool for compressing the dough.
Variable Fruit: While cranberries are the star here, this recipe is extremely adaptable. You can substitute half the cranberries for diced apples or pears for a different autumn twist. In the summer, raspberries or blackberries work wonderfully, though you may need to adjust the sugar depending on the sweetness of the fruit.
Variations and Substitutions
Gluten-Free Option: These bars are easily made gluten-free. Simply swap the all-purpose flour for a high-quality 1:1 gluten-free baking flour blend. Ensure your oats are certified gluten-free as well.
Nutty Crunch: For added texture, mix 1/2 cup of chopped pecans or walnuts into the reserved crumble topping before sprinkling it over the fruit. The nuts will toast beautifully in the oven.
Spiced Up: Enhance the cozy factor by adding a teaspoon of cinnamon and a pinch of nutmeg to the flour mixture. Spices pair excellently with the orange and cranberry flavors.
Serving and Storage
Serving: These bars are best served at room temperature. However, warming them slightly in the microwave for 10 seconds and topping with vanilla bean ice cream turns them into a high-end plated dessert.
Storage: Store the bars in an airtight container at room temperature for up to 3 days. If you live in a particularly hot or humid climate, storing them in the refrigerator extends their life to a week, though the crust may soften slightly.
Freezing: These bars freeze exceptionally well. Cut them into squares and let the glaze set completely. Wrap each bar individually in plastic wrap, then place them in a freezer-safe bag. They can be frozen for up to 3 months. Thaw on the counter for an hour before enjoying.
Nutritional Benefits of Cranberries
Beyond the delicious taste, cranberries bring a host of health benefits. They are considered a superfood due to their high nutrient and antioxidant content. They are rich in Vitamin C, manganese, and fiber. The antioxidants in cranberries have been linked to lower risks of urinary tract infections, improved immune function, and decreased blood pressure. While these bars are a treat containing sugar and butter, the inclusion of whole fruit and oats adds a nutritional boost compared to standard cookies or candies.
Fun Facts and Cultural Context
Cranberries are one of the few fruits native to North America. Indigenous peoples used them for food, fabric dye, and medicine long before European settlers arrived. Today, they are a staple of American and Canadian Thanksgiving and Christmas traditions. The “crumble” or “crisp” originated in Britain during World War II when rationing made ingredients for pie crusts scarce; a simple flour, butter, and sugar topping was an economical alternative that became a beloved classic. These bars combine the New World fruit with the Old World baking technique for a truly transatlantic treat.
Conclusion
Cranberry Crumble Bars are the perfect intersection of ease and elegance. They capture the essence of the holidays with their festive red color and warm spices, yet they are simple enough to whip up on a Tuesday night. The contrast between the buttery, crisp oat topping, the soft base, and the tart, gooey filling is addictive. Whether you are baking for a crowd or just treating yourself, this recipe delivers consistent, delicious results every time. So grab your mixing bowl, preheat that oven, and get ready to fill your kitchen with the scent of butter, vanilla, and baked fruit.