Easy Hot Italian Sliders
The Ultimate Guide to Easy Hot Italian Sliders
If there is one dish that disappears faster than any other at a party, it is a tray of Hot Italian Sliders. There is something universally appealing about warm, soft bread brushed with garlic butter, filled with layers of savory cured meats and gooey melted cheese. These mini sandwiches are the MVP of game days, potlucks, and quick weeknight dinners. They pack all the robust flavors of a classic Italian sub—salami, pepperoni, ham, and provolone—into a bite-sized package that is baked until hot, bubbly, and utterly irresistible.
In this comprehensive guide, we are going to break down exactly how to make the best Italian Sliders you have ever tasted. We will cover everything from selecting the right cold cuts to the secret technique for preventing soggy bottoms. Whether you are a seasoned host or a kitchen novice, this recipe is designed to be fool-proof and crowd-pleasing. Get ready to elevate your appetizer game with a dish that looks as good as it tastes.
Why This Recipe Works
The beauty of these sliders lies in the contrast of textures and temperatures. You have the soft, slightly sweet rolls (often Hawaiian rolls) which provide a pillowy base. Then comes the saltiness of the trio of meats—pepperoni, salami, and ham—which crisp up slightly at the edges as they bake. The provolone cheese acts as the glue, melting into a creamy blanket that holds everything together.
But the real game-changer is the topping. A generous brushing of melted butter infused with garlic, Italian herbs, and sometimes a hint of Parmesan cheese creates a golden, shiny crust that makes these sliders impossible to ignore. The addition of banana peppers or pepperoncini adds a necessary “zing” of acidity to cut through the richness of the meat and cheese. It is a perfectly balanced bite.
Ingredients Overview
To make the perfect batch of Italian Sliders, quality ingredients matter. Here is what you need to grab from the grocery store:
Hot Italian Sliders
Ingredients
Equipment
Method
- Preheat oven to 350°F (175°C). Spray a 9×13 inch baking dish with non-stick cooking spray.
- Slice the entire package of rolls in half horizontally, keeping them attached. Place the bottom slab in the baking dish.
- Layer half of the provolone cheese on the bottom rolls. Top with ham, salami, pepperoni, and banana peppers. Finish with the remaining cheese.
- Place the top slab of rolls over the filling.
- In a small bowl, whisk together melted butter, garlic powder, Italian seasoning, and Parmesan cheese.
- Brush the butter mixture generously over the tops and sides of the rolls.
- Cover with foil and bake for 20 minutes. Remove foil and bake for another 5-10 minutes until tops are golden brown.
- Let cool for 5 minutes before slicing and serving.
Notes
The Foundation
- Slider Rolls: A 12-count package of sweet Hawaiian rolls is the gold standard here. Their slight sweetness pairs perfectly with the salty meats. However, savory dinner rolls or brioche slider buns work just as well if you prefer less sugar.
- Provolone Cheese: You will need sliced provolone. Mild or sharp works, but mild melts a bit more consistently. Mozzarella is a good substitute if you want that classic “pizza pull” stretch.
The Meats (The “Italian” Trio)
- Genoa Salami: This adds a rich, fatty, garlic-peppercorn flavor profile.
- Deli Ham: Provides a sweet and savory base. Honey ham or Black Forest ham are both excellent choices.
- Pepperoni: Use the large sandwich-style slices if you can find them, but standard pizza pepperoni works great too. This adds a bit of spice and that signature red oil.
The “Zing”
- Banana Peppers: Mild or hot pickled banana pepper rings are essential. They add crunch and acid. You can also use jarred roasted red peppers for a mellower, smoky flavor.
The Glaze
- Unsalted Butter: Melted down to act as the base for your herb mixture.
- Garlic Powder: Fresh garlic can burn in the oven, so powder is safer and distributes flavor more evenly.
- Italian Seasoning: A blend of dried basil, oregano, rosemary, and thyme.
- Parmesan Cheese: (Optional) Finely grated parmesan added to the butter gives the tops a salty, crispy finish.
Step-by-Step Instructions
Making these sliders is more about assembly than cooking. Here is the process to ensure perfect layering.
1. Prep Your Station
Preheat your oven to 350°F (175°C). Spray a 9×13 inch baking dish or casserole dish with non-stick cooking spray. This ensures the cheesy edges don’t stick to the pan later.
2. The “Slab” Cut
Keep the rolls attached to each other. Do not pull them apart individually yet. Using a long serrated bread knife, slice through the entire slab of rolls horizontally. You want to end up with one giant top “sheet” and one giant bottom “sheet.” Place the bottom slab into your prepared baking dish.
3. Layer the Meats and Cheese
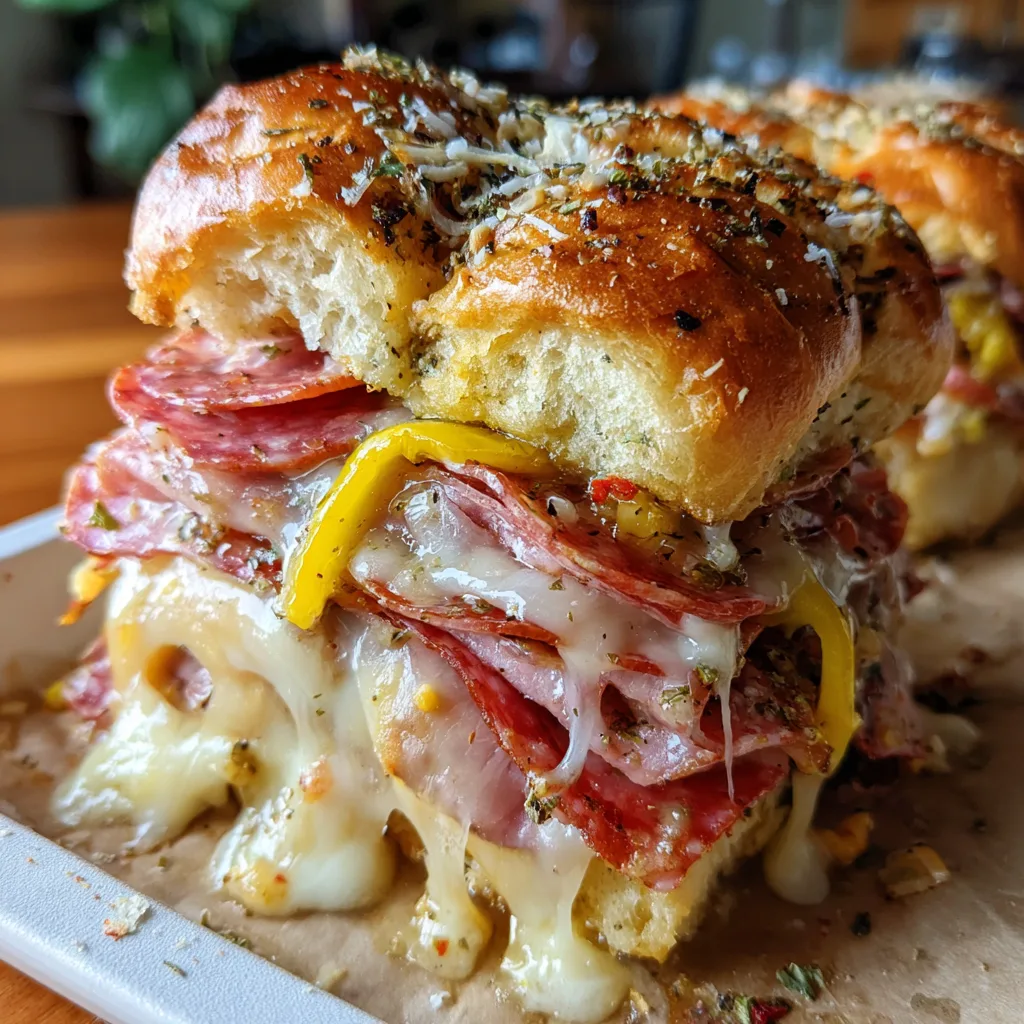
Start with a layer of cheese on the bottom bread. This creates a barrier that prevents the bread from getting soggy from the meat juices. Next, layer your ham, followed by the salami, and finally the pepperoni. Arrange them so every slider gets a fair amount of meat. Top the meat with the banana peppers (pat them dry first!) and then add a second layer of cheese. Placing cheese on both the top and bottom ensures the slider holds together.
4. The Glaze Application
Place the top slab of rolls over the fillings. In a small microwave-safe bowl, melt the butter. Whisk in the garlic powder, Italian seasoning, and a pinch of salt. Using a pastry brush, generously coat the tops of the buns. Don’t be shy—get into the crevices and let it drip down the sides. This is what creates that golden, flavorful crust.
5. Bake to Perfection
Cover the dish with aluminum foil. This is crucial—it traps steam to melt the cheese without burning the tops of the buns. Bake covered for 15-20 minutes. Then, remove the foil and bake for an additional 5-10 minutes until the tops are golden brown and slightly crispy.
6. Serve
Let the sliders sit for about 5 minutes before cutting. This allows the cheese to set slightly so the sliders don’t slide apart messily when you slice them along the perforation lines.
Expert Tips for Non-Soggy Sliders
Drain the Veggies: The number one cause of soggy sliders is wet ingredients. If you use banana peppers or roasted red peppers, drain them thoroughly and pat them dry with a paper towel before layering them on the sandwich.
Toast the Bottom: If you are particularly worried about soggy bread, place the bottom slab of rolls in the oven for 3-5 minutes alone before assembling the sandwich. This toasts the bread slightly, creating a crust that resists moisture.
Double Cheese Barrier: As mentioned in the steps, placing cheese on the bread before the meat acts as a hydrophobic barrier. The fat in the cheese repels the water from the ham and peppers, keeping your bottom bun fluffy.
Variations to Try
Spicy Inferno: Swap the mild provolone for Pepper Jack cheese. Use hot banana peppers or even sliced jalapeños. Add a pinch of red pepper flakes to the butter glaze.
Pizza Style: Spread a thin layer of marinara sauce on the bottom buns before adding the cheese. Use primarily pepperoni and mozzarella cheese. Brush the top with garlic butter and sprinkle with parmesan.
Turkey Pesto: Swap the Italian meats for deli turkey. Spread a layer of basil pesto on the top buns before closing the sandwich. Use mozzarella cheese and add sun-dried tomatoes instead of banana peppers.
Serving Suggestions
These sliders are rich, so they pair well with lighter sides. A crisp green salad with a vinaigrette dressing cuts through the heaviness. Potato chips or a pasta salad are also classic accompaniments for a party spread. If serving for a game day, putting out a side of marinara sauce or ranch dressing for dipping is always a hit.
Make Ahead and Storage
Make Ahead: You can assemble the sliders completely up to 24 hours in advance. Cover the dish tightly with plastic wrap and store it in the fridge. When ready to eat, remove the plastic, cover with foil, and add about 5-10 minutes to the baking time since you are starting from cold.
Storage: Leftover sliders can be stored in an airtight container in the refrigerator for up to 3 days. They reheat surprisingly well. The microwave works in a pinch (30-45 seconds), but an air fryer or toaster oven (350°F for 5 minutes) will restore the crispiness of the crust.
Conclusion
Hot Italian Sliders are the definition of high-reward, low-effort cooking. They take humble deli ingredients and transform them into a warm, gooey, savory masterpiece that feels special enough for a celebration but easy enough for a Tuesday. The combination of the buttery, herbed crust with the spicy, salty filling is simply unbeatable. Next time you need to feed a crowd—or just a hungry family—reach for this recipe. It is guaranteed to become a requested favorite in your household.