Peanut Butter & Jelly Cookies
Peanut Butter & Jelly Cookies: The Ultimate Nostalgic Treat
There is arguably no flavor combination more iconic, more nostalgic, or more universally beloved than peanut butter and jelly. It is the lunchbox staple that defined childhoods across generations. But what happens when you take that classic sandwich profile and transform it into a warm, soft-baked dessert? You get Peanut Butter & Jelly Cookies—a treat that is equal parts comfort food and gourmet indulgence. These aren’t just your average peanut butter cookies; they are thick, chewy pillows of peanut-buttery dough stuffed with a molten core of sweet, sticky fruit preserves.
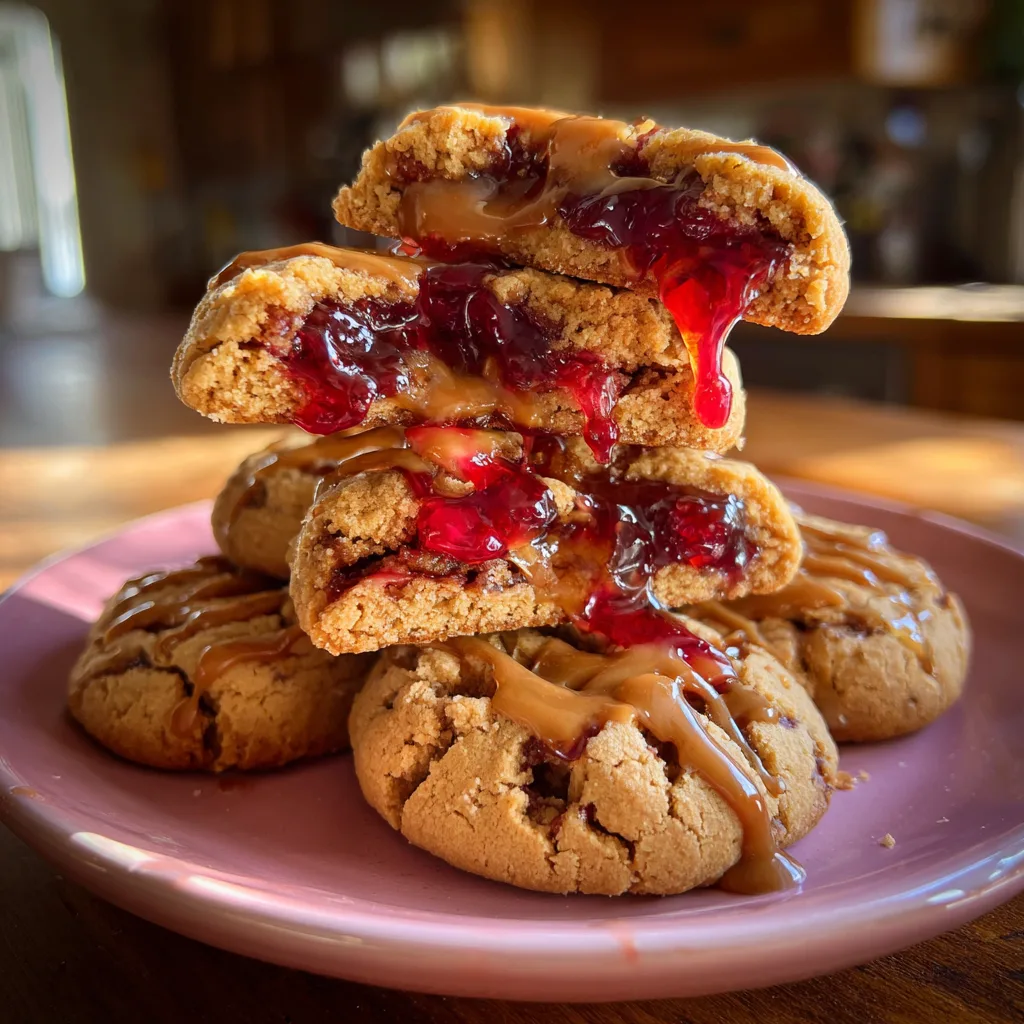
Imagine biting into a cookie that offers the salty-sweet crunch of roasted peanuts on the outside, only to give way to a soft, tender crumb and a burst of warm strawberry or grape jam in the center. It is a sensory experience that instantly transports you back to the school cafeteria, but with a sophisticated, bakery-style twist. Whether you are baking for a bake sale, a holiday cookie exchange, or simply a Tuesday night craving, this recipe is guaranteed to be a showstopper. The visual appeal alone—with the jewel-toned jam peeking through the crinkled golden surface—is enough to make anyone reach for a glass of cold milk.
Why This Recipe Will Become Your New Favorite
We know there are thousands of peanut butter cookie recipes out there. However, this stuffed version elevates the humble cookie into a decadent dessert. Here is why you need to preheat your oven right now:
- Texture Contrast: The edges are slightly crisp, the middle is soft and chewy, and the filling is gooey and smooth. It is a masterclass in texture.
- Nostalgia Factor: It takes the familiar flavors of a PB&J sandwich and repackages them in a way that feels special and new.
- Pantry Staples: You likely have every single ingredient needed for this recipe in your kitchen right now. No fancy flours or obscure extracts required.
- Fun to Make: The process of stuffing and sealing the dough balls is surprisingly therapeutic and a great activity to do with kids.
Ingredients
To achieve the perfect balance of structure and softness, the ingredient ratios here are key. We are looking for a dough that is sturdy enough to hold the filling but tender enough to melt in your mouth.
Peanut Butter & Jelly Cookies
Ingredients
Equipment
Method
- Preheat oven to 375°F (190°C) and line baking sheets with parchment paper.
- In a medium bowl, whisk together flour, baking soda, baking powder, and salt.
- In a large bowl, cream together softened butter, peanut butter, granulated sugar, and brown sugar until light and fluffy (2-3 mins).
- Beat in the egg and vanilla extract until combined.
- Gradually mix in dry ingredients until a soft dough forms.
- Scoop 1.5 tbsp of dough and flatten into a disk. Place 1 tsp of jam in the center.
- Fold edges up over the jam to seal completely and roll into a ball.
- Place on baking sheet 2 inches apart and flatten slightly. Bake 10-12 minutes until golden.
- Cool on baking sheet for 10 minutes to allow filling to set before moving to wire rack.
Notes
For the Cookie Dough:
- All-Purpose Flour: 1 1/2 cups. Spoon and level your flour to ensure you don’t dry out the dough.
- Baking Soda: 1/2 teaspoon. This provides the lift and helps create those beautiful crinkles on top.
- Baking Powder: 1/4 teaspoon. Adds just a little extra fluffiness to the texture.
- Salt: 1/4 teaspoon. Essential to cut through the sweetness and highlight the peanut flavor.
- Unsalted Butter: 1/2 cup (1 stick), softened to room temperature. Using unsalted allows you to control the sodium level, which is important since peanut butter is already salty.
- Peanut Butter: 1/2 cup. Use creamy, commercial peanut butter (like Jif or Skippy). Natural peanut butter that separates is too oily for this recipe and will cause the cookies to spread too much.
- Granulated Sugar: 1/2 cup. For the dough, plus extra for rolling if you want a sparkly exterior.
- Brown Sugar: 1/2 cup, packed. The molasses in brown sugar keeps the cookies chewy and moist.
- Egg: 1 large. Acts as the binder.
- Vanilla Extract: 1 teaspoon. Enhances the overall flavor profile.
For the Filling:
- Jelly or Jam: 1/3 cup. Strawberry and raspberry jam offer a nice tartness and color, while grape jelly gives that classic lunchbox flavor. Choose a thicker preserve rather than a runny jelly for easier stuffing.
Instructions
Making stuffed cookies might seem intimidating, but it is actually quite simple. The trick is keeping the dough cool and sealing the edges tightly.
Step 1: Whisk the Dry Ingredients
In a medium mixing bowl, combine the all-purpose flour, baking soda, baking powder, and salt. Whisk them together well to ensure the leavening agents are evenly distributed. Set this aside.
Step 2: Cream the Butter and Sugars
In a large bowl (or the bowl of a stand mixer fitted with the paddle attachment), beat the softened butter, peanut butter, granulated sugar, and brown sugar together. You want to beat this on medium-high speed for about 2-3 minutes until the mixture is light, fluffy, and pale in color. This aeration step is crucial for a soft cookie.
Step 3: Add Wet Ingredients
Add the egg and vanilla extract to the butter mixture. Beat on medium speed just until combined, scraping down the sides of the bowl as needed. Do not overmix at this stage.
Step 4: Combine the Dough
Gradually add the dry ingredient mixture to the wet ingredients. Mix on low speed until just combined and no streaks of flour remain. The dough should be soft but manageable. If it feels extremely sticky, cover it and chill in the refrigerator for 20-30 minutes.
Step 5: Assemble and Stuff
Preheat your oven to 375°F (190°C) and line two baking sheets with parchment paper. Scoop out about 1.5 tablespoons of dough. Flatten the ball into a thick disk in the palm of your hand.
Crucial Step: Place about 1 teaspoon of jelly in the center of the disk. Carefully fold the edges of the dough up and over the jelly, pinching the seams together to seal it completely. Gently roll it back into a ball. Repeat with the remaining dough.
Step 6: Bake
Place the stuffed dough balls on the prepared baking sheets, spacing them about 2 inches apart. Flatten them very slightly with your hand (don’t squash them, just a gentle tap). Bake for 10-12 minutes. The edges should be set and golden, but the centers might still look slightly underbaked—that is perfect. They will firm up as they cool.
Step 7: Cool
Allow the cookies to cool on the baking sheet for at least 5-10 minutes. This is mandatory! The jam inside is molten hot and needs time to set. Transfer to a wire rack to cool completely before eating.
Expert Tips for the Perfect Stuffing
The “stuffing” step is where the magic happens, but it can also be messy. Here are some pro tips to ensure success:
Freeze the Jam
If you find your jam is too runny to handle, try dolloping teaspoons of jam onto a plate lined with parchment paper and freezing them for an hour. Placing a frozen nugget of jam into the dough makes sealing it 100 times easier and prevents leaks during baking.
The Seal Matters
Make sure there are no thin spots in the dough when you wrap it around the jelly. If the dough is too thin on top, the jelly will bubble out. While a little leakage looks rustic and delicious (as seen in the photos!), you want to keep most of that goodness inside.
Don’t Use Natural Peanut Butter
We mentioned this in the ingredients, but it bears repeating. Natural peanut butters (the kind you have to stir) can cause the dough to be greasy and spread into flat puddles. Stick to the stabilized brands for baking.
Variations and Flavor Twists
While the classic PB&J is hard to beat, this cookie base is a versatile canvas for other fillings.
- The “Elvis”: Swap the jelly for a slice of banana and bake. You could even add bacon bits to the dough for a true savory-sweet Elvis experience.
- Choco-Nut: Instead of jelly, stuff the cookies with a teaspoon of chocolate hazelnut spread (Nutella). Peanut butter and chocolate are a match made in heaven.
- Crunchy Texture: Use crunchy peanut butter instead of creamy for added texture, or roll the dough balls in crushed roasted peanuts before baking.
- Marshmallow Fluff: Create a “Fluffernutter” cookie by stuffing the peanut butter dough with marshmallow creme. Freezing the creme dollops beforehand is essential for this variation.
Serving Suggestions
Warm & Gooey: These cookies are best served slightly warm when the jelly is loose and the cookie is soft. If you are eating them the next day, a 10-second zap in the microwave restores that fresh-baked magic.
Ice Cream Sandwiches: Take two cooled cookies and sandwich a scoop of vanilla bean ice cream between them. The fruitiness of the jelly cuts through the richness of the ice cream perfectly.
The Breakfast Cookie: While we can’t officially endorse cookies for breakfast, pairing one of these with a strong cup of coffee or a glass of oat milk makes for a delightful morning treat.
Storage and Freezing Instructions
If you somehow manage not to eat the entire batch in one sitting, here is how to keep them fresh.
Room Temperature: Store the cookies in an airtight container at room temperature for up to 4 days. Because of the moisture from the jelly, they will stay soft longer than standard cookies.
Freezing Baked Cookies: You can freeze the baked cookies for up to 3 months. Thaw them on the counter for an hour before serving.
Freezing Dough: This is a great prep-ahead hack. Assemble and stuff the dough balls, then freeze them raw on a baking sheet. Once solid, transfer to a freezer bag. You can bake them directly from frozen, just add an extra 2-3 minutes to the baking time.
Frequently Asked Questions
Why did my cookies flatten out?
This usually happens if the butter was too warm (melted instead of softened) or if you used natural peanut butter. It can also happen if the dough wasn’t chilled if your kitchen is particularly hot.
Can I use almond butter?
Yes! You can substitute almond butter or cashew butter 1:1. The flavor profile will change slightly, but the structure should remain similar as long as you use a “no-stir” variety.
Can I make these gluten-free?
Absolutely. Simply swap the all-purpose flour for a high-quality 1:1 gluten-free baking flour blend. Peanut butter is naturally gluten-free (check the label to be safe).
These Peanut Butter & Jelly Cookies are more than just a sweet treat; they are a bite of happiness. They remind us that the simple pleasures are often the best ones. So grab a jar of peanut butter, your favorite jam, and get ready to bake a batch of pure joy.