Pistachio Ferrero Rocher Brownies
Pistachio Ferrero Rocher Brownies
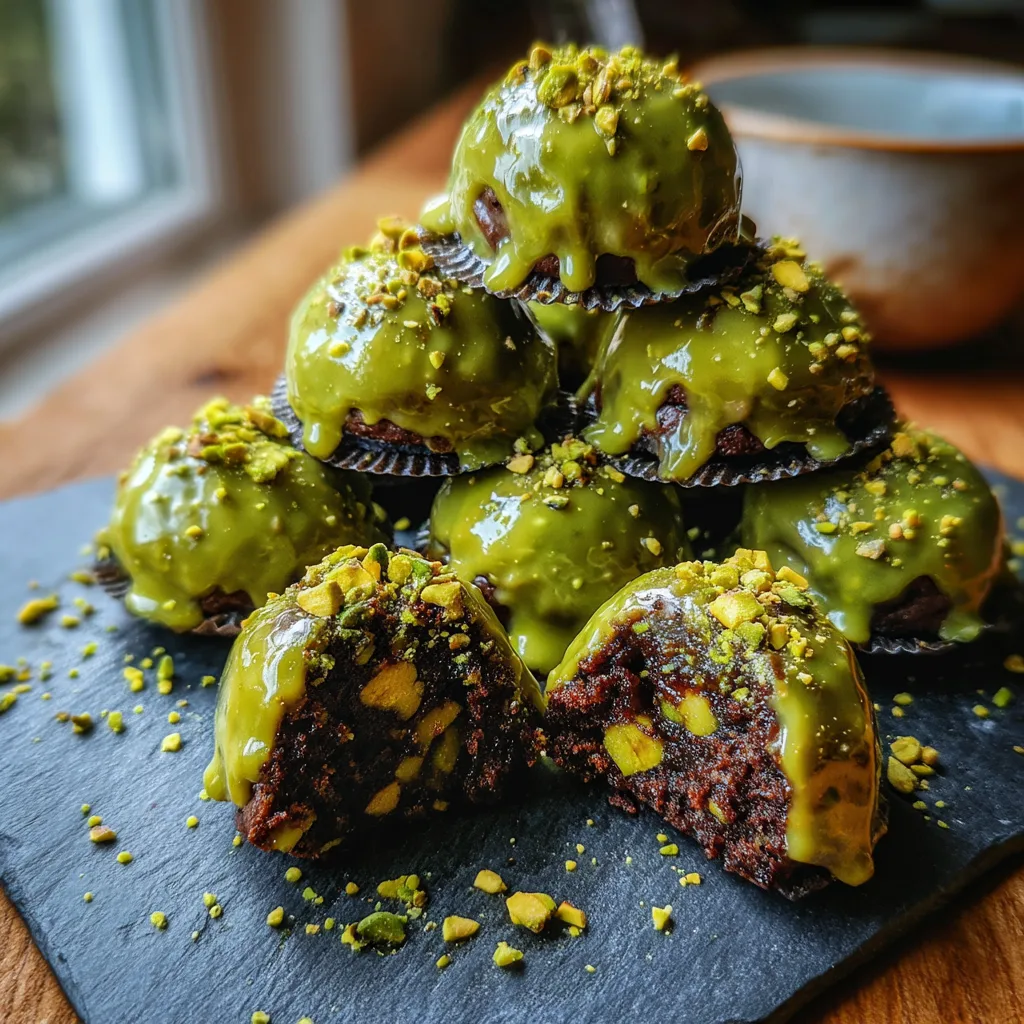
If a fudge brownie and a pistachio truffle had a very expensive, very delicious baby, this would be it. These Pistachio Ferrero Rocher Brownies are not your average bake-sale treat. They are bite-sized spheres of decadent dark chocolate fudge, studded with crunchy green pistachios, and enrobed in a silky, sweet pistachio shell. They are elegant, impressive, and dangerously addictive.
We all know the iconic gold-wrapped hazelnut chocolates that appear during the holidays. They set the standard for texture: a crisp shell, a creamy coating, and a crunchy center. This recipe takes that concept and gives it a gourmet “green” makeover. Instead of hazelnuts, we are using the “green gold” of the culinary world: pistachios. And instead of a wafer center, we are using something far superior—a dense, rich brownie truffle.
Whether you are looking for a show-stopping dessert for a dinner party, a unique homemade gift for the holidays, or just a way to use that jar of pistachio cream you bought on impulse, this recipe is your answer.
The Anatomy of a “Pistachio Rocher”
This dessert is built on contrast. The magic happens when you bite through the snap of the outer shell into the soft, yielding interior.
The Interior: This isn’t just cake batter rolled into a ball. We bake a high-fat, low-flour brownie specifically designed to be dense. It is loaded with melted dark chocolate and cocoa powder for depth, and packed with whole pistachios for that necessary crunch.
The Coating: This is what makes them look like jewels. We use a mixture of white chocolate and pistachio cream (often called pistachio butter or paste). This gives it that vibrant light green color and an intense nutty flavor that white chocolate alone can’t achieve. Mixed into this coating are tiny bits of chopped pistachios, giving it that bumpy “Rocher” texture we love.
Ingredients
Pistachio Ferrero Rocher Brownies
Ingredients
Equipment
Method
- Preheat oven to 350°F (175°C). Line an 8×8 inch pan with parchment paper.
- Melt butter and dark chocolate together. Whisk in sugar and eggs until glossy.
- Fold in flour, cocoa powder, and the cup of roughly chopped pistachios.
- Bake for 20-25 minutes. Cool completely, then refrigerate for 2 hours.
- Scoop chilled brownie mixture and roll into balls. Freeze for 20 minutes.
- Melt white chocolate with coconut oil. Stir in pistachio cream and some chopped pistachios.
- Dip cold brownie balls into the green coating. Top with more pistachios immediately.
- Let set at room temperature or in the fridge before serving.
Notes
For the Fudgy Brownie Center
- Dark Chocolate (70% cocoa): 200g. High quality is essential here as it forms the base flavor.
- Unsalted Butter: 1/2 cup (115g).
- Granulated Sugar: 3/4 cup.
- Eggs: 2 large, room temperature.
- Vanilla Extract: 1 tsp.
- All-Purpose Flour: 1/2 cup. We keep flour low to ensure fudginess.
- Cocoa Powder: 1/4 cup. Dutch-processed gives a darker color.
- Shelled Pistachios: 1 cup, roughly chopped or kept whole for the inside.
For the Pistachio Shell Coating
- White Chocolate: 300g, chopped or chips.
- Pistachio Cream/Paste: 3 tbsp. This is the sweet spread (like Nutella but pistachio), not raw ground nuts. Brands like Pisti or generic “Pistachio Cream” work best.
- Coconut Oil: 1 tbsp. This thins the chocolate slightly for easier dipping and a glossy finish.
- Finely Chopped Pistachios: 1/2 cup. For sprinkling on top and mixing into the shell.
Instructions
Step 1: The Brownie Base
- Preheat & Prep: Preheat your oven to 350°F (175°C). Line an 8×8 inch square baking pan with parchment paper, leaving an overhang for easy removal.
- Melt: In a microwave-safe bowl or double boiler, melt the butter and dark chocolate together until smooth and glossy. Let it cool slightly for 5 minutes.
- Whisk: Whisk in the sugar and vanilla. Then add the eggs one at a time, whisking vigorously after each addition until the batter is shiny and pulls away from the sides of the bowl slightly.
- Combine: Fold in the flour, cocoa powder, and salt. Do not overmix! Finally, fold in the 1 cup of roughly chopped pistachios.
- Bake: Pour the batter into the prepared pan. Bake for 20-25 minutes. A toothpick should come out with moist crumbs, not wet batter. Do not overbake, or they will be too dry to roll.
- Chill: This is crucial. Let the brownies cool completely in the pan, then move the pan to the fridge for at least 2 hours. Cold brownies are easier to shape.
Step 2: Shaping the Truffles
- Scoop: Remove the cold brownie block. Using a tablespoon or a small cookie scoop, scoop out portions of the brownie.
- Roll: Using your hands, roll the brownie chunks into smooth balls. If the brownies are too sticky, dust your hands with a little cocoa powder.
- Freeze: Place the rolled balls on a baking sheet lined with parchment paper. Freeze them for 20 minutes. This helps them hold their shape when hit with the warm chocolate coating.
Step 3: The Pistachio Glaze
- Melt Coating: Melt the white chocolate and coconut oil together in 30-second intervals in the microwave, stirring in between.
- Flavor & Color: Whisk in the pistachio cream. The mixture should turn a beautiful pale green. If you want a deeper green, you can add a tiny drop of green food coloring, but the pistachio paste usually does the job.
- Add Texture: Stir in about half of the finely chopped pistachios into the melted chocolate.
Step 4: Dipping & Decorating
- Dip: Remove the brownie balls from the freezer. Using a fork, dip one ball at a time into the green chocolate mixture. Tap the fork on the edge of the bowl to let excess chocolate drip off.
- Set: Place the coated brownie back onto the parchment paper.
- Garnish: Immediately, while the chocolate is still wet, sprinkle the remaining chopped pistachios on top of the dome.
- Final Set: Let them sit at room temperature until the shell hardens (about 15 minutes) or pop them in the fridge for a quick set. Place in mini cupcake liners for that authentic “chocolate box” look.
💡 Tips for the Perfect Glossy Shell
- Don’t Overheat White Chocolate: White chocolate burns easily. Melt it slowly. If it seizes and becomes clumpy, do not add water! Add a teaspoon more coconut oil or vegetable oil to smooth it out.
- The Pistachio Cream Matters: Try to find a pistachio cream with a high percentage of pistachios (30%+). If you can’t find the cream, you can process raw pistachios into a fine butter, but you may need to add powdered sugar to the coating to balance the sweetness.
- Room Temp vs. Fridge: These taste best at room temperature where the center is softest. If you store them in the fridge, take them out 20 minutes before serving.
Creative Variations
While Pistachio is the star here, you can use this “Brownie Truffle” technique with other flavors:
1. The Classic Hazelnut (Ferrero Style):
Swap the pistachios inside for roasted hazelnuts. Use milk chocolate with Nutella for the coating and roll in crushed wafer cookies.
2. Ruby Raspberry:
Use Ruby chocolate for the coating (naturally pink and fruity) and add freeze-dried raspberries to the brownie batter instead of nuts.
3. Salted Caramel & Peanut:
Use peanuts inside the brownie. Coat with a mix of peanut butter and white chocolate, and sprinkle with sea salt flakes.
Storage and Gifting
These brownies are incredibly sturdy, making them perfect for shipping or gifting.
- Storage: Keep in an airtight container in the fridge for up to 1 week. They can also be frozen for up to 3 months. Thaw in the fridge overnight.
- Gifting: Place individual brownies in gold or brown mini cupcake liners. Arrange them in a small gift box with a clear window. Tie with a green ribbon. It looks like you spent hours making artisanal chocolates!
Why Pistachios?
Aside from their beautiful color, pistachios bring a sophisticated, savory note to desserts that cuts through the sugar. They are rich in protein, antioxidants, and healthy fats. While we won’t pretend these brownies are health food, the inclusion of nutrient-dense nuts makes them a slightly smarter indulgence than a plain candy bar.
Enjoy these little green gems of happiness!