Raspberry Sugar Cookies
When it comes to homemade baked goods, few things are as universally beloved as a classic, chewy sugar cookie. However, there comes a time in every home baker’s journey when the standard vanilla profile, while comforting, feels just a little too predictable. If you are looking to elevate your cookie game and introduce a vibrant, naturally colorful, and intensely flavorful twist to your baking repertoire, you have absolutely found your next project. Enter the magnificent Raspberry Sugar Cookie. These visually stunning, crackly-topped treats offer a perfect marriage of nostalgic buttery sweetness and the bright, tart zing of real raspberries, creating an unforgettable dessert experience that will have everyone asking for the recipe.
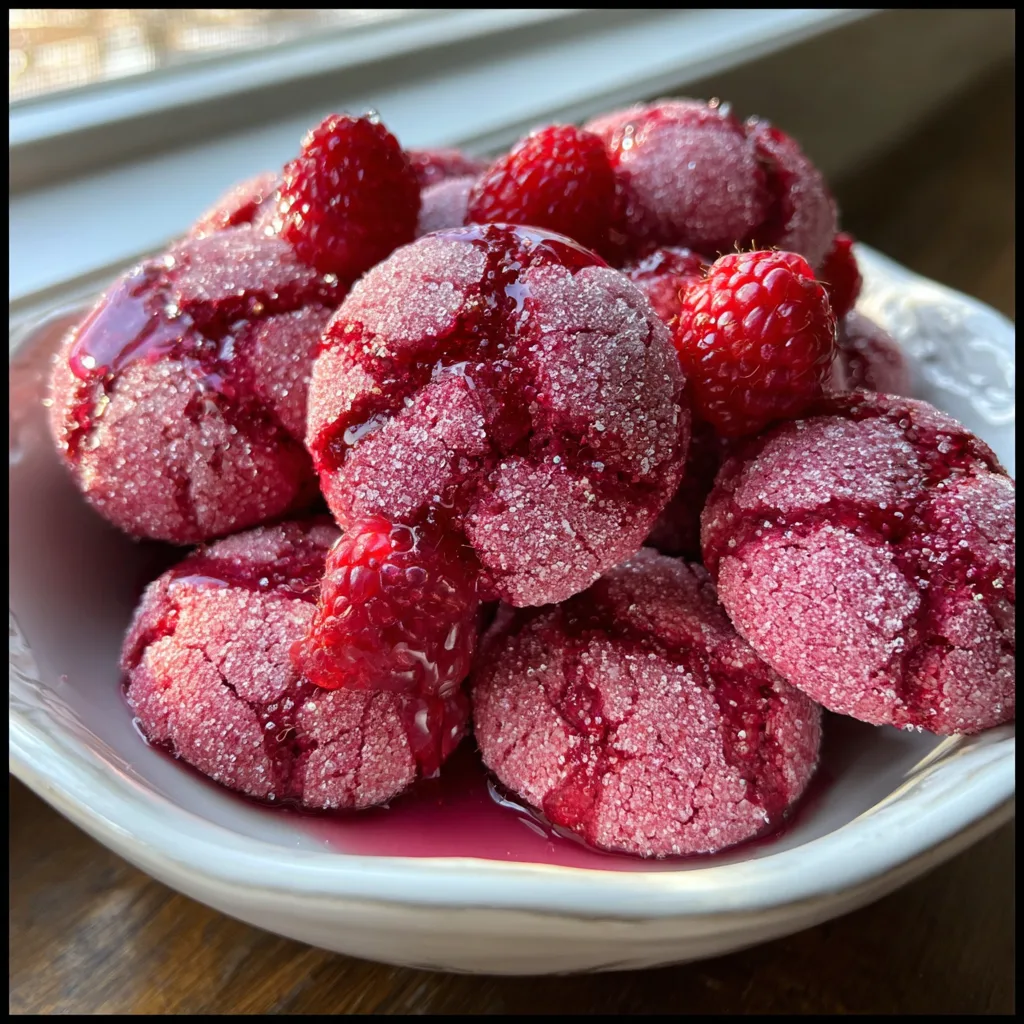
What makes these Raspberry Sugar Cookies truly exceptional is not just their stunning, natural pink hue, but their phenomenal texture. They boast a delicately crisp, sugar-encrusted exterior that shatters beautifully upon the first bite, immediately giving way to a dense, soft, and remarkably chewy center. This isn’t just a sugar cookie with a drop of artificial food coloring and imitation extract; this is a structurally sound, scientifically balanced baked good that utilizes the immense power of real fruit to deliver an authentic, mouth-watering flavor profile. Whether you are baking for a springtime picnic, a Valentine’s Day exchange, a vibrant baby shower, or simply to brighten up a dreary weekday afternoon, these cookies are guaranteed to be an absolute showstopper.
Why These Raspberry Sugar Cookies Will Be Your New Obsession
There are countless cookie recipes floating around the internet, but these Raspberry Sugar Cookies stand head and shoulders above the rest for a multitude of reasons. First and foremost is the undeniable “wow” factor. In a sea of beige and brown baked goods—chocolate chip, oatmeal raisin, peanut butter—a platter of these vibrant, jewel-toned pink cookies immediately draws the eye. They look like they belong in the display case of a high-end French patisserie, yet they are surprisingly simple to execute in a standard home kitchen.
Beyond their striking appearance, the flavor profile is a masterclass in balance. Traditional sugar cookies can sometimes lean towards being cloyingly sweet, relying entirely on butter and refined sugar for their appeal. By introducing the bold, assertive tartness of raspberries, that sweetness is instantly tempered. The acidity of the fruit cuts through the rich butter, resulting in a complex, multi-dimensional flavor that keeps your palate engaged. You get the comforting, familiar background of a vanilla-scented dough, suddenly illuminated by a burst of bright, sunny berry flavor.
Furthermore, these cookies are incredibly fun to make. The process of rolling the soft, pink dough into perfectly round spheres and heavily coating them in sparkling white granulated sugar is deeply satisfying. Watching them transform in the oven—spreading out and forming deep, beautiful cracks that expose the vibrantly colored dough inside—is a joy for bakers of all ages. They are an excellent recipe to tackle with children, as the steps are straightforward and the visual payoff is immediate and exciting.
The Secret Ingredient: The Magic of Freeze-Dried Raspberries
If you have ever attempted to bake fruit into a cookie dough, you likely know the heartbreak of a failed experiment. Fresh and even frozen raspberries are absolutely packed with water. When you introduce raw fruit into a precisely balanced cookie dough, that excess moisture wreaks havoc on the chemistry of the bake. The dough becomes a wet, soupy mess; the cookies spread into thin, unappealing puddles on the baking sheet; and the texture turns spongy and cakey rather than dense and chewy.
This is where the absolute magic of freeze-dried fruit comes into play. Freeze-drying is a process that removes nearly 100% of the water weight from the fruit while leaving the cellular structure, the vibrant natural pigments, and the concentrated flavor entirely intact. By pulverizing freeze-dried raspberries into a fine, dust-like powder, you are essentially creating a potent, water-free flavor bomb.
When you fold this concentrated raspberry powder into your dry ingredients, it acts similarly to cocoa powder or a portion of your flour. It flavors and colors the dough intensely without altering the crucial fat-to-moisture ratio. This means you get all the explosive, tart flavor and stunning pink color of a basket of fresh berries, but your cookies will still bake up with that iconic, chewy, crackly-topped sugar cookie texture. Finding freeze-dried raspberries is easier than ever; they are typically located in the dried fruit section, the health food aisle, or easily sourced online. Do not substitute fresh fruit in this recipe under any circumstances—the freeze-dried powder is the non-negotiable key to your success.
A Deep Dive into the Ingredients
Achieving the perfect Raspberry Sugar Cookie requires understanding how each ingredient functions within the dough. Let’s break down the cast of characters:
Unsalted Butter: Butter is the foundational fat of this recipe, providing richness, tenderness, and flavor. It is imperative that you use unsalted butter so you can control the overall sodium level. The butter must be properly softened to room temperature—not melted, and not ice cold. It should yield slightly when pressed with a finger but still hold its shape. This allows it to cream properly with the sugar, trapping tiny air bubbles that leaven the cookies.
Granulated Sugar: Sugar does much more than just sweeten the dough. When creamed with the butter, its sharp crystals carve out those essential air pockets. In the oven, sugar melts and caramelizes, contributing to the cookie’s spread and crisp edges. Furthermore, rolling the exterior of the dough balls in extra granulated sugar before baking is what creates the signature “crinkle” effect, as the exterior sets quickly while the interior continues to expand.
The Egg: A single large egg acts as the primary binder, providing moisture and protein that gives the cookie its chewy structure. Make sure the egg is also at room temperature so it emulsifies smoothly into the creamed butter mixture without causing it to separate or curdle.
Freeze-Dried Raspberries: As extensively discussed, this is the star of the show. You will need roughly a full cup of whole freeze-dried raspberries, which will yield about a half-cup of fine powder once processed. The powder brings acidity, immense flavor, and that gorgeous natural color.
All-Purpose Flour: The structural backbone of the cookie. It is highly recommended to measure your flour using a digital kitchen scale for accuracy. If you must use measuring cups, use the “spoon and level” method to avoid packing too much flour into the cup, which will result in dry, crumbly cookies.
Baking Soda and Baking Powder: We use a combination of both leavening agents here. Baking soda reacts with the natural acidity of the raspberry powder, aiding in the spread and browning of the cookie. Baking powder provides a little extra lift, ensuring the cookies do not fall entirely flat.
Vanilla Extract and Salt: High-quality pure vanilla extract enhances the buttery notes and bridges the gap between the sweet sugar and the tart fruit. A generous pinch of kosher salt is absolutely mandatory to balance the sweetness and elevate all the other flavors.
Ingredients
For the Raspberry Cookie Dough:
- – 1 cup (about 1.2 oz) freeze-dried raspberries
- – 2 and 1/4 cups all-purpose flour
- – 1 teaspoon baking soda
- – 1/2 teaspoon baking powder
- – 1/2 teaspoon kosher salt
- – 3/4 cup (1.5 sticks) unsalted butter, softened to room temperature
- – 1 and 1/4 cups granulated sugar
- – 1 large egg, room temperature
- – 1 and 1/2 teaspoons pure vanilla extract
- – 1 tablespoon milk or heavy cream (only if dough is too dry)
For Rolling:
- – 1/3 cup granulated sugar (for coating the cookies)
Instructions
- Process the Raspberries: Begin by placing the freeze-dried raspberries into a food processor or a high-powered blender. Pulse them continuously until they break down into a very fine, uniform powder. If you do not have a food processor, you can place the berries in a heavy-duty zip-top bag and crush them thoroughly with a rolling pin until powdered. Measure out exactly 1/2 cup of the powder.
- Whisk the Dry Ingredients: In a medium-sized mixing bowl, combine the all-purpose flour, the 1/2 cup of raspberry powder, the baking soda, the baking powder, and the kosher salt. Whisk vigorously until the pink powder is evenly distributed throughout the flour, ensuring there are no hidden clumps of baking soda. Set this bowl aside.
- Cream the Butter and Sugar: In the bowl of a stand mixer fitted with the paddle attachment (or using a large bowl and a hand mixer), combine the softened unsalted butter and the 1 and 1/4 cups of granulated sugar. Beat on medium-high speed for a full 2 to 3 minutes. The mixture should become visibly lighter in color, very fluffy, and look like damp sand. Do not rush this step; creaming is essential for the cookies’ texture.
- Add the Wet Ingredients: Scrape down the sides and bottom of the bowl with a rubber spatula. Add the room-temperature egg and the vanilla extract. Beat on medium speed until the egg is fully incorporated and the mixture is completely smooth and homogeneous.
- Incorporate the Dry Ingredients: Turn your mixer down to the lowest possible speed. Gradually add the pink flour mixture into the wet ingredients in two or three additions. Mix only until the flour just disappears and a soft dough forms. Do not overmix, or your cookies will become tough. If the dough seems excessively crumbly and won’t come together (which can happen depending on the humidity and your flour measurement), mix in 1 tablespoon of milk or cream to hydrate it.
- Chill the Dough: Cover the bowl tightly with plastic wrap and place the dough in the refrigerator to chill for at least 30 minutes, or up to 2 hours. Chilling allows the flour to fully hydrate and the butter to firm up, which prevents the cookies from spreading into flat puddles in the oven.
- Preheat and Prep: While the dough is chilling, preheat your oven to 350°F (175°C). Line two large baking sheets with parchment paper or silicone baking mats. Pour the remaining 1/3 cup of granulated sugar into a small, shallow bowl for rolling.
- Roll and Coat: Remove the chilled dough from the refrigerator. Using a medium cookie scoop (about 1.5 tablespoons of dough), scoop the dough and roll it between your palms into a smooth ball. Drop the ball into the shallow bowl of granulated sugar and roll it around until it is heavily and evenly coated on all sides. Place the coated dough balls onto the prepared baking sheets, spacing them at least 2 inches apart to allow for spreading.
- Bake to Perfection: Bake in the preheated oven for 11 to 13 minutes. You want to pull them out when the edges are just barely set and the tops have developed deep, beautiful cracks, but the centers still look slightly underbaked and soft. They will continue to cook on the hot pan after you remove them from the oven.
- Cool and Serve: Let the cookies cool on the baking sheet for 5 minutes before carefully transferring them to a wire cooling rack to cool completely. Serve and enjoy the chewy, fruity perfection!
The Science of the Perfect Cookie Crinkle
You might wonder why we go through the trouble of rolling the dough balls in extra granulated sugar before baking. It is not just for extra sweetness; it is a vital structural technique. When the sugar-coated dough hits the hot oven, the exterior sugar coating quickly draws out a tiny amount of moisture from the surface of the dough, crystallizing and drying out the exterior crust much faster than the interior of the cookie bakes.
As the baking powder and baking soda activate and the butter melts, the center of the cookie begins to expand outward and puff up. Because the exterior crust has already dried and set thanks to the sugar coating, it cannot stretch. Therefore, the crust fractures and breaks apart, creating those gorgeous, cavernous cracks that expose the vibrant, moist dough underneath. It is a beautiful display of baking chemistry in action, resulting in a cookie with a delicately crunchy shell and a dense, fudgy center.
Expert Tips for Flawless Raspberry Sugar Cookies
To ensure your cookies turn out perfectly every single time, keep these professional baking tips in mind:
Do Not Skip the Chill: The chilling step is not merely a suggestion; it is a requirement. If you bake this dough immediately after mixing, the butter is too warm and the cookies will spread uncontrollably. A brief 30-minute chill solidifies the fat, ensuring a thicker, chewier final product.
Sift Your Raspberry Powder: If your food processor leaves large, tough seeds from the freeze-dried raspberries in your powder, you may want to pass the powder through a fine-mesh sieve before adding it to your flour. This ensures a perfectly smooth, refined texture in your baked cookies, though leaving the seeds in provides a more rustic, authentic feel.
Watch the Oven Carefully: The line between a perfectly chewy sugar cookie and a dry, hard one is remarkably thin. Because these cookies are pink, you cannot rely on the traditional visual cue of “golden brown edges.” Rely strictly on the timer and the texture. Pull them out the moment they puff up and the deep cracks form, even if the centers look completely raw. The residual heat of the baking sheet will finish the job perfectly.
Exciting Variations and Customizations
While this recipe is a masterpiece on its own, it serves as an excellent foundational dough for further flavor experimentation.
White Chocolate Raspberry: This is perhaps the most popular variation. Fold 3/4 cup of high-quality white chocolate chips into the dough at the very end of the mixing process. The creamy, rich sweetness of the white chocolate is the ultimate counterpoint to the tart raspberry powder, creating a decadent “berries and cream” flavor profile.
Lemon Raspberry Twist: To amplify the bright, fruity notes, add the freshly grated zest of one whole lemon to the butter and sugar during the creaming stage. The citrus oils from the lemon zest will heavily perfume the dough, making these cookies taste like a glass of pink raspberry lemonade.
The Dark Chocolate Drizzle: For an elegant, sophisticated presentation, melt high-quality dark chocolate and vigorously drizzle it over the top of the completely cooled cookies. The slight bitterness of the dark chocolate pairs phenomenally well with the sweet and sour fruit notes.
Serving Suggestions: How to Enjoy Your Cookies
These Raspberry Sugar Cookies are incredibly versatile when it comes to serving. They are robust enough to be packed into lunchboxes or shipped in care packages without crumbling to dust.
For an elevated dessert experience, serve them warm alongside a cup of robust Earl Grey tea or a dark, freshly brewed coffee; the bitterness of the beverages perfectly offsets the sweet, fruity cookie. During the summer months, they make the absolute best base for ice cream sandwiches. Place a hefty scoop of premium vanilla bean or pistachio ice cream between two chilled raspberry cookies for an unforgettable treat.
Storage and Freezing Instructions
Proper storage is essential to maintain that coveted chewy texture.
Room Temperature: Store completely cooled baked cookies in an airtight container at room temperature. They will remain soft, chewy, and delicious for up to 5 days. To keep them extra soft, you can place a small piece of plain white bread in the container; the cookies will absorb the moisture from the bread.
Freezing Baked Cookies: You can freeze the baked cookies in a freezer-safe zip-top bag for up to 3 months. Let them thaw at room temperature for an hour before serving.
Freezing Cookie Dough: This dough freezes exceptionally well. Roll the dough into balls, coat them in sugar, and place them on a baking sheet in the freezer until solid. Then, transfer the frozen, coated balls to a zip-top bag and freeze for up to 3 months. You can bake them straight from frozen, simply adding 1 to 2 extra minutes to the total baking time.
Frequently Asked Questions (FAQs)
Can I use liquid food coloring instead of freeze-dried raspberries?
While you technically could use a drop of pink food coloring and a dash of raspberry extract in a standard sugar cookie dough, you will entirely miss out on the authentic, tart flavor and the unique texture that the actual fruit powder provides. The freeze-dried powder is highly recommended for the true experience.
Why did my cookies turn out flat?
Flat cookies are almost always the result of butter that was too warm. If your butter was melting before you creamed it, or if you skipped the chilling step in the refrigerator, the fat will melt too quickly in the oven, causing the dough to spread before the structure can set.
Can I substitute strawberry freeze-dried powder?
Absolutely! This exact recipe works perfectly with freeze-dried strawberries, blueberries, or even mangoes. Simply swap the fruit powder evenly for a completely different, yet equally delicious, fruity sugar cookie.
Conclusion
Baking is a delightful intersection of art and science, and these Raspberry Sugar Cookies are a testament to that fact. By utilizing the ingenious ingredient of freeze-dried fruit, you are able to bypass the pitfalls of excess moisture and inject an incredible amount of natural color and bold flavor into a beloved classic. The resulting cookie—with its sparkling, crackly crust, its dense, chewy center, and its undeniably vibrant pink hue—is a triumph of home baking. Gather your ingredients, prepare your palate for a burst of berry flavor, and enjoy the process of creating your new favorite cookie recipe!
Raspberry Sugar Cookies
Ingredients
Equipment
Method
- Process the freeze-dried raspberries in a food processor until they form a fine powder. Measure out exactly 1/2 cup of powder.
- In a medium bowl, vigorously whisk together the flour, raspberry powder, baking soda, baking powder, and salt.
- In a large bowl or stand mixer, cream the softened butter and 1 1/4 cups of granulated sugar on medium-high speed for 2-3 minutes until light and fluffy.
- Beat in the egg and vanilla extract until completely smooth, scraping down the sides of the bowl as needed.
- Gradually mix in the dry ingredients on low speed until just combined. If the dough is too crumbly, mix in 1 tablespoon of milk.
- Cover the dough and chill in the refrigerator for at least 30 minutes to firm up.
- Preheat oven to 350°F (175°C) and line baking sheets with parchment paper. Place 1/3 cup of granulated sugar in a shallow bowl.
- Scoop 1.5-tablespoon portions of dough, roll into balls, and coat generously in the granulated sugar. Place 2 inches apart on baking sheets.
- Bake for 11-13 minutes until the cookies puff up and develop deep cracks, but centers are still soft. Cool on the pan for 5 minutes before transferring to a wire rack.