Red Velvet Strawberry Cheesecake
The Ultimate Red Velvet Strawberry Cheesecake: A Showstopping Layer Cake
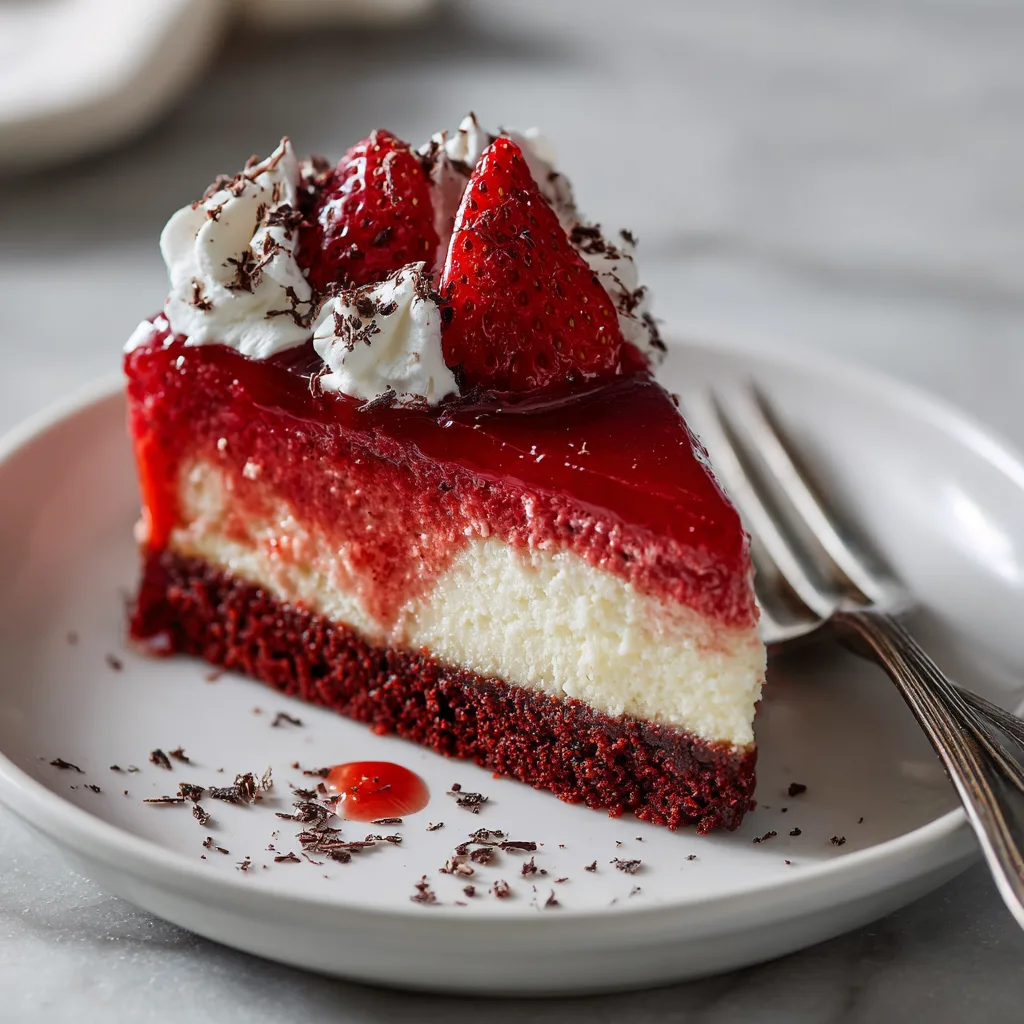
Welcome to the intersection of elegance and indulgence. If you’ve been searching for the perfect dessert to headline your next holiday gathering, Valentine’s Day dinner, or sophisticated dinner party, your search ends here. This isn’t just a cake; it’s a statement piece. My Red Velvet Strawberry Cheesecake combines the cocoa-infused sophistication of classic red velvet cake with the tangy, lusciousness of homemade cheesecake, all crowned by a vibrant, shimmering strawberry glaze that screams ‘fresh.’ As you can see in the detailed hero shot  , the layers are defined, clean, and utterly mesmerizing.
The beauty of this recipe lies in its balanced complexity. We are pairing three distinct flavor profiles—the light, moist crumb of cocoa-driven red velvet; the rich, dense profile of a classic New York-style cheesecake filling; and the bright, slightly acidic sweetness of fresh strawberries. When stacked together, they create an experience that is complex, deeply satisfying, and visually stunning. This article will guide you through making this showstopper, optimized for both taste and ease of preparation.
Why Red Velvet and Cheesecake Belong Together
Historically, Red Velvet cake was known for its reaction between acidic buttermilk and raw cocoa powder, creating a subtle redness and a unique ‘velvety’ texture. Over time, it developed into the rich, dramatic cake we recognize today, often paired with cream cheese frosting. It’s that pairing—the mild, slightly chocolatey cake against the tangy cream cheese—that inspired this construction. Instead of just frosting, we have amplified the tangy element by introducing a full, rich cheesecake layer. The addition of the strawberry glaze provides that necessary fruity brightness, cutting through the richness and making every bite feel dynamic. When presented side-by-side on styled serving plates  , you can see how the light red glaze pop invites you in.
Deconstructing the Ingredients: Quality Makes the Difference
Before you dive into the kitchen, let’s talk about what makes this recipe successful. Achieving those perfect layers requires attention to detail. I’ve organized the ingredients into logical clusters  to help you prep efficiently. We are focusing on quality here.
For the Red Velvet Layers:
The base must be strong but tender. For the absolute best results, I recommend using a high-quality Dutch-processed cocoa powder. It offers a smoother, deeper chocolate flavor and darker color that reacts beautifully with the red dye.
- – **Cake Flour:** This is essential for achieving a fine, delicate, ‘velvety’ crumb. All-purpose flour can make the cake too dense.
- – **Dutch-Processed Cocoa Powder:** Provides the signature sophisticated chocolate notes.
- – **Buttermilk:** Activated by baking soda, it creates a tenderizing rise and that subtle tang.
- – **High-Quality Red Gel Food Coloring:** Gel is concentrated, meaning you need less to achieve that dramatic crimson hue without altering the batter’s consistency.
- – **Unsalted Butter & Vegetable Oil:** We use both—butter for flavor and oil to guarantee moisture that lasts.
For the Cheesecake Filling:
This is where the structure comes from. The goal is dense and creamy, not airy.
- – **Full-Fat Cream Cheese:** Use high-quality blocks (like Philadelphia) and *always* ensure they are completely softened to room temperature. This is non-negotiable for a lump-free filling.
- – **Granulated Sugar:** Sweetens and helps structure the filling.
- – **Eggs:** Room temperature eggs bind the ingredients together. We add them last to minimize air incorporation.
- – **Sour Cream:** Adds that necessary signature cheesecake tang.
- – **White Chocolate:** I often add melted high-quality white chocolate (visible in the glass bowl in
 ) to my filling. It adds stability and a luscious, velvety mouthfeel.
For the Shiny Strawberry Glaze & Topping:
The crown jewel.
- – **Fresh Strawberries:** Choose vibrant, ripe berries for the best flavor and color. (We use them halved for topping as seen in ).
- – **Granulated Sugar:** To draw out the juices and sweeten.
- – **Cornstarch:** A small amount thickens the puree into a stable glaze.
- – **Lemon Juice:** Brightens the flavor and stabilizes the color.
Step-by-Step Instructions: Mastering the Stack
Achieving the flawless presentation seen in the hero image requires patience and precision. We are essentially making two different recipes and then assembling them. We will use two separate 8-inch or 9-inch pans for efficiency.
Phase 1: The Red Velvet Base
- **Preheat and Prep:** Preheat your oven to 350°F (175°C). Line two round cake pans (8-inch is ideal for height) with parchment paper and grease the sides well.
- **Mix Dry:** Whisk together the cake flour, cocoa powder, sugar, baking soda, and salt.
- **Mix Wet:** Cream the butter. Add the oil, room temperature eggs, buttermilk, vinegar, vanilla, and red gel coloring. Be bold with the color; it will lighten slightly when baked.
- **Combine:** Gradually add the dry ingredients to the wet. Do not overmix; stop once the last streak of flour disappears.
- **Bake:** Divide the batter evenly between the prepared pans. Bake for 30-35 minutes, or until a toothpick inserted into the center comes out clean.
- **Cool Completely:** Allow the cakes to cool in the pans for 10 minutes, then invert onto wire racks. Let them cool *completely*. This cake is moist and fragile when warm. *Pro Tip: Wrap cooled cakes in plastic wrap and chill them in the fridge for 2 hours before leveling. Chilled cake creates fewer crumbs.*
Phase 2: The Creamy Cheesecake Layer
- **Prepare Cheesecake:** Lower the oven temperature to 325°F (160°C). Wrap the outside of one clean 8-inch or 9-inch springform pan securely in a double layer of heavy-duty aluminum foil. This pan must match the size of your cake layers. *Note: If you have enough pans, you can bake this simultaneously with the cakes, but ensure your temperatures are managed.*
- **Melt White Chocolate:** (Optional but recommended) Gently melt the white chocolate chips and set aside to cool slightly.
- **Cream Cheese Base:** In a large bowl, beat the *completely softened* cream cheese and sugar together until smooth and fluffy. Add the sour cream and vanilla.
- **Add Stability:** If using, gently fold in the melted and slightly cooled white chocolate.
- **Add Eggs:** Add the eggs one at a time, mixing on *low speed* just until combined. *Critical Tip: Overmixing the eggs can incorporate too much air, causing the cheesecake to puff up and then crack as it cools.*
- **Water Bath (Crucial Step):** Pour the batter into the prepared foil-wrapped springform pan. Place the pan in a larger roasting pan. Pour boiling water into the roasting pan until it reaches halfway up the side of the springform.
- **Bake:** Bake the cheesecake layer for 55-60 minutes, or until the edges are set and the center still has a slight, stable juggle (like Jell-O).
- **Cool Slowly:** Turn off the oven, crack the door, and let the cheesecake cool *inside* the oven for 30 minutes. This slow cooling prevents cracking. Then, transfer the springform pan to a wire rack to cool completely. Once cool, cover and refrigerate for at least 4 hours (or overnight).
Phase 3: The Assembly and Shimmering Glaze
- **Level and Stack:** Once all layers are completely cold, level your red velvet cakes using a serrated knife. Chilled cake layers are cleaner to level. Place one red velvet layer on your final serving platter. *Note: I often place a thin layer of cream cheese frosting (not included in the core recipe but a great optional binder) between the layers for stability, though the sticky glaze can work if the layers are leveled flawlessly.*
- **Assemble:** Gently unmold the cold cheesecake layer. Check for flatness. If it has dome, level it gently. Place the cheesecake layer directly onto the first cake layer. Place the second red velvet cake layer on top. Chill the stacked cake again while you make the glaze.
- **Make the Glaze:** Puree half of your strawberries (as seen clustered in ) with sugar, cornstarch, and lemon juice until smooth. Pass through a fine-mesh sieve to remove seeds. Cook the mixture over medium heat, stirring constantly, until it thickens and becomes translucent/glossy. Remove from heat and let it cool until it is just lukewarm but still pourable. Do *not* pour hot glaze over a cold cake.
- **Glaze and Decorate:** Working quickly, pour the warm (not hot) glaze over the top red velvet layer, using an offset spatula to spread it smoothly. Create those beautiful drips down the sides if desired (visible in the hero shot ).
- **Top and Chill:** Arrange halved fresh strawberries (like those visible in the ingredient spread ) around the perimeter. Dollop whipped cream between the strawberries. Chill the entire assembled cake for at least 1 hour before slicing. Slicing when completely cold guarantees those clean, beautiful layers.
Variations: Making the Recipe Your Own
While this recipe is optimized for success, there are several ways to adjust it to your preferences. The core concept of ‘red velvet and cheesecake’ is very flexible.
- – **No-Bake Filling Shortcut:** For a faster assembly, you can use my simplified no-bake cheesecake filling. *Keyword Note: While this baked version is sturdier, the no-bake shortcut is perfect if you are short on oven time.*
- – **Chocolate Red Velvet:** If you want a more distinct chocolate flavor, add an extra tablespoon of cocoa powder to the cake batter and consider a dark chocolate ganache drip instead of the strawberry glaze. *Keyword Optimization: The ‘Red Velvet Chocolate Cheesecake Variation’ is highly searched during holiday seasons.*
- – **Miniature Perfection:** This recipe can easily be adapted into cupcakes. Place red velvet batter in tins, top with a spoonful of the baked cheesecake batter, and bake for 22-25 minutes. *Pro Tip: Use the strawberry glaze as a core filling.*
- – **Gluten-Free Option:** Simply swap the cake flour for a high-quality 1:1 gluten-free baking blend (like Bob’s Red Mill). The cheesecake and glaze layers are naturally gluten-free.
Creative Sections and Fun Facts
The Science of the Layers: Understanding Stability
You may be wondering why we don’t just bake the red velvet batter on top of the cheesecake layer. The answer is density and moisture migration. Red velvet cake batter is relatively light; cheesecake filling is dense and wet. If baked together in one go, the cake batter will absorb moisture from the cheesecake, making the interface section soggy. Furthermore, the rising action of the cake can disturb the cheesecake layer. Baking them separately, cooling them, and then stacking ensures that the interface between the distinct red and white layers remains crisp and clean . This methodology is critical for the visual presentation that makes this cake so impressive.
Leveling 101: The Secret to Professional Slices
To get the perfectly flat layers shown in my hero image , you *must* level your cake and cheesecake layers. Cakes almost always bake with a slight dome. Cheesecake, even with slow cooling, might have a slight indentation. A long, serrated knife is your best friend here. Always chill the layers completely before trying to level them; a warm cake layer will crumble under the knife. Keep the blade perfectly horizontal. The scraps make a great treat for the baker! When stacking, consider placing the *bottom* (perfectly flat) side of the top cake layer facing *up* for the cleanest possible surface to glaze.
Where Did Red Velvet Actually Come From? A Brief Culinary History
While often associated with the American South, the origins of ‘velvet’ cake go back to Victorian-era England. Bakers used specialized ingredients (like cocoa) and acidic components (like vinegar) to achieve a finer texture, or ‘velvet’ crumb. The characteristic red hue was originally a natural chemical reaction between raw cocoa and acidic buttermilk. It was the Adams Extract company (one of the first to market food coloring) that capitalized on this reaction by promoting the dramatic, dye-driven color we know today, turning it into a marketing success during the Great Depression. Sometime later, someone (accounts vary widely, from the Waldorf-Astoria to inventive home cooks) had the brilliant idea to pair this sophisticated cocoa flavor with rich, tangy cream cheese frosting. This recipe is just the modern evolution of that iconic culinary handshake.
Serving Suggestions and Slicing Perfection
This Red Velvet Strawberry Cheesecake is rich, so smaller, elegant slices are appropriate. To achieve the perfect, professional-looking slice seen in , use a long, sharp knife. Run the blade under very hot water, wipe it clean, and make one swift, confident cut. Clean the blade and re-heat it after *every single slice*. This ensures the clean definition between the red velvet and white cream cheese layers. This dessert is perfect served slightly chilled and pairs wonderfully with a cup of robust coffee, a glass of dry sparkling wine, or a sophisticated dessert liqueur. It needs no extra accompaniments beyond what we’ve already piled on! We find that serving it on elegant, simple white plates like those shown in our styled overhead shot makes the colors pop.
Storage
Because this dessert contains fresh fruit and cream cheese, it *must* be stored in the refrigerator. Cover it securely with plastic wrap or keep it in a large, airtight cake carrier. When properly stored, it will last for 3 to 4 days, though the fresh strawberries on top are best enjoyed within the first 24 hours. If you wish to make it ahead, you can bake and freeze the leveled cake layers weeks in advance.
Enjoy every moment of making—and especially eating—this showstopper!
Red Velvet Strawberry Cheesecake
Ingredients
Equipment
Method
- Preheat oven to 350°F (175°C). Grease and line two round (8-inch or 9-inch) cake pans with parchment paper.
- In a medium bowl, whisk together the cake flour, cocoa powder, sugar, baking soda, and salt.
- In a separate large bowl, cream the butter. Add oil, room temp eggs, buttermilk, vinegar, vanilla, and red gel coloring. Be bold with the color. Mix well.
- Gradually add the dry ingredients to the wet. Do not overmix; stop once the last streak of flour disappears.
- Divide batter evenly between prepared pans. Bake 30-35 mins until a toothpick inserted into the center comes out clean. Cool in pans 10 mins, then invert onto wire racks to cool COMPLETELY.
- Prepare for Cheesecake Phase: Lower oven to 325°F (160°C). Wrap the outside of one clean springform pan (matching the cake layer size) in heavy-duty foil. Melt the optional white chocolate and set aside.
- Beat softened cream cheese and sugar until smooth and fluffy. Add sour cream and vanilla.
- Add eggs one at a time, mixing on low speed just until combined. *Crucial: Do not overmix eggs.* Fold in the cooled melted white chocolate, if using.
- Pour cheesecake batter into the prepared springform pan. Place in a roasting pan. Pour boiling water into the roasting pan to reach halfway up the side of the springform.
- Bake the cheesecake layer 55-60 mins until edges are set but the center has a slight jiggle. Turn off oven, crack door, cool inside 30 mins. Transfer to a rack to cool completely, then refrigerate for at least 4 hours (or overnight).
- Assemble the Stack: Level the cold red velvet cakes with a serrated knife. Gently unmold and level the cheesecake layer if necessary. Place one red velvet layer on a serving platter. Stack the cheesecake layer, then the second red velvet layer on top.
- Make the Glaze: Puree half the strawberries with sugar, cornstarch, and lemon juice. Cook over medium heat, stirring constantly, until it thickens and is glossy/translucent. Let cool until lukewarm but still pourable. *Do not pour hot glaze over a cold cake.*
- Pour lukewarm glaze over the stacked cake, using a spatula to spread smoothly and create drops if desired *[Image 10]*. Top with halved fresh strawberries and dollops of whipped cream. Chill for 1 hour before slicing.