Savory Breakfast Pop-Tarts
The Ultimate Cheesy Sausage & Egg Breakfast Pop-Tarts: Nostalgia Meets Savory Comfort
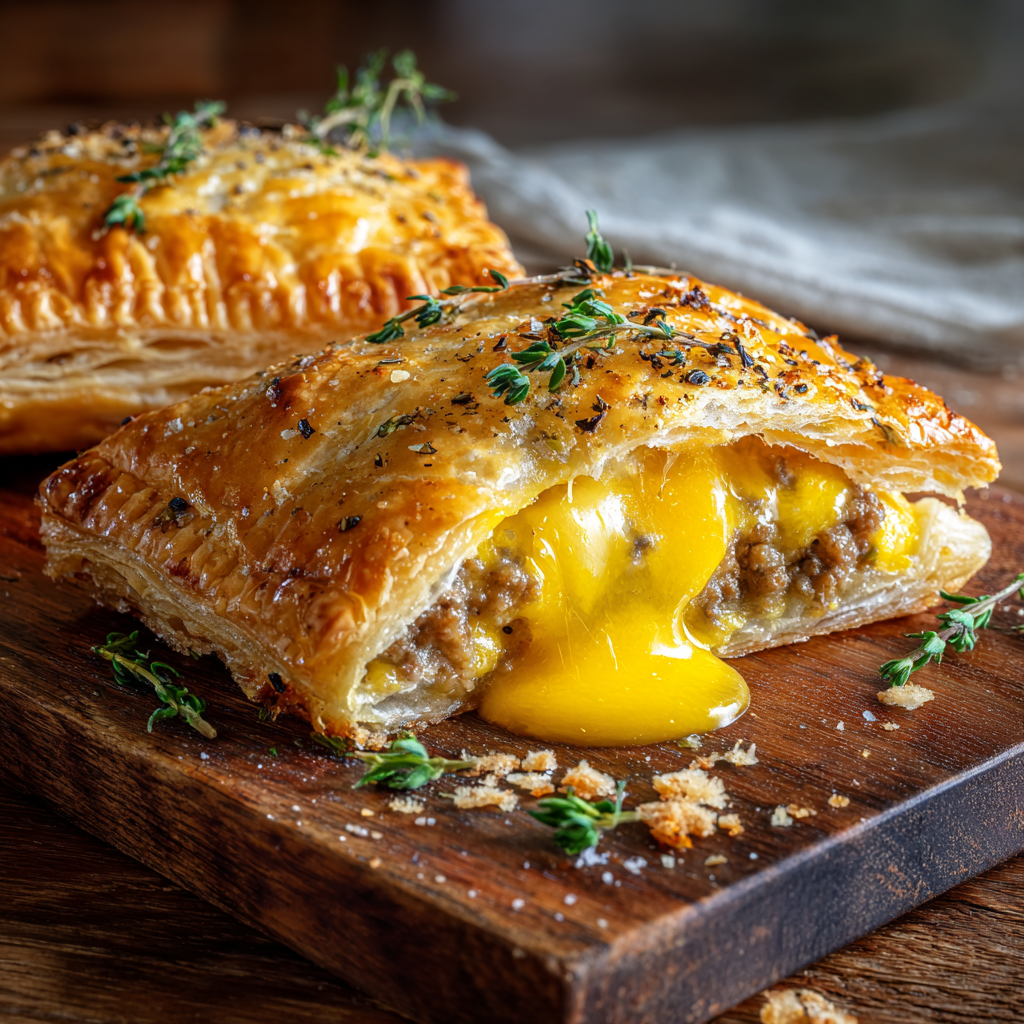
There is something deeply nostalgic about a rectangular toaster pastry. For many of us, it was the quintessential quick breakfast of childhood, usually filled with sugary fruit jam and coated in sprinkles. But what if we took that beloved format and gave it a grown-up, savory twist? Enter the **Savory Breakfast Pop-Tart**. This isn’t a dry, cardboard-like convenience food. This is buttery, flaky puff pastry stuffed to the brim with savory breakfast sausage, fluffy scrambled eggs, and an undeniable amount of gooey, melted cheese.
These homemade hand pies are the answer to the boring breakfast rut. They are essentially elevated homemade Hot Pockets, but with infinitely better ingredients and that irresistible shatteringly crisp texture that only real puff pastry can provide. Whether you need a grab-and-go option for busy mornings, a hearty contribution to a weekend brunch spread, or just comfort food at its finest, these cheesy pockets deliver on every level. They are fun to make, incredibly satisfying to eat, and guaranteed to become a household favorite.
Why This Recipe Is a Game Changer
Why make your own pop-tarts when you could buy frozen breakfast sandwiches? The difference is night and day, and it all comes down to control over textures and flavors.
- The Power of Puff Pastry: Store-bought frozen puff pastry is a modern miracle. It does all the hard work of creating hundreds of buttery layers for you. When baked, it puffs up into a golden, crispy vessel that shatters when you bite into it, contrasting perfectly with the soft, cheesy filling.
- Customizable Filling: Unlike store-bought options containing mystery meats, you control exactly what goes inside. We are using hearty breakfast sausage, real eggs, and high-quality melting cheese.
- The “Cheese Pull” Factor: This recipe doesn’t skimp on the cheese. By using a combination of sharp cheddar for flavor and American cheese for that classic, superior meltability, you get a filling that oozes out decadently when sliced hot.
- Meal Prep Friendly: These pastries freeze exceptionally well. You can make a big batch on Sunday, freeze them before or after baking, and have a gourmet breakfast ready in minutes all week long.
Ingredients Needed for Flaky Perfection
The beauty of this recipe lies in using readily available ingredients to create something spectacular.
The Pastry & Topping:
- Frozen Puff Pastry: You will need 1 package (usually contains 2 sheets), thawed according to package directions. Keep it cold until you are ready to work with it.
- Egg Wash: 1 large egg beaten with 1 tablespoon of water. This is crucial for that glossy, golden-brown bakery finish.
- Topping Seasoning: A mix of fresh chopped thyme or chives, flaky sea salt, and cracked black pepper. This adds a savory aroma and visual appeal to the top crust.
The Cheesy Sausage Filling:
- Breakfast Sausage: 1/2 lb of ground pork sausage (hot or mild, depending on your preference). You can also use turkey sausage.
- Eggs: 4 large eggs, scrambled softly. You don’t want them overcooked before they go into the oven.
- Cheese: The star of the show. You need about 4-6 slices of American cheese OR 1 cup of shredded sharp cheddar cheese. A mix is often best for flavor and melt.
- Salt and Pepper: To season the egg and sausage mixture.
Step-by-Step Instructions
Making these requires a little assembly line work, but it is a fun process that yields impressive results.
Phase 1: Prepare the Filling
- Brown the Sausage: In a medium skillet over medium-high heat, cook the ground breakfast sausage. Break it up with a wooden spoon into small crumbles as it cooks. Once browned and cooked through, remove it from the pan with a slotted spoon and drain on paper towels to remove excess grease.
- Scramble the Eggs: Wipe out most of the sausage grease from the skillet, leaving just a thin film. Reduce heat to medium-low. Pour in the beaten eggs (seasoned with a pinch of salt and pepper). Cook slowly, stirring frequently, until soft curds form. Remove from heat while they are still slightly glossy and undercooked—they will finish cooking in the oven.
- Cool Filling: It is vital that your filling components cool down to room temperature before assembling. Hot filling will melt the butter in the puff pastry, causing it to become greasy and preventing it from puffing properly.
Phase 2: Assemble the Pop-Tarts
- Preheat and Prep: Preheat your oven to 400°F (200°C). Line two large baking sheets with parchment paper.
- Roll and Cut Pastry: On a lightly floured surface, gently roll out one sheet of thawed puff pastry to smooth out the creases and make it slightly larger. Using a pizza cutter or sharp knife, cut the sheet into even rectangles. Aim for 6 rectangles per sheet (making 3 pop-tarts total per sheet). Repeat with the second sheet. You should have 12 rectangles total, to make 6 pop-tarts.
- Fill: Place 6 of the rectangles on your prepared baking sheets spaced well apart. These are your bottoms. In the center of each bottom rectangle, place a slice of cheese (or a heap of shredded cheese), followed by a spoonful of scrambled eggs, and topped with sausage crumbles. Leave a clear 1/2-inch border around the edges.
- Seal: Brush a little bit of the egg wash around the empty border of the bottom pastries. Place the remaining 6 pastry rectangles on top of the filled ones. Use a fork to firmly crimp the edges all the way around, sealing the filling inside. This gives it that classic pop-tart look and prevents leaks.
Phase 3: Bake to Golden Glory
- Finishing Touches: Brush the tops of all the pop-tarts generously with the remaining egg wash. Using a sharp knife, cut two or three small slits in the top of each tart to allow steam to escape. Sprinkle the tops with fresh thyme, flaky salt, and black pepper.
- Bake: Bake for 18–22 minutes, rotating the pans halfway through. They should be deep golden brown and puffed high.
- Cool: Let them cool on the baking sheets for at least 5–10 minutes before serving. The filling will be molten hot right out of the oven.
Expert Tips for Pastry Success
1. Keep it Cold: Puff pastry gets its lift from layers of cold butter turning into steam in a hot oven. If your pastry gets warm and sticky while working, pop it back in the fridge for 15 minutes before proceeding.
2. Don’t Overfill: It is tempting to stuff them, but overfilling will cause the seams to burst open during baking, resulting in a cheese explosion on your baking sheet instead of in your mouth.
3. The Seal is Crucial: Crimp those edges firmly. If your fork isn’t doing the trick, you can use your fingers to pinch and fold the edges over for a more rustic seal. The egg wash “glue” is essential here.
4. Docking vs. Slits: While sweet pop-tarts are often “docked” (poked with holes all over the top surface), for these savory ones with a chunky filling, slicing a few vents with a knife works better to release steam without letting the cheese bubble out too much.
Variations on the Savory Theme
Once you master the technique, the filling possibilities are endless.
- Bacon & Gruyère: Swap the sausage for crispy crumbled bacon and use nutty Gruyère cheese instead of cheddar for a more sophisticated flavor profile.
- Veggie Delight: Sauté spinach, mushrooms, and onions until all moisture is evaporated. Mix this with scrambled eggs and feta cheese for a hearty vegetarian option.
- Southwestern: Add diced green chiles to your scrambled eggs, use Pepper Jack cheese, and serve with a side of salsa.
- Ham & Swiss: A classic combination. Use diced deli ham and Swiss cheese slices with a touch of Dijon mustard smeared on the bottom pastry layer.
Storage and Reheating Guide
Refrigerator: Store baked, cooled pop-tarts in an airtight container in the fridge for up to 4 days. Reheat in a toaster oven or air fryer at 350°F for 5-7 minutes to restore crispness. Microwaving will make the pastry soggy.
Freezer (Baked): Let baked pop-tarts cool completely. Wrap each one individually in plastic wrap, then place them all in a freezer-safe bag. Freeze for up to 2 months. Reheat from frozen in a 350°F oven or air fryer for 10-15 minutes.
Freezer (Unbaked): Assemble the pop-tarts completely (up to the egg wash step, but don’t wash them yet). Freeze them solid on a baking sheet, then transfer to a freezer bag. When ready to bake, brush with egg wash and add toppings. Bake from frozen, adding an extra 5–8 minutes to the baking time.
Final Thoughts
These Savory Sausage & Cheese Breakfast Pop-Tarts are a labor of love that pays off with every flaky, cheesy bite. They bring a sense of fun and indulgence to the breakfast table that standard eggs and toast just can’t match. So grab a box of puff pastry and get ready to make your new favorite weekend treat. Your inner child (and your adult taste buds) will thank you.
Savory Sausage & Cheese Breakfast Pop-Tarts
Ingredients
Equipment
Method
- Brown sausage in a skillet, breaking into crumbles. Drain excess fat and set sausage aside.
- In the same skillet over low heat, soft-scramble the 4 eggs. Remove from heat and let cool completely alongside the sausage.
- Preheat oven to 400°F (200°C). Line two baking sheets with parchment paper.
- Roll out puff pastry sheets slightly. Cut each sheet into 6 even rectangles (12 total).
- Place 6 rectangles on baking sheets. Top center of each with a cheese slice, scrambled eggs, and sausage crumbles, leaving a border.
- Brush borders with egg wash. Place remaining 6 rectangles on top. Crimp edges firmly with a fork to seal.
- Brush tops with egg wash. Cut small vent slits in tops. Sprinkle with thyme, salt, and pepper.
- Bake for 18-22 minutes until deeply golden brown and puffed. Cool for 10 minutes before serving.