Strawberry Crunch Cheesecake Tacos
Strawberry Crunch Cheesecake Tacos: The Ultimate Nostalgic Dessert
If you grew up chasing the ice cream truck down the street for a Strawberry Shortcake bar, prepare to have your mind blown. These Strawberry Crunch Cheesecake Tacos are a grown-up (yet incredibly fun) twist on that childhood favorite. Imagine a crispy, golden taco shell, coated in a sweet, buttery strawberry-vanilla crumble, filled with a velvety smooth no-bake cheesecake mousse, and drizzled with a glossy strawberry glaze. It is a collision of textures and flavors that is visually stunning and undeniably delicious.
This dessert is not just a treat; it is an experience. The contrast between the crunchy, cookie-coated shell and the cloud-like filling is addictive. It’s perfect for summer BBQs, Cinco de Mayo parties with a twist, or just a Tuesday night when you need something spectacular. In this extensive guide, we will break down every single component—from perfecting the homemade taco shells to achieving that signature “crunch” topping—ensuring your kitchen turns into the most popular bakery in town.
Why This Recipe is a Viral Sensation
You may have seen variations of this dessert taking over social media, and for good reason. It combines three beloved elements into one handheld package:
- The Nostalgia Factor: The “Strawberry Crunch” topping is made from a blend of Golden Oreos and strawberry flavoring (often gelatin or freeze-dried fruit) that perfectly mimics the coating of the classic Good Humor ice cream bars.
- Texture Heaven: Most desserts are one-note in texture. This one offers a distinct crunch from the shell and coating, followed by the smoothness of the cream cheese filling, and finally the wet, sticky sweetness of the glaze.
- Customizable Format: While we are making tacos today, this same flavor profile works for cakes, cupcakes, and parfaits. However, the taco format is unique because it allows for a perfect ratio of shell-to-filling in every bite.
- No-Bake Filling: The cheesecake center requires zero oven time. It’s light, airy, and stable enough to pipe, making it much easier than a traditional baked cheesecake.
The Anatomy of the Perfect Dessert Taco
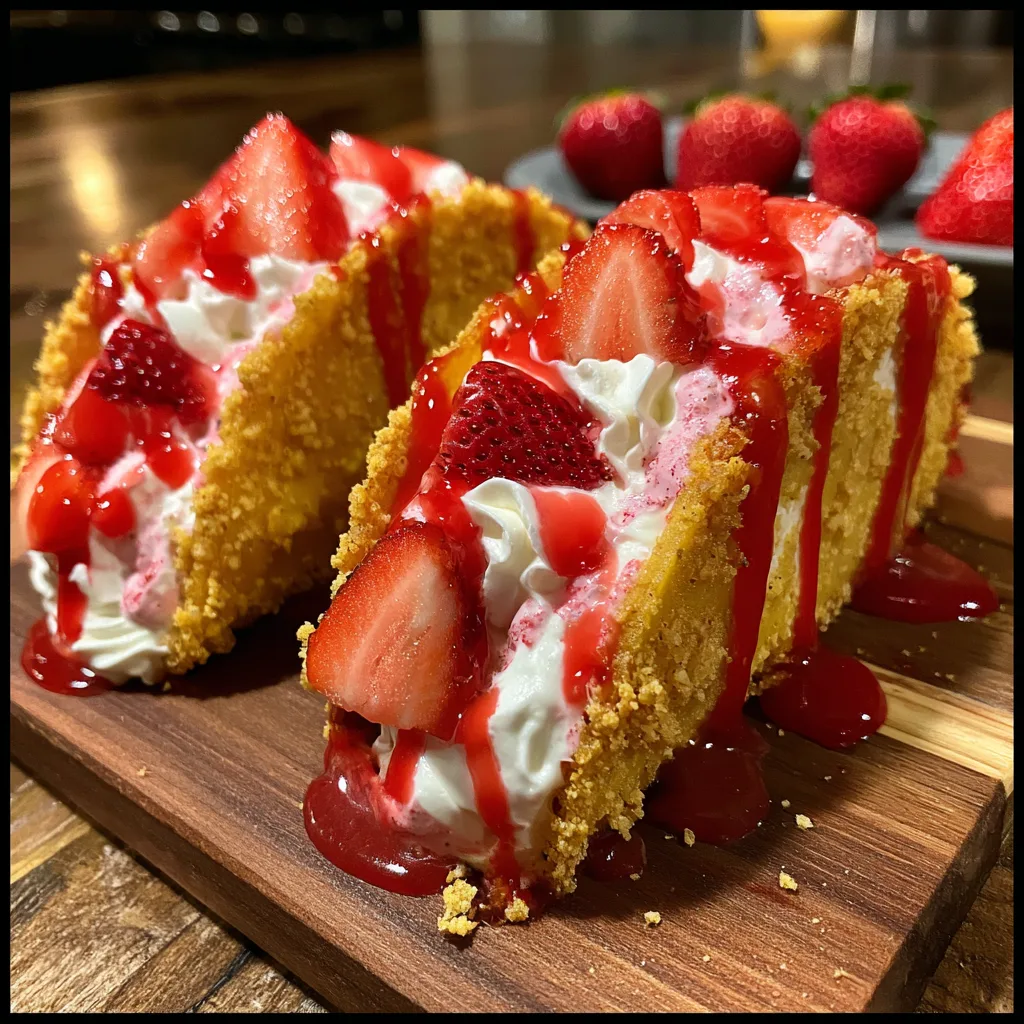
To recreate the mouth-watering image above, you need to understand the four distinct layers of this dish:
1. The Shell
We aren’t using pre-made hard taco shells here, which are too salty and corn-heavy for dessert. Instead, we use flour tortillas. When fried (or baked) and shaped, flour tortillas puff up slightly, creating a flaky, pastry-like base that pairs beautifully with sweet ingredients.
2. The Glue
To get that delicious crumble to stick to the shell, we need an adhesive. Melted white chocolate or candy melts are the secret weapon here. Not only do they act as edible glue, but they also add a layer of creamy sweetness that prevents the shell from getting soggy from the filling.
3. The Strawberry Crunch
This is the star of the show. It is a mixture of crushed vanilla sandwich cookies (like Golden Oreos) and strawberry flavor. There are two ways to achieve the strawberry element:
Method A (The Bakery Hack): Using Strawberry Jello powder mixed with butter and flour/cookies. This gives that vibrant pink color and intense candy-like flavor.
Method B (The Natural Route): Using freeze-dried strawberries. This offers a tart, real-fruit flavor and a more muted pink color. For the viral look, Method A is usually preferred.
4. The Cheesecake Filling
This isn’t just plain whipped cream. It’s a stabilized mixture of cream cheese, powdered sugar, vanilla, and heavy whipping cream. It needs to be stiff enough to hold its shape inside the taco shell without collapsing.
Ingredients List
Here is everything you need to assemble these masterpieces:
Strawberry Crunch Cheesecake Tacos
Ingredients
Equipment
Method
- Pulse Golden Oreos in a food processor until crumbs form. Mix with strawberry gelatin powder and 3 tbsp melted butter. Set aside.
- Heat oil in a skillet. Fry tortillas one by one, folding them in half with tongs to create a taco shape. Fry until golden brown. Cool on wire rack.
- Melt white chocolate. Brush the outside of each cooled taco shell with chocolate, then immediately dip into the strawberry crunch mixture. Chill for 10 mins.
- Beat softened cream cheese, powdered sugar, and vanilla until smooth. In a separate bowl, whip heavy cream to stiff peaks. Fold whipped cream into cream cheese mixture.
- Pipe the cheesecake filling into the taco shells.
- Drizzle with strawberry glaze and top with fresh strawberry slices before serving.
Notes
For the Shells
- 6-8 small Flour tortillas (fajita size works best)
- Vegetable oil (for frying)
- 1/2 cup Granulated sugar (optional, for light dusting)
- 1 cup White chocolate chips or white candy melts
- 1 tbsp Coconut oil (to thin the chocolate)
For the Strawberry Crunch Topping
- 20 Golden Oreo cookies (or generic vanilla sandwich cookies)
- 3 tbsp Unsalted butter, melted
- 1 small box (3 oz) Strawberry gelatin powder (Jello)
- Optional: Red food coloring for deeper color
For the Cheesecake Filling
- 8 oz Cream cheese, softened to room temperature
- 1 cup Powdered sugar, sifted
- 1 tsp Vanilla extract
- 1 cup Heavy whipping cream (very cold)
- 1 tsp Lemon juice (adds a tang that cuts the sweetness)
For the Garnish
- Strawberry Glaze (store-bought sundae syrup or homemade strawberry reduction)
- Fresh Strawberries, sliced
Step-by-Step Instructions
Step 1: Make the Strawberry Crunch
This step can be done ahead of time. Place the Golden Oreos (filling included) into a food processor. Pulse until you have coarse crumbs—do not pulverize them into dust; you want texture.
Transfer the crumbs to a bowl. Add the strawberry gelatin powder and the melted butter. Mix with a fork until the mixture resembles wet sand and starts to clump together. If you want a more vibrant red, add a tiny drop of food coloring here. Set this aside.
Step 2: Form and Fry the Shells
Heat about 1 inch of vegetable oil in a deep skillet to 350°F (175°C).
The Shaping Trick: Carefully place a flour tortilla into the hot oil. Let it cook for about 5-10 seconds until it bubbles. Then, using metal tongs, grip the center of the tortilla and fold it in half to create a taco shape. Hold it in that shape while it fries for another minute per side until golden brown and crispy.
Remove and place upside down on a paper towel-lined rack to drain and cool. Repeat with all tortillas.
Step 3: Coat the Shells
In a microwave-safe bowl, melt the white chocolate chips with the coconut oil in 30-second intervals, stirring until smooth.
Brush the outside (and the top rim inside) of each cooled taco shell with the melted chocolate. Immediately dip the coated shell into the Strawberry Crunch mixture, pressing the crumbs gently to ensure they adhere. Place the coated shells on a baking sheet and refrigerate for 10 minutes to set the chocolate.
Step 4: Prepare the Cheesecake Filling
In a large mixing bowl, beat the softened cream cheese, powdered sugar, lemon juice, and vanilla extract until smooth and creamy. Scrape down the sides of the bowl.
In a separate cold bowl, whip the heavy whipping cream until stiff peaks form.
Gently fold the whipped cream into the cream cheese mixture using a spatula. Do this carefully to keep the filling airy. Transfer the filling to a piping bag fitted with a large star tip (like a Wilton 1M).
Step 5: Assembly
Take your chilled taco shells. Pipe a generous swirl of the cheesecake filling into each shell, filling it from end to end.
Drizzle heavily with strawberry glaze (as seen in the photo, let it drip!). Top with a fresh slice of strawberry.
Expert Tips for Success
Creating that professional “bakery style” look requires attention to detail:
- Room Temperature Cream Cheese: This is non-negotiable. If your cream cheese is cold, your filling will be lumpy. If you forgot to take it out, microwave it in 10-second bursts until soft (but not melted).
- Don’t Burn the Chocolate: White chocolate seizes easily. When melting, go slow and stir often. If it becomes thick and grainy, add a teaspoon more of coconut oil or vegetable oil to smooth it out.
- The Crumb Texture: If your crumb mixture feels too “wet” from the butter, spread it out on a baking sheet and bake it at 350°F for 5-8 minutes. This dries it out and makes it extra crunchy, which helps it stay crisp on the shell.
- Preventing Sogginess: Coating the inside of the shell with a thin layer of white chocolate creates a moisture barrier. This keeps the shell crispy even after you add the wet cheesecake filling.
Variations and Substitutions
1. The “Shortcake” Method (No Fry):
If you want to avoid frying, you can drape the soft tortillas over the rungs of your oven rack (hanging down) and bake at 375°F for 10 minutes until hard. They won’t be as flaky as fried shells, but they are healthier and less messy.
2. Chocolate Version:
Swap Golden Oreos for regular chocolate Oreos and use chocolate pudding mix instead of strawberry jello for a “Chocolate Eclair” version.
3. Using Freeze-Dried Fruit:
If you prefer natural flavoring, omit the Jello powder. Pulverize 1 cup of freeze-dried strawberries into a powder and mix that with the Golden Oreo crumbs and butter. The flavor will be tart and authentic.
4. The “Waffle” Taco:
Instead of tortillas, use frozen round waffles! Thaw them slightly, fold them gently (taco shape), and toast them in the oven. Then proceed with the chocolate dip and crumb coating.
Storage Instructions
These tacos are best enjoyed immediately, as moisture is the enemy of crunch.
- Make Ahead: You can prepare the shells (fry and coat them) up to 2 days in advance. Store them in an airtight container at room temperature. Make the filling and store it in the piping bag in the fridge for up to 3 days. Assemble right before serving.
- Leftovers: If already assembled, store in the refrigerator loosely covered. They will last 24 hours, but the shell will gradually soften.
- Freezing: You can freeze the assembled tacos! They turn into something resembling a Choco Taco. Wrap individually in plastic wrap and freeze for up to a month. Thaw for 10 minutes before eating.
Fun Facts: The Rise of the Dessert Taco
The concept of the dessert taco gained mainstream popularity with the “Choco Taco,” a Klondike product invented in 1983. It revolutionized the idea that tacos had to be savory. In recent years, the “Strawberry Crunch” flavor profile has seen a massive resurgence, driven largely by nostalgia for 90s school lunches and ice cream trucks. By combining these two trends, this recipe taps into a deep cultural love for playful, hybrid foods. It’s a prime example of “kidulting”—adults enjoying high-quality versions of childhood snacks.
Conclusion
These Strawberry Crunch Cheesecake Tacos are more than just a sweet treat; they are a showstopper. They look incredibly impressive on a platter, with the bright reds and gold contrasting beautifully against the white filling. Yet, despite their complex appearance, they are surprisingly simple to construct once you have your components ready. Whether you are looking to impress guests or just want to indulge in a serious craving, this recipe delivers on every level: texture, flavor, and pure joy.