The Ultimate No Bake Peanut Butter Cup Pie
There are few flavor combinations in the culinary world as universally adored, fiercely defended, and absolutely crave-worthy as chocolate and peanut butter. It is a dynamic duo that strikes the perfect balance between rich, roasted nuttiness and deep, sweet cocoa. When you take those iconic flavors and transform them into a luscious, creamy, chilled dessert that does not even require you to turn on your oven, you have achieved dessert perfection. Welcome to the comprehensive guide to making the absolute best No Bake Peanut Butter Cup Pie.
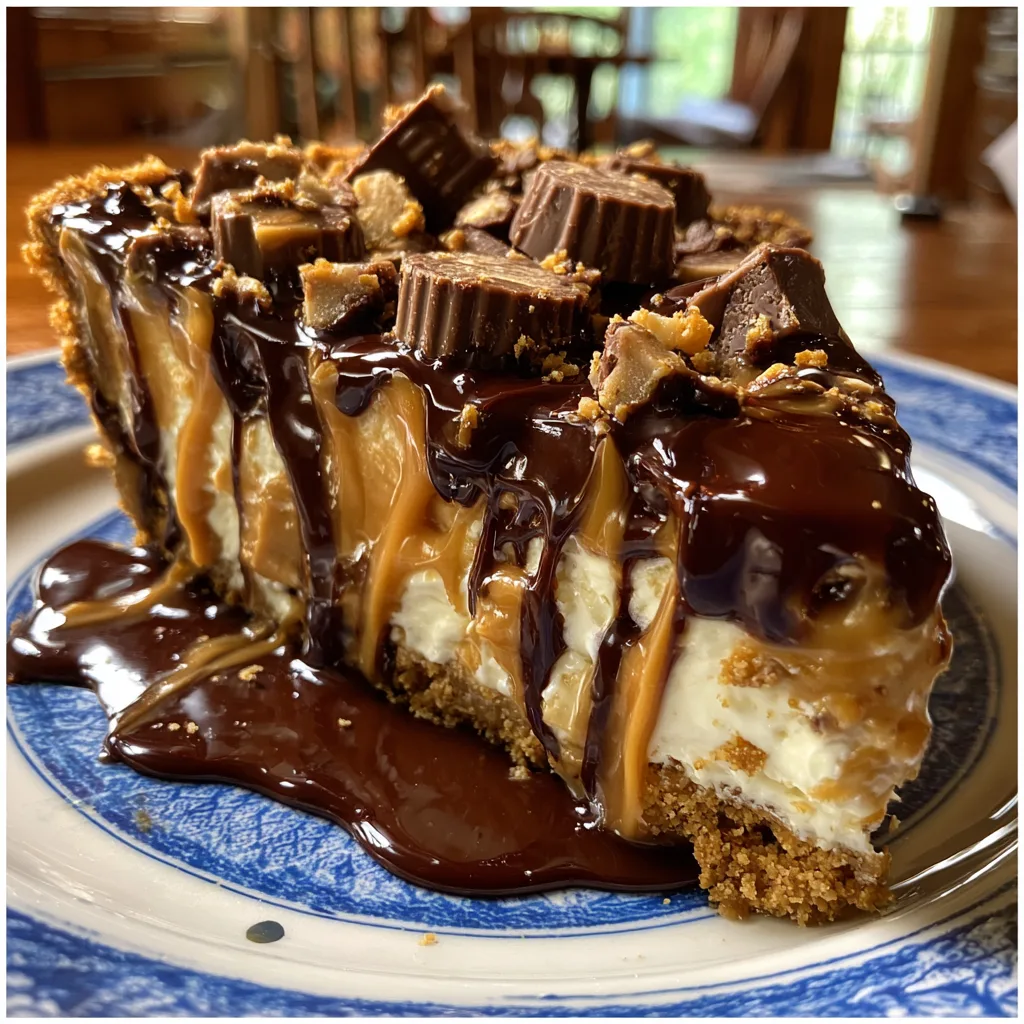
If you are looking for a show-stopping dessert that requires minimal effort but delivers maximum impact, this is it. This pie features a buttery, crumbly graham cracker crust (though you can easily swap it for an Oreo crust if you are a true chocoholic). Inside that crust sits a mile-high mound of light, fluffy, sweet peanut butter filling that is heavily studded with chopped chocolate peanut butter cups. To finish it off, the entire pie is drizzled—or rather, drenched—in a glossy, rich chocolate fudge sauce and showered with even more peanut butter cups. It is decadent, it is rich, and it is guaranteed to be the first dessert to disappear at any potluck, holiday gathering, or family dinner.
In this detailed article, we are going to dive deep into the mechanics of this pie. We will explore why no-bake desserts are a baker’s best friend, dissect every single ingredient to ensure you get the perfect texture, and provide you with professional tips, tricks, and variations so you can customize this masterpiece to your exact liking.
The Magic of No-Bake Desserts
Before we get our hands dirty, let us appreciate the sheer genius of the no-bake dessert. For many home cooks, baking can be a source of stress. It requires precise measurements, chemical reactions, and careful monitoring of oven temperatures. A pie crust can shrink, a cake can fall, and cookies can burn in the blink of an eye. No-bake desserts completely eliminate this anxiety.
First and foremost, no-bake pies are practically foolproof. Because there are no eggs to temper and no flour to leaven, you are simply combining delicious ingredients until they taste good, and then letting the refrigerator do the heavy lifting. This makes it a fantastic recipe to make with children or for novice bakers who want to build their kitchen confidence.
Secondly, a no-bake pie is a seasonal superhero. During the sweltering heat of summer, the last thing anyone wants to do is preheat an oven to 350 degrees and heat up their entire house. This pie allows you to serve a magnificent dessert while keeping your kitchen cool. Conversely, during the busy holiday season—Thanksgiving and Christmas—oven space is premium real estate. Turkeys, hams, and casseroles are fighting for rack space. A No Bake Peanut Butter Cup Pie can be made entirely ahead of time and tucked away in the fridge or freezer, freeing up your oven and your schedule.
Breaking Down the Ingredients
To achieve the ethereal, mousse-like texture of the filling and the perfect structural integrity of the crust, ingredient selection is key. Let us look at what makes this pie tick.
The Crust Foundation
A great pie needs a great foundation. For this recipe, we use a classic graham cracker crust. The slightly honeyed, wheaty flavor of graham crackers provides a wonderful canvas that doesn’t compete with the intense peanut butter flavor. You will need finely crushed graham cracker crumbs, a touch of granulated sugar to help bind it, and melted unsalted butter. The melted butter acts as the glue. When the crust is chilled, the butter solidifies, holding the crumbs together so you can cut a perfect, clean slice.
The Cream Cheese Base
The secret to a pie filling that is stable enough to slice but soft enough to melt in your mouth is cream cheese. You absolutely must use full-fat, block-style cream cheese. Do not use the whipped cream cheese that comes in a tub, as it contains too much air and water, which will make your pie runny. Furthermore, your cream cheese must be completely softened to room temperature before you begin. If it is too cold, you will end up with unappetizing lumps of white cheese floating in your peanut butter filling.
The Peanut Butter
For this specific recipe, standard commercial creamy peanut butter is highly recommended. Brands that are homogenized and stabilized (like Jif or Skippy) work best because they will not separate. Natural peanut butters—the kind where the oil separates and sits on top—can wreak havoc on the texture of a no-bake pie, often causing the filling to split or become grainy. Stick to the classic, creamy stuff for the smoothest texture.
The Sweetness and Fluff
Powdered sugar is used instead of granulated sugar because it dissolves instantly into the cream cheese and peanut butter without leaving any gritty texture. A splash of pure vanilla extract enhances all the flavors. To give the pie its signature airy, cloud-like texture, we fold in whipped topping (like Cool Whip) or stiffly whipped heavy cream. This aerates the dense peanut butter base, transforming it from a heavy block of fudge into a light, velvety mousse.
The Star of the Show: Peanut Butter Cups
You cannot have a Peanut Butter Cup Pie without the actual candy! You will need plenty of them. Chopping them up and folding them directly into the batter ensures that every single bite contains a satisfying chunk of chocolate and crumbly peanut butter. Reserving some for the top is crucial for that spectacular, drool-worthy presentation.
Step-by-Step Instructions to Pie Perfection
Creating this pie is a simple, straightforward process, but following these steps carefully ensures a flawless result.
Step 1: Constructing the Crust. Start by pulverizing your graham crackers into fine crumbs using a food processor, or place them in a zip-top bag and crush them with a rolling pin. Mix the crumbs with a little sugar and the melted butter until the mixture resembles wet sand. Press this mixture firmly and evenly into the bottom and up the sides of a 9-inch pie dish. Use the bottom of a measuring cup to really pack it down. Place the crust in the freezer to set while you make the filling.
Step 2: Beating the Base. In a large mixing bowl, use a hand mixer or a stand mixer fitted with the paddle attachment to beat the room-temperature cream cheese until it is completely smooth and creamy. Scrape down the sides of the bowl. Add the creamy peanut butter and beat them together until they are fully integrated and uniform in color.
Step 3: Sweetening the Deal. Turn your mixer to low and slowly add the powdered sugar and vanilla extract. Once the sugar is incorporated, turn the speed up to medium and beat for about two minutes until the mixture is slightly aerated and very smooth.
Step 4: Folding in the Fluff. This is the most crucial step for texture. Take your whipped topping (or freshly whipped heavy cream) and gently fold it into the peanut butter mixture using a rubber spatula. Do not use the electric mixer for this step, or you will deflate the whipped cream and your pie will be dense and heavy. Use a gentle over-and-under motion until no white streaks remain.
Step 5: Adding the Candy. Fold in about one to one-and-a-half cups of roughly chopped peanut butter cups. Ensure they are evenly distributed throughout the fluffy filling.
Step 6: Assembling and Chilling. Remove your set crust from the freezer. Spoon the peanut butter filling into the crust, using an offset spatula to smooth the top into a beautiful, swooping dome. Now, the hardest part: waiting. Place the pie in the refrigerator for a minimum of 4 hours, but ideally overnight. This chilling period is non-negotiable; it allows the cream cheese and butter to firm up so the pie holds its shape when sliced.
Step 7: The Grand Finale. Right before serving, warm up some thick chocolate fudge sauce (the kind you put on ice cream) until it is pourable but not scalding hot. Drizzle it generously all over the top of the chilled pie. Shower the pie with the remaining chopped peanut butter cups. Serve immediately to the sound of applause.
No Bake Peanut Butter Cup Pie
Ingredients
Equipment
Method
- Combine graham cracker crumbs, granulated sugar, and melted butter in a bowl. Press the mixture firmly into the bottom and up the sides of a 9-inch pie dish. Freeze while preparing the filling.
- In a large bowl, beat the room temperature cream cheese and creamy peanut butter together until completely smooth and well combined.
- Add the powdered sugar and vanilla extract, beating until smooth and fluffy.
- Using a rubber spatula, gently fold in the whipped topping until no white streaks remain. Do not overmix.
- Fold in 1 cup of the chopped peanut butter cups.
- Spread the filling evenly into the chilled crust. Cover lightly and refrigerate for at least 4 hours, or overnight until firm.
- Before serving, drizzle the top generously with warmed chocolate fudge sauce and sprinkle with the remaining 1/2 cup of chopped peanut butter cups.
Notes
Pro-Tips for the Best Texture and Flavor
To elevate your pie from “good” to “bakery-quality,” keep these professional tips in your back pocket:
- Freeze your candy: Before chopping your peanut butter cups, place them in the freezer for 20 minutes. This prevents the chocolate from smudging and the peanut butter from smooshing, giving you clean, beautiful chunks for the filling and the topping.
- The Hot Knife Trick: Because this pie is chilled and contains sticky peanut butter and chocolate, cutting a clean slice can be tricky. Fill a tall glass with boiling water. Dip a sharp chef’s knife into the hot water, wipe it completely dry with a towel, and make a slice. Repeat this dipping and wiping process for every single cut. The hot blade will glide through the cold pie like butter, resulting in perfectly photogenic slices.
- Enhance the Crust: For a slightly salty contrast to the sweet filling, try adding a pinch of flaky sea salt to your graham cracker crust mixture before pressing it into the pan.
Fun Variations and Customizations
Once you master the base recipe, this pie is incredibly adaptable. Here are a few ways to switch it up:
- The Chocolate Lovers Crust: Swap the graham crackers for an equal amount of crushed Oreo cookies (filling included). Omit the extra sugar in the crust, but keep the melted butter. This creates a dark, intense chocolate base that mimics a real peanut butter cup perfectly.
- The Pretzel Crust: For the ultimate salty-sweet experience, use crushed salted pretzels instead of graham crackers. You may need to add an extra tablespoon of butter and sugar to help the pretzels bind.
- Different Candies: While peanut butter cups are the classic choice, you can fold in chopped Snickers, Butterfingers, or even Reese’s Pieces for added crunch and color.
- Peanut Butter Drizzle: Melt a few tablespoons of creamy peanut butter in the microwave for 15 seconds and drizzle it over the top of the pie alongside the chocolate fudge for a beautiful, two-toned finish.
Make-Ahead and Storage Instructions
As mentioned earlier, this pie is an absolute dream for meal prep and advance planning.
Refrigerator Storage: The pie will keep beautifully in the refrigerator for up to 5 days. Be sure to cover it loosely with plastic wrap or place it in a pie keeper so it doesn’t absorb any savory odors from your fridge. The crust may soften slightly after day three, but it will still taste incredible.
Freezer Storage: This pie freezes exceptionally well! In fact, many people prefer eating it straight from the freezer, like an ice cream cake. To freeze, do not add the final fudge drizzle or the topping candies. Wrap the firmly set pie tightly in two layers of plastic wrap and one layer of aluminum foil. It will keep for up to 3 months. When you are ready to serve, let it thaw in the refrigerator overnight, then add your fudge and fresh candy toppings right before slicing.
Frequently Asked Questions (FAQ)
Can I use a store-bought crust?
Yes, absolutely! If you are incredibly short on time, a pre-made graham cracker or chocolate cookie crust from the baking aisle works perfectly fine. Simply pour the filling directly into the store-bought crust.
Can I make this pie without heavy cream or Cool Whip?
The whipped element is necessary for the fluffy texture. If you do not want to use a processed whipped topping, you can absolutely whip 1 cup of cold heavy whipping cream to stiff peaks and fold that in instead. It tastes richer and more natural.
Why is my pie filling runny?
A runny filling is almost always the result of one of three things: using low-fat or tub cream cheese instead of block cream cheese, overmixing the whipped cream until it deflates, or not chilling the pie long enough. Be sure to follow the ingredients and chilling times strictly!
Conclusion
The No Bake Peanut Butter Cup Pie is more than just a dessert; it is an experience. It brings together the nostalgic, comforting flavors of your favorite childhood candy and elevates them into a sophisticated, crowd-pleasing format. The contrast between the crunchy crust, the ethereal, creamy filling, and the rich, gooey fudge topping creates a symphony of textures in every single bite.
Whether you are hosting a summer barbecue, contributing to a holiday buffet, or simply treating your family on a random Tuesday, this pie delivers unparalleled joy for a fraction of the effort of traditional baking. Gather your ingredients, prepare your mixing bowls, and get ready to create a dessert that will have everyone asking for the recipe. Enjoy every single indulgent, peanut-buttery bite!