Brownie Bottom Bars with Oreo Topping: A Fudgy, Layered Dream
There are very few dessert flavor combinations as universally adored and inherently satisfying as a deeply fudgy brownie paired with the classic crunch and creaminess of chocolate sandwich cookies. It is the perfect marriage of rich cocoa and a texture that keeps you coming back for more. In this comprehensive guide, we are going to dive into the wonderful world of Brownie Bottom Bars. This particular recipe takes that iconic pair and transforms it into a spectacular layered masterpiece. Imagine a base of dense, decadent chocolate brownie, a middle layer of smooth, creamy filling, and a topping that is a glorious, messy mountain of crushed Oreos all drenched in a shiny, glossy glaze. If that sounds like heaven to you, then you are in the right place.
Whether you are a seasoned baker looking for your next show-stopping creation to impress at a dinner party, or a total novice in the kitchen searching for a fool-proof way to bring a smile to everyone’s face, this recipe is for you. We will walk you through every step of the process, from selecting the finest cocoa powder to achieving that perfect, mirror-like gloss on your glaze. Get ready to fill your home with the warm, irresistible aroma of baked chocolate and elevate your dessert game to a whole new level. These Brownie Bottom Bars are not just a treat; they are an indulgent, mouth-watering experience.
Why This Brownie Bottom Bars Recipe Works: A Deep Dive into Texture and Flavor
What sets these Brownie Bottom Bars apart from a simple plate of brownies or a cookie? It is all in the masterful interplay of layers, textures, and flavors. Let’s break down exactly why this recipe works so flawlessly:
- The Fudgy Foundation: The base layer is not your average, cakey brownie. It is dense, chewy, and intensely chocolatey, creating a robust platform that holds up to the layers above. We achieve this by meticulously balancing the ratio of fat, sugar, and flour, and including a secret ingredient (espresso powder) that makes the chocolate taste even deeper and more complex.
- The Creamy Middle Ground: Above the brownie base sits a smooth, velvety cream cheese filling. This layer provides a wonderful tangy contrast that prevents the bars from becoming overly sweet and overwhelming. Its silky texture is the perfect bridge between the fudgy base and the crunchy topping, adding another dimension of luxury to every single bite.
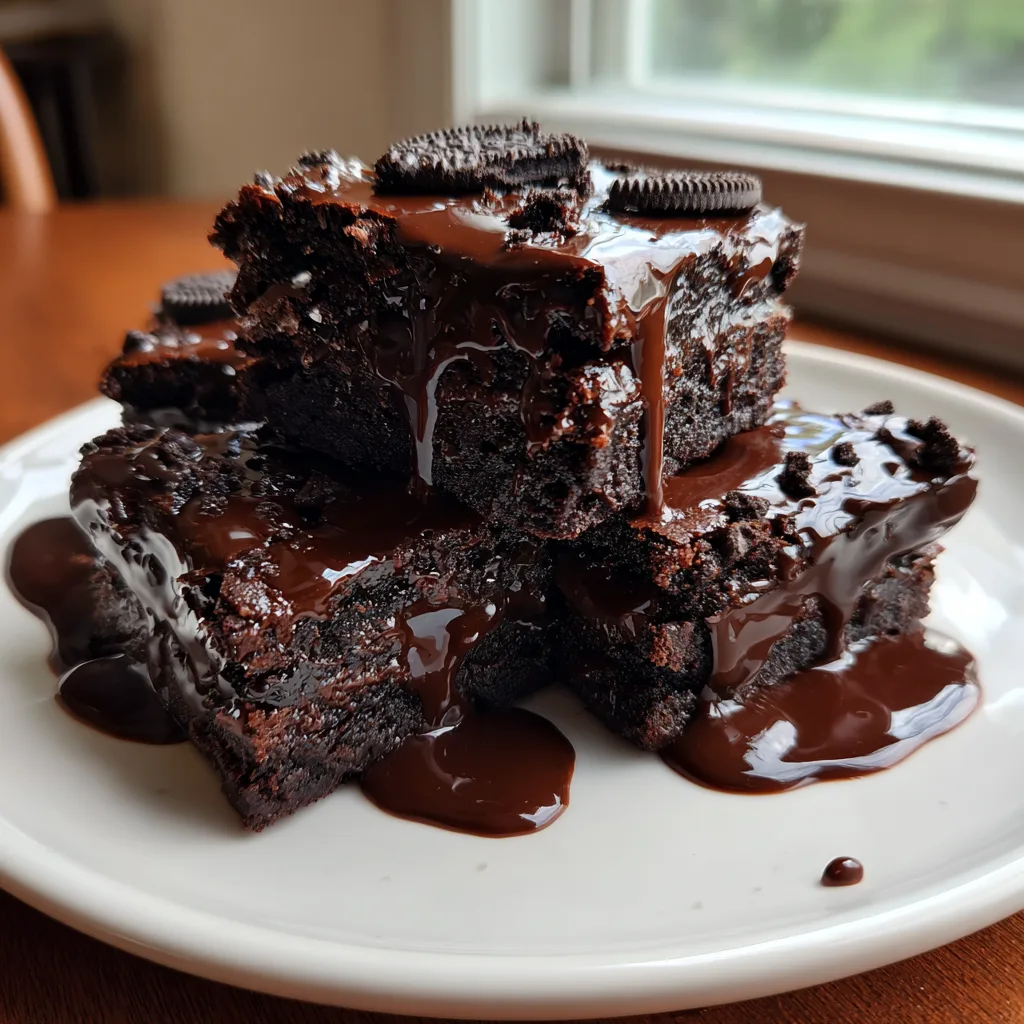
- The Messy, Glistening Crown: The real star of the show is the topping. We take crushed chocolate sandwich cookies and create a messy, textured layer that adds a satisfying crunch. But we don’t stop there. The entire masterpiece is drenched in an ultra-shiny chocolate glaze that is so glossy it creates a mirror reflection. This glaze not only adds another level of rich cocoa flavor but also acts as a visual and textural drench that makes the bars look utterly irresistible and drool-worthy.
- Balanced Contrast: Every element of this bar has a counterpart. The rich chocolate is balanced by the tangy cream cheese. The dense, fudgy base is contrasted by the airy, creamy filling and the crunchy cookie topping. It’s a harmonious dance of flavors and textures that keeps your palate engaged with every single forkful. This is why these bars are the ultimate dessert.
Key Ingredients for Dessert Perfection
The quality of your ingredients directly translates to the quality of your finished dessert. When it comes to something as chocolate-intensive as this, there is no substitute for using the best. Here is a look at the critical ingredients that make these bars a true dessert masterpiece:
- Premium Cocoa Powder: The quality of your cocoa powder is paramount. We highly recommend using a high-quality Dutch-processed or high-fat natural cocoa. It provides a deeper, smoother, and more intense chocolate flavor than common grocery store brands. This is not the place to skimp; your brownies will thank you for the investment.
- High-Fat European-Style Butter: To achieve that exceptionally fudgy, dense texture, we recommend using a European-style butter with a higher fat content (like Kerrygold or Plugrá). It adds richness and a beautiful, smooth mouthfeel to the brownie base, enhancing the entire experience.
- Quality Cream Cheese: For the filling, use a full-fat, brick-style cream cheese. Avoid the whipped variety or lower-fat alternatives, as they contain too much air and moisture, which will make your filling runny and prevent it from setting properly. Let it come to room temperature to ensure it mixes smoothly without any lumps.
- Classic Chocolate Sandwich Cookies (like Oreos): Don’t try to get fancy with different flavors or brands. The original chocolate and cream combo of a classic Oreo is what provides that perfect texture and quintessential flavor that everyone knows and loves. Its classic crunch is the ideal crown for these layered bars.
- Pure Vanilla Extract: Use only real, pure vanilla extract. The depth of flavor it provides is infinitely superior to any artificial imitation and enhances the entire flavor profile of both the brownie and the filling, adding a comforting, sophisticated note to your creation.
Essential Equipment for a Smooth Baking Process
While you don’t need fancy, professional-grade tools, having the right basic equipment can make the difference between a seamless baking experience and a frustrating one. Gather these essentials before you begin:
- A Standard 9×9 Inch Baking Pan: This is the ideal size pan for this recipe. It allows for the perfect thickness in each layer, ensuring a balanced bar. Using a larger pan will result in thinner layers and can lead to overbaking, robbing your bars of their luxurious texture.
- Mixing Bowls and a Sturdy Spatula: You’ll need at least two mixing bowls—one for the brownie batter and one for the cream cheese filling. A sturdy rubber spatula is essential for properly combining ingredients and scraping every bit of delicious batter from the bowls without missing a drop.
- An Offset Spatula: This is a key tool for achieving perfectly level layers. Its angled blade makes it incredibly easy to smooth out your brownie batter and cream cheese filling, ensuring each layer is distributed evenly and your finished bars look as professional as they taste.
- A Sturdy Wire Rack: Proper cooling is essential for these bars to set correctly. A wire rack allows air to circulate around the entire pan, ensuring it cools evenly and quickly, preventing a soggy bottom.
- Sharp Chef’s Knife: When it’s time to slice, a sharp chef’s knife is non-negotiable. To get those perfectly clean, clean, picture-perfect squares you see in professional food photography, dip your knife in hot water and wipe it clean between every single cut. This prevents the messy topping and glaze from dragging and messing up the smooth, beautiful layers beneath.
Step-by-Step Instructions: Creating Your Masterpiece
Now that you have your ingredients and equipment ready, let’s walk through the detailed steps to create your very own Brownie Bottom Bars. Don’t rush; take your time and follow each step precisely for the absolute best results:
- Prep Your Station: Start by preheating your oven to 350°F (175°C). Line your 9×9 inch baking pan with parchment paper, allowing for some overhang on two sides. This is a game-changer that makes it incredibly easy to lift the entire batch out of the pan for perfect, damage-free cutting.
- Create the Fudgy Brownie Base: In a large mixing bowl, combine your melted butter and sugar, whisking well. Add the eggs, one at a time, followed by the vanilla extract and the optional espresso powder, mixing until smooth. Sift in the cocoa powder, flour, and salt, then gently fold with your spatula until just combined, being careful not to overmix, as this can make your brownies tough. Fold in the chocolate chips and pour the luxurious batter into your prepared pan, using your offset spatula to smooth the surface into a perfect, level layer.
- Prepare the Creamy Filling: In a separate bowl, using a hand mixer, beat the room-temperature cream cheese until it is completely smooth and free of lumps. Add the powdered sugar, a touch of cream or milk, and vanilla, mixing on low speed until combined. Increase the speed to medium and beat until the filling is silky and uniform, creating a velvety layer that will soon join its chocolatey partner.
- Assemble the Layers: Gently dollop the cream cheese filling over the brownie batter. Use your offset spatula to spread it into an even layer, being careful not to disturb the brownie batter below. Take about half of your crushed cookies and sprinkle them generously over the cream cheese layer, creating a wonderful textural contrast that will bake right in.
- Bake to Perfection: Place the pan in the preheated oven and bake for 30 to 35 minutes. You’ll know it’s done when the edges look set and a toothpick inserted into the center of the brownie base comes out with just a few moist crumbs attached, but not completely clean. The center of the cream cheese filling should still have a slight jiggle, promising a perfectly soft and creamy texture.
- Make the Glistening Glaze: While the bars are cooling, create the final drench of indulgence. In a small microwave-safe bowl, melt the chocolate and butter together in 30-second bursts, stirring in between. Once smooth, whisk in the powdered sugar, a touch of hot water, and vanilla until you have a thick, glossy glaze that is so shiny it creates a mirror reflection.
- Add the Crowning Glory: Once the bars have cooled slightly, pour the decadent glaze over the entire surface, ensuring every single cookie and peak of cream cheese is completely drenched. Immediately sprinkle the remaining crushed cookies over the wet, glistening glaze, letting them adhere and become part of the messy, magnificent texture.
- The Hardest Part: Waiting: Let the bars cool completely in the pan on a wire rack. Then, for the absolute best texture and easiest slicing, cover the pan and refrigerate for at least 1 to 2 hours. This chilling period allows all the layers to firm up, making it possible to achieve those clean, clean, picture-perfect squares without any mess.
- Slice and Enjoy: Once chilled, use the parchment paper to gently lift the entire batch of bars out of the pan. Place them on a cutting board. Using a large, sharp chef’s knife, dip it in hot water, wipe it clean, and slice the bars into 16 even squares, ensuring you get perfect, beautiful layers with every single cut. Serve and prepare to be showered with compliments for your incredible dessert.
Brownie Bottom Bars
Ingredients
Equipment
Method
- Preheat oven to 350°F (175°C) and line a 9×9 inch baking pan with parchment paper.
- In a large bowl, whisk together the melted butter and granulated sugar until combined.
- Whisk in the eggs one at a time, followed by the vanilla extract and optional espresso powder.
- Sift in the cocoa powder, flour, and salt, then gently fold until just combined. Do not overmix. Fold in the chocolate chips.
- Pour the brownie batter into the prepared pan and smooth the top to create an even layer.
- In a separate bowl, beat the room-temperature cream cheese until completely smooth. Add the powdered sugar, cream, and vanilla, mixing until silky and uniform.
- Dollop the cream cheese filling over the brownie batter and gently spread into an even layer with an offset spatula. Sprinkle half of the crushed cookies on top.
- Bake for 30-35 minutes until the edges are set and a toothpick inserted into the brownie base comes out with moist crumbs. The center of the filling should still jiggle slightly.
- While the bars cool, create the glaze: in a small bowl, melt the chocolate and butter together in 30-second microwave bursts, stirring. Once smooth, whisk in the powdered sugar, hot water, and vanilla until a thick, ultra-shiny glaze forms.
- Pour the decadent glaze over the partially cooled bars, completely drenching the entire surface. Immediately sprinkle the remaining crushed cookies over the wet, glistening glaze.
- Let the bars cool completely, then refrigerate for at least 1-2 hours until firm before slicing into 16 perfect squares with a hot, clean knife. Enjoy every indulgent, mouth-watering bite!
Notes
Tips for a Flawless Dessert Every Time
Baking is both an art and a science, and a few small tips can make all the difference in the world. Here are a few expert pointers to ensure your Brownie Bottom Bars come out perfectly every single time:
- Room Temperature is Key: For both the brownie base and the cream cheese filling, ensure your eggs, butter, and cream cheese are at room temperature. Cold ingredients don’t mix as well, leading to lumpy batter and filling, and can affect the overall texture of your baked good, preventing it from achieving that perfect fudgy and creamy balance.
- Sift, Don’t Skip: Take the extra 30 seconds to sift your cocoa powder and flour. It prevents clumps of dry ingredients from hiding in your batter, ensuring everything is perfectly smooth and combined. It’s a small step that makes a massive difference in the final product’s quality.
- Don’t Overmix the Brownie Batter: When folding in the dry ingredients, stop as soon as you no longer see streaks of flour. Overmixing develops gluten, which is the enemy of a fudgy brownie, transforming it from dense and chewy into something tough and cakey. A light touch is what leads to dessert perfection.
- Clean Your Knife: When it’s time to slice, remember to dip your knife in hot water, wipe it clean, and make a cut. Repeat this process for every single cut. This prevents the messy, drenching glaze and cookie topping from dragging through the smooth layers, ensuring you get picture-perfect squares with every single piece, worthy of being a Reddit food post.
- Patience is a Virtue: We know the urge to dig in as soon as it comes out of the oven is strong, but resisting it is critical. These bars absolutely must cool completely, and preferably chill, to achieve the proper texture and allow you to get those beautiful, clean slices. Your patience will be richly rewarded with a dessert that is not just delicious, but visually stunning.
Indulgent Variations and Customizations
While the combination of brownie and Oreo is undeniable, this layered dessert bar is incredibly adaptable. Here are a few creative ideas for switching things up and creating your own signature bar cookie:
- The Peanut Butter Perfection: Skip the cream cheese filling and create a layer of smooth, creamy peanut butter fudge. Top with crushed peanut butter cups instead of Oreos and finish with a peanut butter glaze for an utterly indulgent, rich flavor combination that will have all the peanut butter lovers in your life clamoring for more.
- The Triple Chocolate Sensation: Create a chocolate cream cheese filling by adding 1/4 cup of cocoa powder. Top with crushed chocolate sandwich cookies and mini chocolate chips, and finish with a white chocolate glaze for a truly decadent, triple-threat chocolate experience.
- The Classic Chocolate Chip: Skip the cookie topping altogether and fold 1 cup of classic semi-sweet chocolate chips into the brownie base and sprinkle another 1/2 cup over the cream cheese filling. Top with more chips right after baking and finish with a simple caramel or chocolate drizzle for a timeless, crowd-pleasing classic.
- The S’mores Sensation: Create a graham cracker crust as your base. Top with the fudgy brownie, followed by a layer of marshmallow fluff or mini marshmallows. Top with a few graham cracker crumbs and chocolate chips, and pop under the broiler for a minute to toast the marshmallows, creating a gooey, messy, s’mores-inspired treat that is perfect for any gathering.
Serving Suggestions and Storage
These Brownie Bottom Bars are a fantastic dessert that can be served in a variety of ways. They are delicious on their own, but can also be elevated with a few simple additions:
- The Decadent Dessert Plate: Serve a perfectly sliced square on a dessert plate alongside a scoop of premium vanilla bean or salted caramel ice cream. Drizzle the entire creation with a final, drenching ribbon of warm chocolate fudge or caramel sauce for an utterly indulgent dessert worthy of any celebration.
- The Party Platter: Cut the bars into 16 even squares and arrange them on a beautiful serving platter. These bars are a perfect finger food for a party, and their stunning layered look and messy, glistening topping make them an instant conversation starter. Your guests will be lining up for a piece.
- The Comfort Food Favorite: Sometimes, simplicity is best. A perfect square of Brownie Bottom Bar is the ultimate comfort food on its own, especially when paired with a tall, cold glass of milk. It’s the perfect way to satisfy any after-school or late-night craving.
- How to Store: These bars can be stored in an airtight container at room temperature for up to 3 days. However, for the longest shelf life and to maintain the absolute best texture, especially in warmer climates, we recommend storing them in the refrigerator, where they will stay fresh and fudgy for up to 7 days. They can also be frozen for up to 3 months; simply thaw at room temperature for an hour before enjoying.
Fun Facts and Cultural Context: A Look into Bar Cookies
Bar cookies, like these magnificent Brownie Bottom Bars, are a fascinating corner of the culinary world. Did you know the very first brownie recipe is believed to have been published in 1896 in the Fannie Farmer Cookbook? It was a simple, cake-like chocolate confection that bore little resemblance to the fudgy squares we love today. Over the following century, brownies evolved through countless variations, becoming dense, fudgy, and a canvas for endless creativity, eventually giving rise to the layered bar cookie.
The term “bar cookie” itself is a beautifully descriptive piece of language, referring to a type of cookie that is baked in a rectangular pan, creating a thick, often layered confection that can be cut into individual squares or bars. Unlike traditional dropped or rolled cookies, which are individual units of baked good, a bar cookie is a single, large entity until the final cut is made. This makes them inherently social, a dish shared from one larger whole, a common centerpiece for gatherings, parties, and family dinners, symbolizing community and sharing in a way that individual cookies never quite can.
In American culture, bar cookies are synonymous with home baking, comfort, and community. They are the star of school bake sales, the go-to contribution for potluck dinners, and a staple of holiday treat boxes. Their ease of production and ability to easily scale makes them a universally accessible dessert, a way to share a bit of sweetness and indulgence with a large number of people with relative ease. This long history of sharing and community is baked right into every layer of our Brownie Bottom Bars, a testament to the fact that food is not just about sustenance; it is about connection, joy, and the simple pleasure of sharing something magnificent with those you love. Now, get ready to create your own piece of history and connection, one fudgy layer at a time. Happy baking!