Chocolate Chip Vanilla Custard Brioches
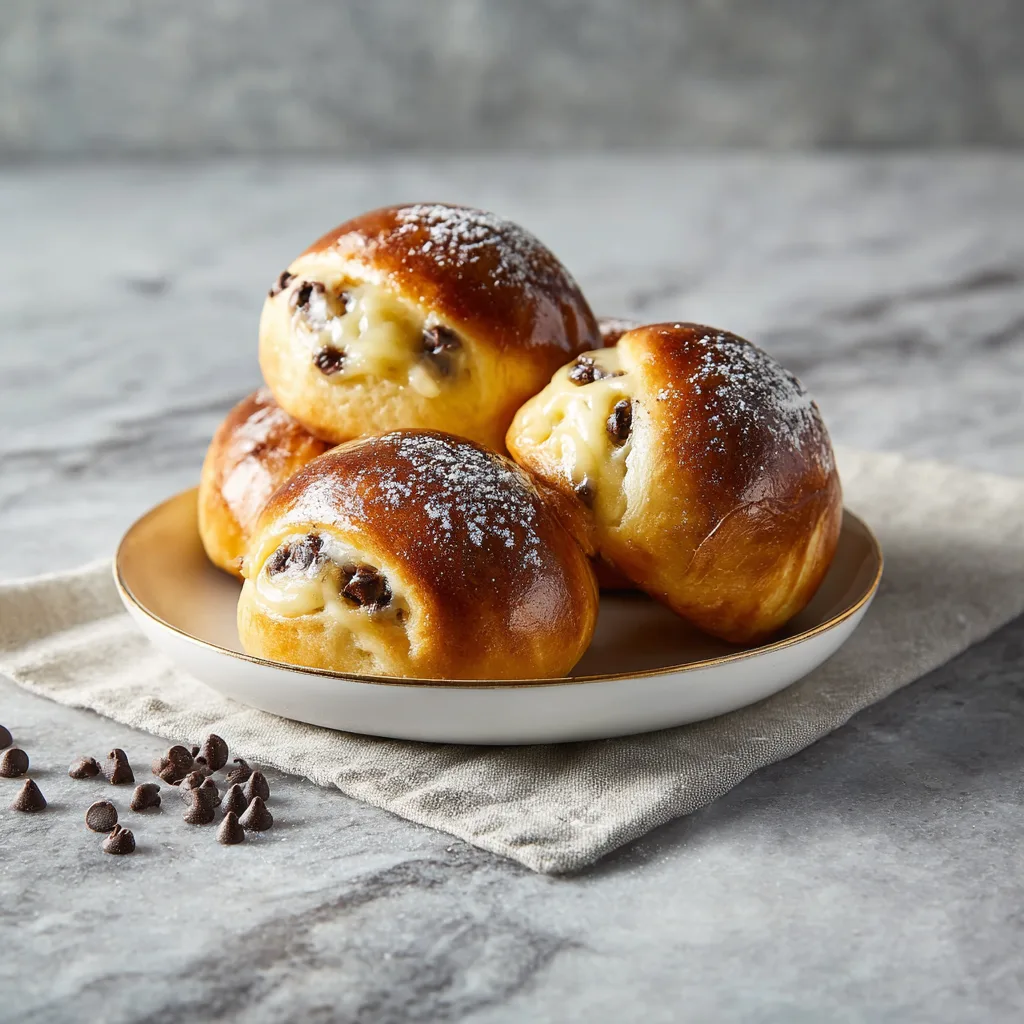
Welcome to a masterclass in combining three of the most beloved elements of French baking: impossibly soft, butter-rich brioche bread, silky smooth traditional vanilla pastry cream (crème pâtissière), and the universally adored addition of rich, dark chocolate chips. If you have ever gazed longingly into the lit display case of a Parisian patisserie, marveling at the plump, golden pastries oozing with creamy fillings, this recipe for Chocolate Chip Vanilla Custard Brioches is your ticket to recreating that magic in your very own kitchen.
This is not just another sweet bun recipe. This is an experience. We are talking about creating a dough that is so enriched with butter and eggs that it practically melts in your mouth, serving as the perfect, pillowy vessel for a thick, luxurious layer of homemade vanilla bean custard. The generous scattering of mini chocolate chips provides an essential textural contrast—a slight, satisfying snap that breaks up the softness of the bread and the cream, while delivering bursts of deep cocoa flavor that perfectly balance the sweet vanilla.
The Magic of the “Brioche Suisse” Inspired Bun
To understand the roots of this magnificent pastry, we have to look at the traditional French “Brioche Suisse” or “Pain Suisse.” Traditionally, these are made using a laminated croissant dough or a brioche dough rolled out into a large rectangle, smeared with pastry cream and chocolate chips, folded in half, and cut into strips. Our recipe takes this flavor profile—the holy trinity of brioche, vanilla custard, and chocolate—and transforms it into individual, plump buns that are sliced open and generously stuffed.
This method offers several distinct advantages for the home baker. First, it ensures an incredible ratio of filling to bread. By baking the brioche buns separately and slicing them open like a soft sandwich to pipe in the custard, you can fit an abundance of filling inside without the risk of it leaking out and burning on the baking sheet during the oven process. Second, the custard remains chilled and perfectly pristine, contrasting beautifully with the freshly baked, room-temperature bun. It is a sensory delight that plays with both temperature and texture.
Why This Recipe is a Guaranteed Triumph
Baking enriched doughs and making custards from scratch can seem intimidating, but this recipe breaks the process down into manageable, foolproof steps. Here is why this specific combination and method will yield spectacular results:
- The Perfect Crumb: By using bread flour rather than standard all-purpose flour, we develop enough gluten to structure the dough, allowing it to hold the massive amount of butter we will incorporate. This results in a crumb that is structured yet incredibly tender and airy.
- Foolproof Pastry Cream: Our crème pâtissière method utilizes a cornstarch base, which stabilizes the egg yolks and makes the custard much less likely to split or curdle than traditional flour-based or pure-yolk custards. It sets up perfectly thick, meaning it will hold its shape beautifully when piped into the buns.
- Textural Symphony: The interplay of the shiny, slightly chewy crust of the egg-washed brioche, the cloud-like interior crumb, the cold, velvet-smooth custard, and the firm bite of the chocolate chips creates a mouthfeel that is simply unmatched.
- Make-Ahead Friendly: Both the brioche dough and the vanilla custard can (and should) be made in advance. A slow, overnight cold fermentation in the refrigerator improves the flavor of the dough and makes it much easier to shape, while the custard needs time to chill and set. This breaks the recipe into easy, manageable stages.
A Deep Dive into the Ingredients
When making a recipe that relies heavily on fundamental baking techniques, the quality of your ingredients is paramount. Let’s explore what you will need.
For the Rich Brioche Dough:
- Bread Flour: Essential for brioche. The higher protein content (usually around 12-14%) creates the strong gluten network required to hold the heavy butter and eggs without the dough collapsing into a dense brick.
- Instant Yeast: We prefer instant yeast for its reliability and ease of use—it can be mixed directly into the dry ingredients without needing to be bloomed in warm liquid first.
- Granulated Sugar: Provides sweetness, feeds the yeast to aid in the rise, and contributes to the beautiful golden-brown crust during baking.
- Salt: Never skip salt in baking. It controls the yeast fermentation rate and drastically enhances the final flavor of the bread.
- Large Eggs: They must be at room temperature. Eggs provide hydration, color, richness, and structure to the dough. Cold eggs will shock the yeast and slow down the proofing process significantly.
- Whole Milk: Adds fat and tenderness. Like the eggs, it should be warm (but not hot—around 100°F) to encourage yeast activity.
- Unsalted Butter: The star of the show. Use high-quality European-style butter if possible, as it has a higher fat content and lower water content. It must be softened to room temperature so it can be seamlessly incorporated into the dough.
- Egg Wash: An extra egg beaten with a splash of milk gives the baked brioches their signature deep golden, mirror-like shine.
For the Vanilla Bean Custard (Crème Pâtissière):
- Whole Milk: The base of the custard. Do not substitute with skim or low-fat milk, as you need the fat for a rich, creamy mouthfeel.
- Vanilla Bean or High-Quality Extract: If you can use a real vanilla bean, scraping the seeds into the milk is highly recommended for both flavor and those beautiful little black specks. Otherwise, a high-quality pure vanilla bean paste or extract works wonderfully.
- Egg Yolks: Provide richness, color, and thickening power. Save the whites for an omelet or meringue!
- Granulated Sugar: Sweetens the custard. We use just enough to balance the cocoa of the chocolate chips without making the bun overly cloying.
- Cornstarch: Our primary thickening agent. It yields a smooth, stable custard that holds its shape beautifully when piped.
- Cold Butter: Whisking a tablespoon of cold butter into the hot, finished custard adds a glossy finish and an extra layer of richness.
For the Finishing Touch:
- Mini Semi-Sweet Chocolate Chips: Mini chips are crucial here. Regular-sized chips can be too bulky and overpower the delicate texture of the custard and the bun. Semi-sweet chocolate provides the perfect slightly bitter contrast to the sweet vanilla filling.
Essential Equipment
To ensure your success, gather the following tools before you begin:
- Stand Mixer with a Dough Hook: While you *can* knead brioche by hand, incorporating a massive amount of softened butter into a sticky dough is a very messy, tiring, and lengthy process by hand. A stand mixer makes this effortless.
- Medium Saucepan and Whisk: For cooking the pastry cream evenly without scorching.
- Fine Mesh Strainer: Crucial for passing the cooked custard through to catch any tiny bits of cooked egg, ensuring a perfectly silky texture.
- Plastic Wrap: You will need this to cover the dough during proofing and to press directly onto the surface of the hot custard to prevent a skin from forming.
- Baking Sheets and Parchment Paper: For baking the buns evenly without sticking.
- Piping Bag: While you can spoon the filling in, a piping bag with a large round tip allows for neat, generous, and even distribution of the custard inside the buns.
Step-by-Step Instructions: Mastering the Technique
Follow these detailed steps carefully, paying attention to temperatures and visual cues.
Chocolate Chip Vanilla Custard Brioches
Ingredients
Equipment
Method
- Make the custard: Heat 1 1/2 cups milk and vanilla in a saucepan until simmering. In a bowl, whisk egg yolks, 1/3 cup sugar, and cornstarch until pale.
- Slowly whisk half the hot milk into the egg mixture to temper. Return everything to the saucepan and cook over medium heat, whisking constantly, until thick and boiling for 1 minute.
- Remove from heat, whisk in 1 tbsp cold butter. Strain through a fine mesh sieve into a bowl, cover with plastic wrap touching the surface, and chill for at least 3 hours.
- Make the dough: In a stand mixer, combine bread flour, yeast, 1/4 cup sugar, and salt. Add room temperature eggs and warm milk. Mix with a dough hook until a shaggy dough forms.
- With the mixer on low, gradually add softened butter one tablespoon at a time until incorporated. Knead on medium speed for 10-15 minutes until the dough passes the windowpane test.
- Place dough in a greased bowl, cover, and let rise in a warm place for 1-1.5 hours until doubled. (For best results, chill overnight after this step).
- Divide dough into 8 equal pieces. Roll each into an oval bun shape. Place on a parchment-lined baking sheet, cover, and let rise for 1 hour until puffy.
- Preheat oven to 350°F (175°C). Brush buns with egg wash and bake for 15-18 minutes until golden brown. Cool completely on a wire rack.
- Whisk the chilled custard to smooth it out. Fold in half of the mini chocolate chips and transfer to a piping bag.
- Slice a slit down the top of each cooled bun. Pipe the custard generously inside and sprinkle with remaining mini chocolate chips.
Notes
Part 1: The Vanilla Custard (Make Ahead)
- Heat the Milk: In a medium saucepan, combine the whole milk and vanilla (if using a scraped bean, add the pod too). Heat over medium heat until it just begins to simmer—do not let it boil. Remove from heat.
- Whisk Yolks and Sugar: In a separate heat-proof bowl, vigorously whisk together the egg yolks and granulated sugar until the mixture becomes pale yellow and slightly thickened (about 2 minutes). Add the cornstarch and whisk until completely smooth and free of lumps.
- Temper the Eggs: This is the crucial step. Slowly pour about half a cup of the hot milk into the egg yolk mixture while whisking constantly and vigorously. This slowly raises the temperature of the eggs without scrambling them.
- Cook the Custard: Pour the tempered egg mixture back into the saucepan with the remaining hot milk. Place over medium heat, whisking continuously. The mixture will begin to thicken. Once it reaches a gentle boil (large bubbles popping on the surface), whisk vigorously for exactly one more minute to cook out the raw cornstarch taste.
- Strain and Chill: Remove from heat and immediately whisk in the cold butter (and vanilla extract, if using instead of a bean). Pass the thick custard through a fine-mesh strainer into a clean, shallow bowl. Press a piece of plastic wrap directly against the entire surface of the custard to prevent a rubbery skin from forming. Refrigerate for at least 3 hours, or up to 3 days.
Part 2: The Brioche Dough
- Combine Dry Ingredients: In the bowl of your stand mixer, whisk together the bread flour, instant yeast, sugar, and salt.
- Add Liquids: Attach the dough hook. With the mixer on low speed, add the room-temperature eggs and the warm milk. Mix until a shaggy dough forms and no dry flour remains. Knead on medium-low speed for about 5 to 7 minutes to begin developing the gluten.
- Incorporate the Butter: This requires patience. With the mixer running on low, add the softened, room-temperature butter one tablespoon at a time. Wait until each piece is fully incorporated before adding the next. The dough will look incredibly messy and separated at first—do not panic! Just keep mixing.
- The Final Knead: Once all the butter is added, increase the speed to medium and knead for another 10 to 15 minutes. You are looking for the “windowpane test”: the dough should be glossy, incredibly stretchy, and you should be able to gently stretch a small piece of it so thin that light passes through it without the dough tearing.
- First Proof (Bulk Fermentation): Form the dough into a smooth ball. Place it in a lightly greased bowl, cover tightly with plastic wrap, and let it rise at warm room temperature for about 1 to 1.5 hours, or until doubled in size. (Pro Tip: For the best flavor and easiest handling, punch the dough down after this rise, cover it again, and place it in the refrigerator overnight.)
Part 3: Shaping, Baking, and Assembling
- Shape the Buns: Turn the proofed (and ideally chilled) dough onto a very lightly floured surface. Divide the dough into equal portions (about 80-90 grams each). Roll each piece into a smooth ball, then gently roll it back and forth under your palms to elongate it into a 4-inch oval bun (similar to a hot dog bun).
- Second Proof: Place the shaped buns onto a parchment-lined baking sheet, leaving plenty of space between them. Cover loosely with a clean kitchen towel and let rise in a warm, draft-free spot until they are very puffy and delicate to the touch (about 1 to 1.5 hours depending on your kitchen’s temperature).
- Bake: Preheat your oven to 350°F (175°C). Carefully brush each bun with the egg wash, being gentle so as not to deflate them. Bake for 15 to 18 minutes, or until deeply golden brown and shiny. Transfer to a wire rack to cool completely to room temperature.
- Prep the Custard: Remove the chilled custard from the fridge. It will be very firm. Whisk it vigorously by hand or with a mixer for a minute until it returns to a smooth, creamy, pipeable consistency. Fold in half of the mini chocolate chips. Transfer to a piping bag.
- Assemble: Take a completely cooled brioche bun and slice it down the top center, cutting about 3/4 of the way through (like a top-split hot dog bun). Gently pry it open. Pipe a generous, overflowing amount of the vanilla-chocolate chip custard into the split.
- Garnish: Sprinkle the remaining mini chocolate chips generously over the exposed custard, pressing them in slightly so they stick. Serve immediately and enjoy the masterpiece!
Pro Tips for Brioche Success
- Temperature is Everything: If your kitchen is very warm, your dough might become a greasy mess as the butter melts out of the gluten network. If this happens, put the mixing bowl in the fridge for 15 minutes to firm the butter up, then resume kneading.
- Do Not Rush the Proofing: Enriched doughs take longer to rise than lean bread doughs because the sugar, fat, and eggs weigh down the yeast. Let the dough tell you when it’s ready—it should be distinctly puffy, jiggly, and doubled in volume.
- Cool the Buns Completely: Never pipe cold custard into a warm bun. The residual heat from the bread will melt the butter and break down the cornstarch in the custard, turning your beautiful filling into liquid soup.
Delicious Variations
Once you have conquered the base recipe, the customization options are endless:
- Coffee Chocolate Chip: Infuse the hot milk for the custard with 2 tablespoons of instant espresso powder before whisking into the egg yolks.
- Pistachio Raspberry: Replace the vanilla extract with a touch of almond or pistachio extract in the custard. Skip the chocolate chips and instead fold fresh raspberries and chopped pistachios into the filling.
- Double Chocolate: Add 3 tablespoons of high-quality Dutch-processed cocoa powder to the dry ingredients of your brioche dough for a chocolate-on-chocolate experience.
Storage and Freezing Guidelines
Because these brioches contain a dairy-rich custard, their storage requires care.
- Short-Term Storage: Assembled buns must be kept in the refrigerator in an airtight container. They are best consumed within 24 to 48 hours. The brioche will firm up slightly in the cold, so allow them to sit at room temperature for 15 minutes before eating to take the chill off the bread.
- Freezing the Dough: You can freeze the shaped, unbaked brioche buns. After shaping, place them on a baking sheet in the freezer until solid, then transfer to a freezer bag for up to two months. To bake, arrange them on a baking sheet, cover, and let them thaw and complete their second proof at room temperature (this will take several hours) before egg washing and baking.
- Freezing Baked Buns: You can freeze the baked, unfilled brioche buns perfectly. Thaw at room temperature. Do not freeze the assembled buns, as freezing and thawing will ruin the delicate texture of the cornstarch-thickened pastry cream, making it weep and become watery.
Final Thoughts
Creating Chocolate Chip Vanilla Custard Brioches from scratch is an act of culinary love. It requires patience, precision, and a willingness to get your hands a little buttery. But when you take that first bite—experiencing the soft, sweet bread yielding to the cool, rich vanilla cream and the snap of dark chocolate—you will know that every minute spent kneading and whisking was entirely worth it. These are perfect for a spectacular weekend brunch, a luxurious afternoon tea, or simply treating yourself to patisserie-level perfection at home.