Adorable Fruit and Cheese Waffle Cone Appetizers: The Perfect Party Snack
Introduction to a Whimsical Bite
When it comes to hosting a memorable gathering, the food you serve plays a starring role. While massive grazing tables and intricate charcuterie boards have dominated the party scene for the last few years, there is a new trend taking center stage: individualized, handheld appetizers. Enter the incredibly charming, perfectly portioned, and utterly delicious Fruit and Cheese Waffle Cone Appetizers. These miniature edible “baskets” are a feast for the eyes and the palate, combining the nostalgic crunch of a waffle cone with the sophisticated, sweet-and-savory pairing of fresh summer berries and sharp cheddar cheese.
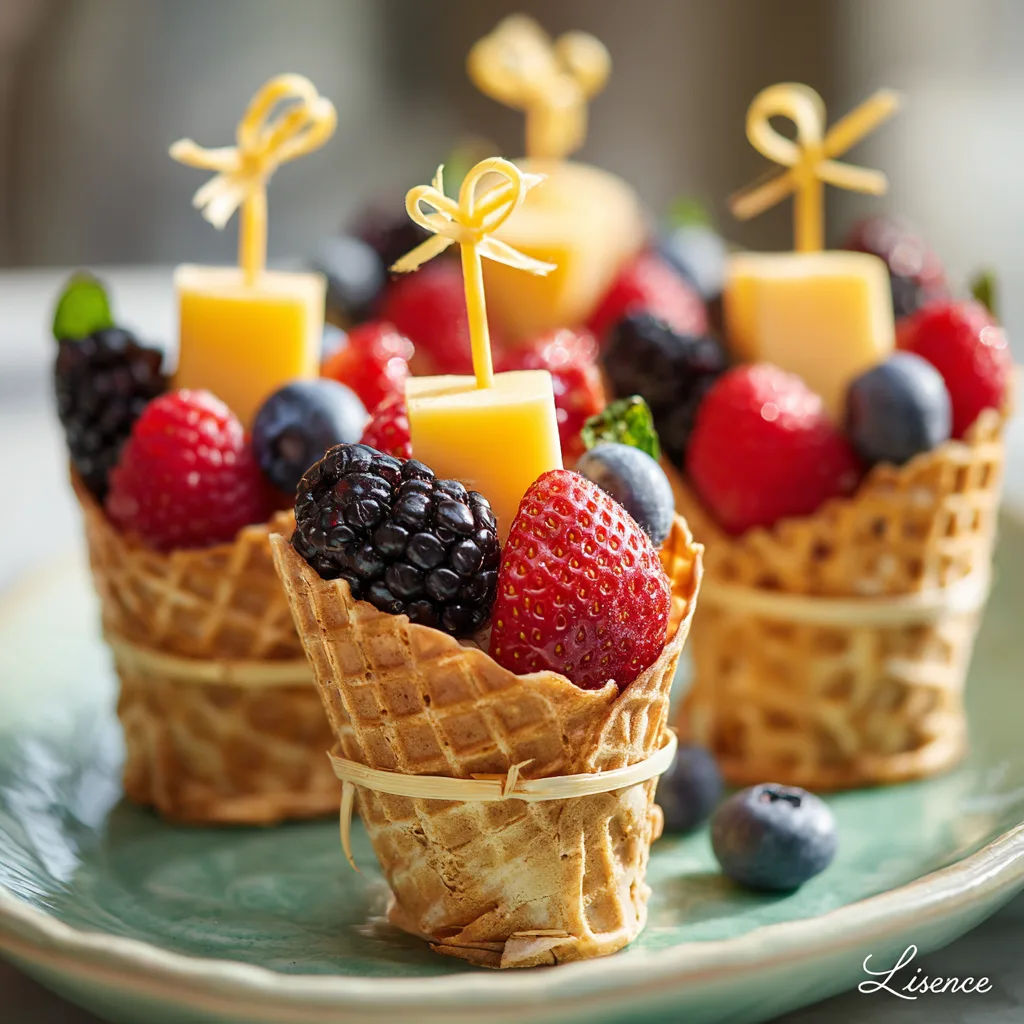
Imagine the delight on your guests’ faces when they are greeted not by a standard fruit platter, but by a whimsical tray of tiny edible baskets. The visual appeal is undeniable. The bright, jewel-toned reds and blues of the strawberries, raspberries, blackberries, and blueberries pop beautifully against the warm, golden-brown hue of the waffle cone and the rich orange of the cheese cubes. To top it all off, a clever “basket handle” made from a thin strip of cheese gives these cones an irresistible, storybook-like charm.
Beyond their stunning appearance, these appetizers are remarkably practical. They offer a hygienic, grab-and-go solution that encourages mingling. Guests no longer need to hover around a central food station juggling a plate, a fork, and a napkin. Everything is contained within a delicious, edible vessel. Whether you are throwing a whimsical woodland-themed baby shower, hosting an elegant bridal brunch, planning an Easter garden party, or simply looking for a fun and healthy snack to make with your kids, these Fruit and Cheese Waffle Cones are guaranteed to be the highlight of your menu.
Why You Will Fall in Love With This Recipe
If you need a little more convincing before you head to the grocery store, here is why this recipe deserves a permanent spot in your entertaining repertoire:
- Unmatched Visual Appeal: Let’s be honest, we eat with our eyes first. These cones look like miniature works of art. The basket handle detail elevates them from a simple snack to a gourmet presentation.
- Incredibly Easy to Assemble: There is absolutely zero cooking or baking required. If you can wash fruit and slice cheese, you can master this recipe in minutes. It is the ultimate low-stress appetizer.
- Built-In Portion Control: Because each cone is individually assembled, it ensures that every guest gets a perfect, balanced ratio of fruit to cheese to crunchy cone.
- Kid-Friendly and Adult-Approved: The familiar, sweet taste of berries and the mild creaminess of cheddar appeal to picky eaters, while the elegant presentation and charcuterie-style pairing satisfy adult palates.
- Eco-Friendly Serving: The vessel is completely edible! This means fewer plastic cups or paper plates ending up in the trash at the end of your event.
Breaking Down the Ingredients
Because this recipe relies on raw, uncooked components, the quality of your ingredients is paramount. Let’s explore exactly what you need to build the perfect fruit and cheese cone.
The Edible Vessel: Flat-Bottom Waffle Cones
The foundation of this appetizer is the cone itself. It is crucial to purchase miniature flat-bottom waffle cones (sometimes labeled as “ice cream cups” or “waffle bowls” depending on the brand). Traditional pointed sugar cones or waffle cones will not stand up on their own, making them incredibly difficult to display and serve. The flat bottom allows you to arrange them beautifully on a platter. The waffle texture provides a sturdy wall that won’t immediately get soggy from the fruit, and its subtle vanilla sweetness complements the savory cheese.
The Fresh Fruit Medley
A mix of berries provides the best variety of colors, textures, and sweet-tart flavors. Ensure your fruit is at the peak of ripeness.
- Blueberries: These provide a beautiful pop of deep indigo and a satisfying, juicy snap.
- Raspberries: Delicate and tart, raspberries add an elegant texture and a bright, ruby-red color.
- Blackberries: Earthy and sweet, blackberries add size and a gorgeous dark contrast to the mix.
- Strawberries: Depending on the size of your cones, you will want to quarter or slice your strawberries so they fit neatly alongside the other ingredients without overwhelming the cone.
The Savory Element: Cheddar Cheese
To balance the natural sweetness of the berries and the cone, you need a savory element. A block of sharp or mild orange cheddar cheese is ideal for a few reasons. First, the firm texture makes it easy to cut into perfect, uniform cubes that mimic the size of the berries. Second, the bright orange color creates a stunning visual contrast against the dark berries. Third, cheddar pairs beautifully with apples and berries, creating a classic cheese-board flavor profile.
The “Basket Handle” Magic
The detail that truly sets this appetizer apart is the adorable basket handle. To achieve this, you need a cheese that is pliable and flexible. A thin slice of mild yellow cheese (like Gouda, Edam, or a processed American cheese slice) works best. You will cut this into thin, long strips that can bend into a semi-circle without snapping. A decorative bamboo cocktail pick—specifically one with a knotted or looped end—is used to pierce through the center of the handle and into a piece of fruit or cheese below, anchoring the entire structure together.
Step-by-Step Assembly Instructions
Assembly is quick, but doing it in an organized fashion will save you time and ensure your cones look professionally catered.
- Prep the Fruit: Gently wash all your berries. This next step is critical: dry them completely. Use a salad spinner lined with paper towels, or lay them out on a clean kitchen towel and gently pat them dry. Any residual water will seep into the waffle cone and cause it to become soggy. Hull the strawberries and cut them into halves or quarters depending on their size.
- Prep the Cheese Cubes: Take your block of orange cheddar cheese and slice it into uniform 1/2-inch cubes. You want them to be roughly the same size as your blackberries and raspberries for a cohesive look.
- Create the Handles: Take your slices of pliable yellow cheese and use a sharp knife or a pizza cutter to cut thin strips, about 1/4 inch wide and 3 to 4 inches long.
- Build the Base Layer: Begin filling your flat-bottom waffle cones. Start by dropping one or two cubes of cheddar cheese into the very bottom. This acts as a savory anchor and prevents smaller berries from getting stuck at the bottom.
- Layer the Filling: Continue filling the cone, alternating between blueberries, raspberries, blackberries, strawberry slices, and cheddar cubes. Arrange them so different colors are resting next to each other. Allow the fruit to mound slightly over the top rim of the cone.
- Attach the Handle: Take one of your thin yellow cheese strips and gently bend it into an arch over the top of the fruit. Take a bamboo cocktail pick and carefully pierce it through the top center of the cheese arch, driving the pick down into a strawberry or cheese cube nestled in the center of the cone. This will secure the handle in place.
- Arrange and Serve: Carefully place the finished “baskets” onto your serving platter. Keep them out of direct sunlight or heat to prevent the cheese from sweating.
Expert Tips for Preventing Soggy Cones
The only enemy of this delightful appetizer is moisture. A soggy waffle cone will collapse and ruin the presentation. Follow these expert tips to maintain that perfect crunch:
- Thorough Drying: As mentioned, wet fruit is the main culprit. Wash your fruit hours in advance if possible and let it air dry completely on a towel.
- The Chocolate Seal (Optional but recommended): If you are making these well in advance, you can waterproof the inside of the cones! Melt a small amount of white chocolate or candy melts. Use a pastry brush or a small spoon to coat the inside walls of the waffle cone with a thin layer of the melted chocolate. Let it set completely before adding your fruit. The white chocolate acts as an invisible moisture barrier and adds a lovely, subtle sweetness.
- Timing is Everything: For the absolute best texture, try to assemble these cones no more than 1 to 2 hours before your guests arrive.
Creative Themed Variations
Once you master the basic fruit and cheese cone, the variations are endless. You can tailor these edible baskets to any holiday or party theme:
The Caprese Cone
For a purely savory Italian twist, ditch the berries. Fill the cones with miniature mozzarella pearls (bocconcini) and sweet cherry tomatoes. Drizzle a tiny amount of thick balsamic glaze inside the cone first, and garnish the top with a fresh basil leaf. Use a strip of roasted red pepper for the handle.
The Tropical Getaway
Perfect for a summer pool party. Fill the cones with cubes of fresh mango, pineapple, kiwi, and halved green grapes. Use a strip of fruit leather (fruit roll-up) for the basket handle to keep the sweet, fruity theme going.
The Ultimate Dessert Basket
Turn this into a decadent sweet treat. Coat the rim of the cone in melted dark chocolate and dip it in crushed nuts or sprinkles. Fill the inside with mini marshmallows, chocolate chips, fresh strawberries, and small brownie bites. Top it off with a tiny drizzle of caramel sauce.
How to Display Your Appetizer Cones
Presentation is key when serving handheld appetizers. Since these cones have flat bottoms, they can stand up on their own, but they are top-heavy and prone to tipping if the platter is bumped.
The Platter Method: If using a flat platter, choose one with a slight lip. Arrange the cones close together so they support one another. Garnish the empty spaces on the platter with extra loose berries, fresh mint leaves, or edible flowers to create a lush, abundant look.
The Stand Method: For a truly professional look, invest in an acrylic or wooden cone stand (often sold for ice cream or sushi hand rolls). These stands have holes cut into them that securely hold the cones upright, eliminating any worry of them tipping over. Alternatively, you can fill a deep decorative tray or shallow basket with granulated sugar, clean decorative pebbles, or dried beans, and gently nestle the base of the cones into the material to keep them anchored.
Frequently Asked Questions (FAQs)
Can I make these the night before my party?
It is not recommended to assemble them the night before, as the moisture from the cut fruit and cheese will inevitably soften the waffle cone, even if you dry the fruit well. However, you can wash and dry all the fruit and slice all the cheese the night before, storing them in airtight containers in the fridge. Assembly will only take a few minutes the next day.
What if I can’t find miniature flat-bottom waffle cones?
If you cannot find flat-bottom cones, you can use traditional pointed sugar cones, but you absolutely must use a cone stand or a tray filled with sugar/beans to keep them upright. Alternatively, you can use small, sturdy edible pastry cups or phyllo dough shells, though you will lose the distinct “waffle basket” look.
Are these gluten-free?
Standard waffle cones are not gluten-free. However, many specialty health food stores and online retailers sell excellent gluten-free waffle cones. Swap those in, and this entire appetizer becomes a safe and delicious option for your gluten-sensitive guests.
Conclusion
The Fruit and Cheese Waffle Cone Appetizer is a testament to the fact that the best party foods are often the simplest. By combining everyday, fresh ingredients in a novel and visually stunning way, you create an experience that guests will talk about long after the party ends. They are sweet, savory, crunchy, juicy, and undeniably adorable. The next time you are tasked with bringing a snack to a gathering or hosting your own event, skip the standard cheese board and weave a little magic with these delightful edible baskets.
Fruit and Cheese Waffle Cone Appetizers
Ingredients
Equipment
Method
- Wash all the berries thoroughly and dry them completely using a salad spinner or by gently patting them with paper towels. Moisture will make the cones soggy.
- Cut the block of cheddar cheese into uniform 1/2-inch cubes.
- Slice the pliable yellow cheese into thin strips, roughly 1/4 inch wide and 3 to 4 inches long, to serve as the basket handles.
- Begin assembling by dropping 1 or 2 cheddar cheese cubes into the bottom of each flat-bottom waffle cone to act as a sturdy base.
- Layer the blueberries, raspberries, blackberries, strawberry slices, and remaining cheddar cubes inside the cone, allowing the mixture to mound slightly over the top.
- Gently bend a thin strip of yellow cheese into an arch over the top of the filling to mimic a basket handle.
- Secure the handle by piercing a decorative bamboo cocktail pick through the top center of the cheese arch and down into a piece of fruit or cheese below.
- Arrange the finished cones upright on a serving platter and serve immediately.