The Unmatched Decadence of Extra Gooey Biscoff Butter Brownies
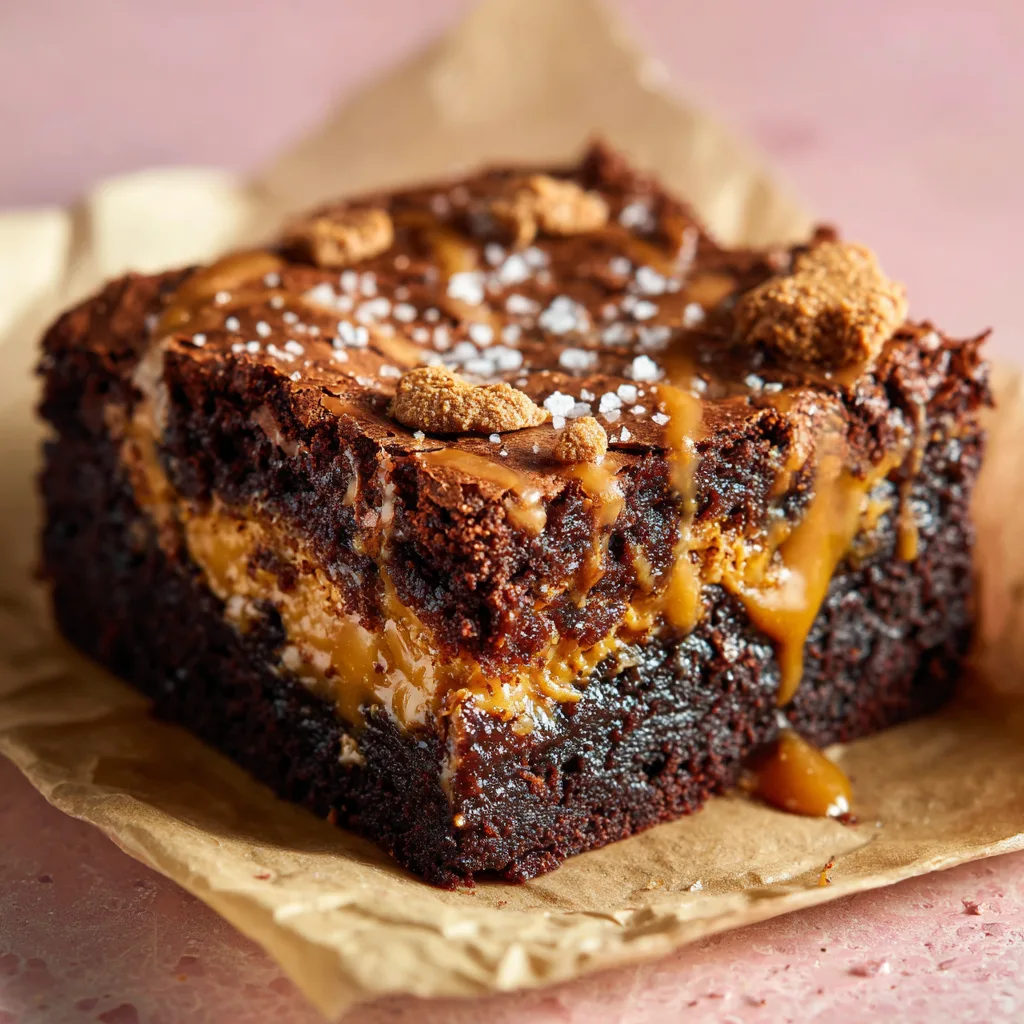
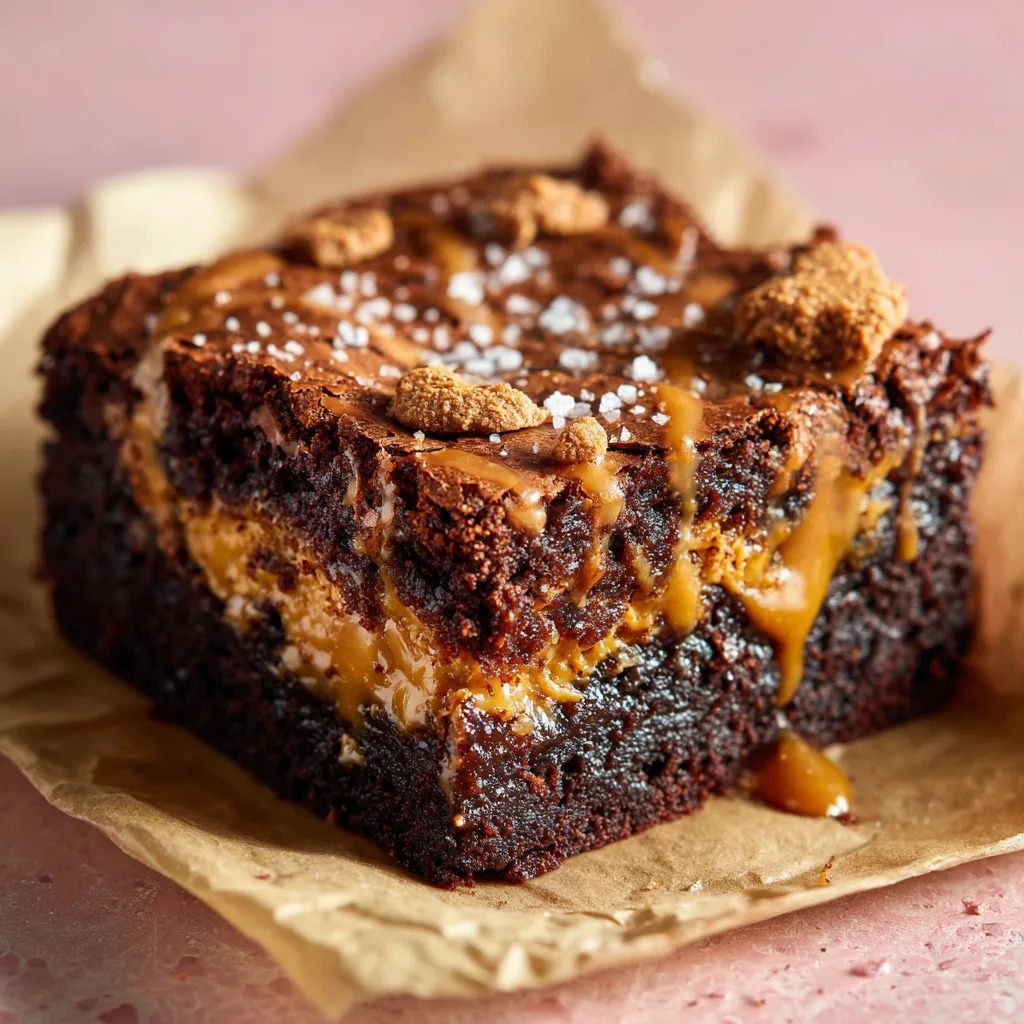
There are brownies, and then there are Extra Gooey Biscoff Butter Brownies. If you have ever found yourself torn between the deep, dark, comforting embrace of a rich chocolate brownie and the spiced, caramelized, sweet perfection of Lotus Biscoff cookie butter, this recipe is your ultimate culinary salvation. We are not just talking about a subtle hint of cookie butter swirled into the batter; we are talking about a thick, unapologetic, molten layer of Biscoff spread stuffed right into the heart of the fudgiest, darkest brownie you will ever bake. Crowned with a glossy Biscoff drizzle, crushed speculoos cookies, and a hit of flaky sea salt, this dessert is a masterpiece of texture and flavor.
The magic of this dessert lies in the contrast. Brownies, when made correctly, are dense, intensely chocolatey, and delightfully chewy. Biscoff spread—made from the famous Belgian speculoos cookies—brings a completely different flavor profile to the table. It is sweet, heavily caramelized, and spiked with warm spices like cinnamon, nutmeg, and ginger. When you bite into these brownies, your palate is first greeted by the savory crunch of sea salt and crisp cookie pieces. Then, you break through the paper-thin, crackly brownie top into the dense chocolate crumb. Finally, you hit the liquid gold: a warm, gooey center of melted cookie butter that balances the bitterness of the dark chocolate perfectly. It is a multi-sensory experience that is guaranteed to ruin all other brownie recipes for you.
Whether you are baking for a holiday party, trying to impress a date, or simply need an aggressively comforting weekend baking project, these stuffed brownies are the answer. In this comprehensive guide, we will explore the science behind the perfect fudgy brownie texture, the best way to handle cookie butter to ensure it stays gooey, and the foolproof methods for achieving that coveted, tissue-paper-thin crinkly crust on top.
The Science of the Perfect Fudgy Brownie
Before we dive into the Biscoff inclusion, we have to perfect the base. A stuffed brownie requires a very specific type of batter. If the batter is too cakey, the brownie will dry out around the cookie butter. If it is too wet, the entire structure will collapse when you try to slice it. We want fudgy. Achieving this requires understanding the role of your ingredients:
- Fat-to-Flour Ratio: The defining characteristic of a fudgy brownie versus a cakey brownie is the ratio of fat (butter and chocolate) to dry ingredients (flour and cocoa powder). This recipe uses a very high fat-to-flour ratio. A minimal amount of flour is used just to give the brownies enough structure to hold together, resulting in a dense, truffle-like texture.
- Melted Chocolate vs. Cocoa Powder: We use both, but for different reasons. Melted high-quality dark chocolate provides the gooey texture and the structural fat (cocoa butter). Dutch-processed cocoa powder provides that intense, dark, slightly bitter chocolate flavor without adding extra moisture that could make the brownies greasy.
- The Sugar Content: We use a combination of white granulated sugar and light brown sugar. White sugar aids in creating the crinkly top and provides sweetness. Brown sugar contains molasses, which adds chewiness, moisture, and a deeper caramel flavor that beautifully complements the Biscoff.
- The Ribbon Stage: The secret to that glossy, paper-thin crust on top of a brownie is dissolved sugar and aerated eggs. By whipping the eggs and sugars together vigorously until they are pale, thick, and leave a “ribbon” trail when the whisk is lifted, you create a delicate meringue-like layer that rises to the top during baking.
Why Biscoff and Dark Chocolate are a Match Made in Heaven
Lotus Biscoff, or speculoos, is a traditional Belgian spiced shortcrust biscuit. The flavor profile is defined by the Maillard reaction—the browning of sugars and amino acids—which gives the cookies their distinct caramel note. The spice blend traditionally includes cinnamon, nutmeg, cloves, ginger, and sometimes white pepper or cardamom.
When you pair this deeply sweet, spiced, and caramelized profile with dark chocolate (ideally between 60% and 70% cacao), something incredible happens. The bitterness and slight acidity of the dark chocolate temper the aggressive sweetness of the cookie butter. The warm spices in the Biscoff enhance the natural earthy, fruity notes found in high-quality cocoa. Furthermore, the salt we add—both in the batter and sprinkled on top—acts as a bridge, linking the sweet caramel notes with the savory cocoa depth, preventing the dessert from becoming cloying.
Essential Ingredients for Extra Gooey Biscoff Brownies
Quality matters when you are baking something this indulgent. Here is what you need to gather:
- Unsalted Butter: Using unsalted butter allows you to control the exact sodium content of the batter. European-style butter, which has a higher butterfat content, will yield an even richer brownie.
- Dark Chocolate: Use high-quality dark chocolate baking bars (not chocolate chips, which contain stabilizers that prevent them from melting smoothly). Aim for 60-70% cacao.
- Lotus Biscoff Spread (Cookie Butter): You will need a full jar. We use smooth spread for the molten center and the drizzle on top.
- Lotus Biscoff Cookies: A handful of these, roughly chopped, provides a crucial textural contrast on top of the soft brownies.
- Eggs: Large, room-temperature eggs are essential for whipping up to the ribbon stage. Cold eggs will not aerate properly and will shock the melted chocolate.
- Sugars: A mix of white granulated and light brown sugar. Do not reduce the sugar; it is structurally vital for the texture and the crust.
- Dutch-Processed Cocoa Powder: This cocoa has been treated with an alkalizing agent to reduce its acidity, resulting in a smoother, darker, and more deeply chocolatey flavor than natural cocoa powder.
- All-Purpose Flour: Just enough to bind the batter. Do not over-measure; fluff your flour with a spoon and level it off.
- Vanilla Extract and Flaky Sea Salt: Vanilla enhances the chocolate flavor, while flaky sea salt (like Maldon) is non-negotiable for cutting the sweetness and adding a satisfying crunch.
The “Frozen Disk” Technique: How to Stuff a Brownie
You might be tempted to just dollop the Biscoff spread directly into the batter, but doing so can result in the cookie butter melting into the batter completely, losing that distinct, thick layer. The professional trick is to freeze the Biscoff spread before baking.
Before you even begin making the brownie batter, line an 8×8 inch baking pan with parchment paper. Pour the required amount of Biscoff spread into the pan and spread it into an even, flat layer. Place this pan directly into the freezer for about 30 to 45 minutes until the Biscoff is completely solid. When you are ready to assemble, you will pour half your brownie batter into your final baking pan, peel the frozen square of Biscoff off its parchment, lay it onto the batter, and cover it with the remaining batter. As the brownies bake, the Biscoff slowly melts from a frozen state, ensuring it stays perfectly suspended in the center rather than mixing into the crumb.
Step-by-Step Instructions for Masterpiece Brownies
- Prep the Biscoff Layer: Line an 8×8 inch square baking dish with parchment paper. Warm about 3/4 cup of Biscoff spread in the microwave for 15 seconds until easily spreadable. Pour it into the lined pan, smooth it out to the edges, and freeze for at least 30 minutes until solid.
- Preheat and Prep: Preheat your oven to 350°F (175°C). Line a separate 8×8 inch metal baking pan with parchment paper, leaving an overhang on the sides so you can easily lift the brownies out later.
- Melt Chocolate and Butter: In a heatproof bowl set over a saucepan of simmering water (a double boiler), combine the chopped dark chocolate and the unsalted butter. Stir continuously until completely melted, smooth, and glossy. Remove from heat and let it cool slightly.
- Whip Eggs and Sugar: In a large mixing bowl, combine the room-temperature eggs, white sugar, and brown sugar. Using an electric hand mixer or a stand mixer with a whisk attachment, beat on medium-high speed for 4 to 5 minutes. The mixture should become very pale, thick, and significantly increased in volume.
- Combine Wet Ingredients: Pour the slightly cooled melted chocolate and butter mixture into the whipped eggs and sugar. Add the vanilla extract. Use a rubber spatula to gently fold the mixture together until just combined. Be careful not to deflate the air you whipped into the eggs.
- Fold in Dry Ingredients: Sift the all-purpose flour, Dutch-processed cocoa powder, and salt directly over the wet batter. Use the spatula to gently fold the dry ingredients into the wet. Stop mixing as soon as the last streak of flour disappears. Overmixing will develop gluten and make your brownies tough.
- Assemble: Pour exactly half of the brownie batter into your prepared baking pan. Spread it into an even layer. Retrieve your frozen Biscoff layer from the freezer, peel off the parchment paper, and place the solid Biscoff square directly on top of the batter. Pour the remaining brownie batter over the Biscoff layer, spreading it carefully to completely encase the cookie butter.
- Bake: Bake on the middle rack of the oven for 30 to 35 minutes. The edges should look set, and the center should be slightly puffed and have a crinkly crust. A toothpick inserted into the center will come out with moist crumbs and melted Biscoff (it should not come out completely clean; if it does, they are overbaked).
- The Agonizing Cool Down: Remove the brownies from the oven. This is the hardest part: you must let them cool completely in the pan at room temperature. Because they are stuffed with molten cookie butter, cutting them while warm will result in a messy collapse. Let them set for at least 2 to 3 hours, or pop them in the fridge for an hour after they reach room temperature for cleaner slicing.
- Decorate and Serve: Once cooled and sliced, warm some extra Biscoff spread in the microwave and drizzle it generously over the top. Scatter the crushed Biscoff cookies and finish with a heavy pinch of flaky sea salt.
Extra Gooey Biscoff Butter Brownies
Ingredients
Equipment
Method
- Line an 8×8 baking pan with parchment. Melt 3/4 cup of Biscoff spread slightly, pour into the pan, spread into an even layer, and freeze for 30-45 minutes until solid.
- Preheat oven to 350°F (175°C). Line a second 8×8 metal baking pan with parchment paper, leaving an overhang.
- Melt the unsalted butter and chopped dark chocolate together in a double boiler or in the microwave in 30-second bursts until smooth. Let cool slightly.
- In a large bowl, beat the eggs, white sugar, and brown sugar on medium-high speed for 4-5 minutes until pale, thick, and doubled in volume.
- Gently fold the melted chocolate mixture and vanilla extract into the whipped eggs and sugar until just combined.
- Sift the flour, cocoa powder, and salt into the wet ingredients. Gently fold with a spatula until no streaks of dry flour remain. Do not overmix.
- Pour half of the brownie batter into the prepared pan. Retrieve the frozen Biscoff layer, peel off the parchment, and place it gently on top of the batter.
- Pour the remaining brownie batter over the frozen Biscoff layer, spreading it to the edges to completely cover the cookie butter.
- Bake for 30 to 35 minutes until the edges are set and the top is glossy and crinkled. The center will still have a slight jiggle.
- Let the brownies cool completely in the pan for at least 2-3 hours (or chill in the fridge for 1 hour after reaching room temp) before lifting out by the parchment paper.
- Slice into 16 squares. Warm the remaining 1/2 cup of Biscoff spread and drizzle over the top. Garnish with chopped Biscoff cookies and flaky sea salt.
Notes
Pro Tips for Ultimate Success
Even a straightforward brownie recipe can benefit from some professional finesse. Keep these tips in mind:
- Use a Metal Baking Pan: Glass or ceramic pans conduct heat differently and retain heat long after being removed from the oven, which easily leads to overbaked, dry brownies. A light-colored metal pan (like aluminum) is best for even baking.
- Do Not Rely on the Toothpick Test: Because of the gooey center, the traditional toothpick test will fail you. Look for visual cues: the edges should be visibly pulling away from the sides slightly, and the top should be shiny and crackled. When you give the pan a gentle shake, the center should have a very slight jiggle, but not look liquid. They will continue to set as they cool.
- Slicing Cleanly: For those perfect, Instagram-worthy slices showing off the distinct layers, chilling the brownies in the refrigerator for an hour before cutting is highly recommended. Use a large, sharp chef’s knife, and wipe the blade clean with a hot, damp paper towel between every single cut.
Serving and Storage Suggestions
Serving: While they are magnificent at room temperature, a brief 10-second trip to the microwave will turn the Biscoff center back into a molten lava state. Serve a warm square with a generous scoop of premium vanilla bean ice cream. The cold vanilla melting over the hot, spiced cookie butter and dark chocolate is an unparalleled dessert experience.
Room Temperature Storage: Store the cooled, sliced brownies in an airtight container at room temperature for up to 4 days. They will actually become fudgier on day two as the moisture redistributes.
Freezing: These brownies freeze exceptionally well. Wrap individual squares tightly in plastic wrap, then place them in a freezer-safe zip-top bag. They will keep for up to 3 months. When the craving strikes, you can eat them straight from the freezer (they have a delightful chewy, nougat-like texture when frozen) or thaw them at room temperature for an hour.
Conclusion
These Extra Gooey Biscoff Butter Brownies represent the pinnacle of indulgence. They require a bit of patience—especially waiting for that frozen layer to set and the baked brownies to cool—but the reward is a dessert that looks like it came from a high-end bakery and tastes even better. The interplay of dark, bitter chocolate, sweet and spicy caramel, crunchy cookies, and sharp sea salt creates a flawlessly balanced treat. Tie on your apron, preheat your oven, and prepare to meet your new signature bake.