Twix Cookies Recipe
Irresistible Twix Cookies: The Best Christmas Cookie Recipe
If you are a fan of the classic candy bar featuring a crunchy biscuit, gooey caramel, and smooth chocolate, get ready to have your mind blown. These Twix Cookies take all those beloved elements and transform them into a bite-sized, buttery cookie that is infinitely better than anything you can buy in a wrapper.
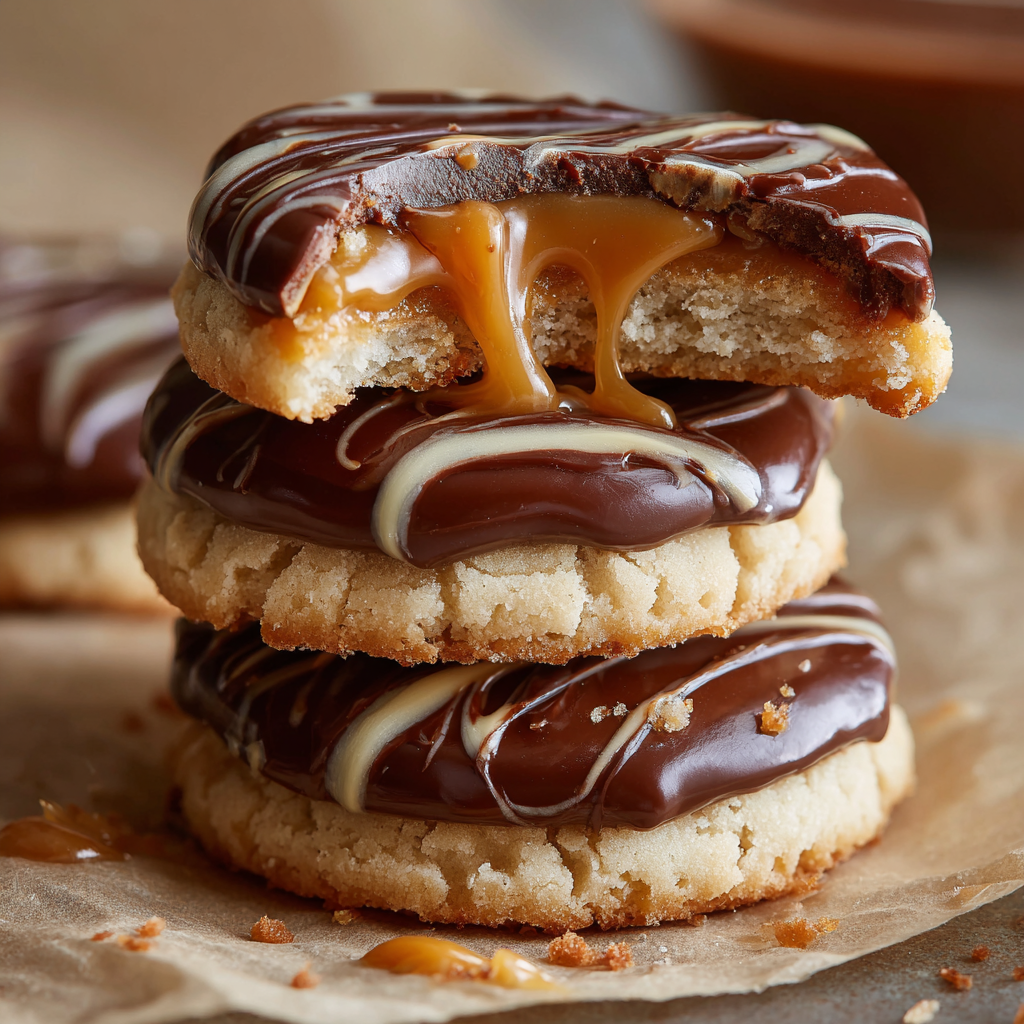
The magic of this recipe lies in the layers. It starts with a melt-in-your-mouth shortbread base—tender, buttery, and just sturdy enough to hold the toppings. Next comes a layer of rich, chewy caramel that adds that signature “Twix” pull. Finally, a dollop of milk chocolate is smoothed over the top, sealing in the deliciousness. When you take a bite, you get the snap of the chocolate, the chew of the caramel, and the crumble of the cookie all at once.
In this comprehensive guide, we will walk you through how to make the perfect shortbread that doesn’t spread, the trick to keeping your caramel soft but set, and how to get that professional-looking chocolate swirl on top. These cookies are the MVP of any Christmas cookie exchange, but be warned: they are highly addictive!
Why This Recipe Beats the Candy Bar
We all love a Twix bar, but let’s be honest—homemade is always better. Here is why this cookie version reigns supreme:
- Better Ingredients: No preservatives or artificial waxes here. Just real butter, sugar, and cream.
- The Ratio: In a candy bar, the biscuit can sometimes be dry. Here, the ratio of caramel to cookie is increased, making for a much more indulgent bite.
- Visual Appeal: As seen in the photo, the layered look with the chocolate swirl makes them look like they came from a high-end bakery.
- Customizable: You can use dark chocolate if you prefer it less sweet, or sprinkle sea salt on top for a gourmet finish.
The Three Layers of Perfection
Understanding each component is key to nailing this recipe.
1. The Shortbread Base
Unlike a sugar cookie, shortbread doesn’t rely on eggs for structure. It relies on butter. This makes the texture sandy and tender rather than chewy. It is important not to overwork the dough, or the gluten will develop and make the cookies tough. We bake these until they are just barely set—pale on top and very lightly golden on the bottom.
2. The Caramel Filling
For the caramel layer, you have two options: homemade or semi-homemade. For this “easy” version that ensures stability, we recommend using soft store-bought caramels melted down with a splash of heavy cream. This guarantees that the caramel will set firm enough to hold the chocolate but stay soft enough to bite through without breaking your teeth.
3. The Chocolate Topping
Milk chocolate is traditional for a Twix, but it can be finicky to melt. Adding a teaspoon of shortening or coconut oil to your melting chocolate helps it become glossy and spreadable. It also prevents the chocolate from blooming (turning white) as it sets.
Ingredients List
For the Shortbread Cookies:
- Unsalted Butter: 1 cup (2 sticks), softened to room temperature.
- Powdered Sugar: ¾ cup (using powdered instead of granulated ensures a melt-away texture).
- Vanilla Extract: 1 teaspoon.
- All-Purpose Flour: 2 cups + 2 tablespoons (spooned and leveled).
- Salt: ¼ teaspoon.
For the Caramel Layer:
- Soft Caramels: 11 oz bag (like Kraft or Werther’s Chewy).
- Heavy Cream: 1-2 tablespoons.
For the Chocolate Layer:
- Milk Chocolate Chips: 1 ½ cups (or high-quality chocolate bar chopped).
- Vegetable Shortening or Coconut Oil: 1 teaspoon (for shine).
Step-by-Step Instructions
Step 1: Make the Shortbread Dough
Preheat your oven to 350°F (175°C). Line two baking sheets with parchment paper.
In a large bowl or stand mixer, cream the softened butter and powdered sugar together until smooth and fluffy (about 2 minutes). Add the vanilla extract and mix.
Gradually add the flour and salt. Mix on low speed just until a dough forms. It may look crumbly at first, but keep mixing and it will come together.
Step 2: Roll and Cut
Turn the dough out onto a lightly floured surface. Roll it out to about ¼-inch thickness.
Use a round cookie cutter (about 2 inches in diameter) to cut out circles. Transfer the circles to the prepared baking sheet. Re-roll scraps and repeat.
Step 3: Bake
Bake for 8-10 minutes. The cookies should still be pale on top and just barely starting to turn golden on the bottom edges. Do not let them brown! Remove from the oven and let them cool completely on the baking sheet. They are fragile when hot.
Step 4: Prepare the Caramel
Unwrap the caramels and place them in a microwave-safe bowl with the heavy cream. Microwave in 30-second intervals, stirring in between, until completely smooth and melted.
Let the caramel cool slightly for about 2-3 minutes so it thickens up a bit.
Step 5: Spread the Caramel
Spoon about 1 teaspoon of caramel onto the center of each cooled cookie. Use the back of the spoon to gently spread it towards the edges, but leave a small rim of cookie visible.
Let the caramel set for about 15-20 minutes until it is no longer hot to the touch.
Step 6: The Chocolate Finish
In another microwave-safe bowl, melt the chocolate chips and shortening in 30-second intervals, stirring until smooth.
Spoon a dollop of melted chocolate on top of the caramel layer. Use the back of your spoon to swirl it into a circle, covering most of the caramel.
Let the cookies sit at room temperature until the chocolate hardens completely (this can take an hour or two). If you are impatient, pop them in the fridge for 15 minutes!
Expert Tips for Success
Preventing the “Spread”
If your kitchen is warm and your shortbread dough feels soft after rolling, stick the baking sheet in the fridge for 10 minutes before putting it in the oven. Cold dough hits the hot oven and holds its shape better.
Caramel Consistency
If your caramel is too runny, let it cool longer. If it’s too stiff, microwave it for 10 more seconds. You want it to be the consistency of thick honey so it pools on the cookie without running off the sides.
Storage
Store these cookies in an airtight container at room temperature for up to 5 days. If you stack them, place a piece of wax paper between layers to keep the chocolate from getting scuffed.
Variations to Try
Salted Caramel: Sprinkle a few flakes of Maldon sea salt on top of the wet chocolate for a sweet-salty combo.
Peanut Butter Twix: Swap the caramel layer for a mixture of peanut butter and melted white chocolate.
Dark Mode: Use dark chocolate chunks instead of milk chocolate for a richer, less sweet cookie.
Final Thoughts
These Irresistible Twix Cookies are a labor of love that is worth every second. They look impressive, taste incredible, and bring a nostalgic candy bar flavor to your holiday baking lineup. Whether you are leaving them out for Santa or hoarding them for yourself (we won’t judge), they are guaranteed to be a hit.
So grab your rolling pin and get ready to make the best cookie of the season. Enjoy!
Twix Cookies
Ingredients
Equipment
Method
- Preheat oven to 350°F (175°C). Cream butter and powdered sugar until fluffy. Add vanilla, flour, and salt. Mix until dough forms.
- Roll dough on a floured surface to 1/4 inch thickness. Cut into circles and place on baking sheet.
- Bake for 8-10 minutes until set but not browned. Cool completely.
- Melt caramels and cream in microwave until smooth. Spoon onto cooled cookies and spread slightly.
- Let caramel set for 15 minutes.
- Melt chocolate chips and shortening until smooth. Spoon over the caramel layer.
- Let chocolate set completely before serving.