Magic Custard Cake
Vanilla Magic Custard Cake: One Batter, Three Layers
Baking often feels like chemistry, precise and predictable. But sometimes, it feels like pure alchemy. The Vanilla Magic Custard Cake is the culinary equivalent of pulling a rabbit out of a hat. You prepare a single, simple batter, pour it into a pan, and slide it into the oven. But when you pull it out an hour later, something miraculous has happened: the batter has separated into three distinct, perfect layers.
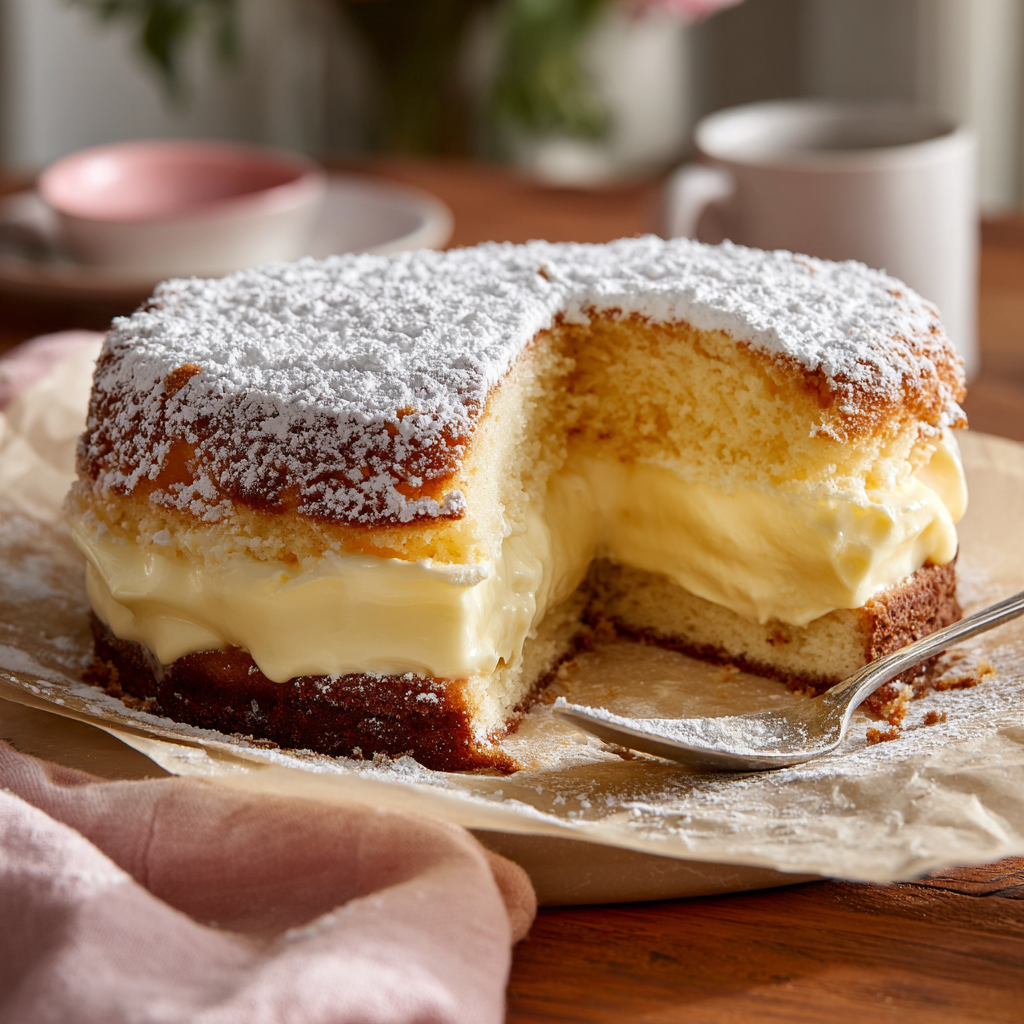
The bottom layer is a dense, fudge-like crust. The middle layer—the star of the show—is a silky, trembling vanilla custard. The top layer is a light, airy sponge cake that turns golden brown in the oven. It is a textural masterpiece that offers a little bit of everything in a single bite. And the best part? It requires no fancy equipment, no complex layering techniques, and ingredients you likely already have in your pantry right now.
In this comprehensive guide, we are going to demystify the “magic.” We will explore the science behind the separation, the critical temperature of your ingredients, and the folding technique that ensures your sponge layer rises to the occasion. Whether you are a seasoned baker or a complete novice, this recipe is a showstopper that tastes as incredible as it looks.
The Science Behind the Magic
How does one batter become three cakes? The secret lies in the eggs and the baking temperature.
The Separation: This recipe relies heavily on eggs. You separate the yolks from the whites. The yolks are beaten with sugar, butter, flour, and a large amount of milk, creating a very thin, liquid batter. The egg whites are whipped to stiff peaks and then folded in. Because the whites are full of air, they are lighter than the liquid yolk mixture. During baking, these aerated whites slowly float to the top, forming the sponge layer.
The Custard and Base: The milk and egg yolk mixture settles at the bottom. The flour in the batter sinks to the very bottom to create the dense crust (the “fudge” layer), while the proteins in the egg yolks and milk coagulate in the middle to form the creamy custard. The low baking temperature (usually around 325°F/160°C) allows this separation to happen gently without scrambling the eggs, resulting in that silky texture we crave.
Ingredients Checklist
Here is what you need to create this triple-layer delight. Precision is key here.
The Core Components
- Eggs: You will need 4 large eggs, separated. It is easier to separate eggs when they are cold, but they whip better when they are at room temperature. Separate them first, then let them sit for 30 minutes.
- Granulated Sugar: This provides the sweetness and helps stabilize the egg whites.
- Unsalted Butter: Melted and slightly cooled. If the butter is too hot, it can cook the egg yolks prematurely.
- All-Purpose Flour: Just a small amount is needed to create the base layer.
- Vanilla Extract: Use high-quality vanilla extract or vanilla bean paste, as this is the primary flavor profile of the cake.
- Milk: This is crucial: the milk must be lukewarm. If it is cold, it will solidify the melted butter and break your batter. If it is boiling, it will cook the eggs. Aim for barely warm to the touch.
- Powdered Sugar: For dusting the top after baking.
Step-by-Step Instructions
Phase 1: The Yolk Mixture
- Preheat and Prep: Preheat your oven to 325°F (160°C). Grease an 8×8 inch square baking pan or an 8-inch round cake pan and line it with parchment paper. This cake is sticky, so parchment is your best friend.
- Beat Yolks: In a large bowl, beat the 4 egg yolks and granulated sugar together until they are pale yellow and creamy. This usually takes about 2-3 minutes with an electric mixer.
- Add Fats: Add the melted (cooled) butter and vanilla extract. Beat for another minute until incorporated.
- Add Flour: Mix in the flour until evenly combined. The mixture will be thick and sticky at this point.
- Add Milk: Slowly pour in the lukewarm milk while beating on low speed. The batter will become very thin and liquid. Set this bowl aside.
Phase 2: The Egg Whites
- Whip Whites: In a separate, impeccably clean bowl, whip the 4 egg whites until stiff peaks form. When you lift the beater, the whites should stand straight up without drooping.
- The Fold: This is the most critical step. Add the egg whites to the liquid batter in three batches. Gently fold them in using a spatula or a whisk.
Crucial Tip: Do not overmix. You want to leave small lumps of egg white floating on top of the batter. These lumps are what rise to become the sponge layer. If you mix until smooth, you will lose the top layer.
Phase 3: The Slow Bake
- Pour: Pour the batter into the prepared pan. It will look lumpy and messy—that is perfect.
- Bake: Bake for 45 to 60 minutes. The time depends heavily on your oven and pan material.
- The Jiggle Test: Check the cake at 45 minutes. Gently shake the pan. The cake should be golden on top and firm around the edges, but the center should still have a distinct “jiggle” or wobble, similar to gelatin. If it is completely solid, the custard layer is overcooked.
- Cool: Remove from the oven and let it cool completely in the pan. Once cool, refrigerate for at least 3 hours. This cake needs to set cold to slice cleanly.
- Serve: Dust generously with powdered sugar before cutting into squares or wedges.
Troubleshooting Common Issues
My cake didn’t have layers!
This usually happens for one of two reasons: either the egg whites were overmixed into the batter (destroying the sponge layer), or the oven temperature was too high (cooking the cake too fast before separation could occur).
The bottom is rubbery.
This can happen if the flour wasn’t mixed into the yolks well enough before adding the milk, or if the cake was baked at too high of a temperature.
The cake collapsed.
The sponge layer will naturally deflate slightly as it cools—that is normal. However, a major collapse usually means the egg whites weren’t whipped to stiff peaks to begin with.
Variations to Try
Once you master the vanilla version, the magic continues with these flavors:
- Chocolate Magic Cake: Replace 1/4 cup of the flour with high-quality cocoa powder.
- Lemon Magic Cake: Add 1 tablespoon of lemon zest to the yolk mixture and swap the vanilla for lemon extract.
- Coffee Cardamom: Infuse the milk with crushed cardamom pods and add a shot of espresso to the batter.
Storage
This cake is essentially a custard, so it must be kept cold.
- Refrigerator: Store leftovers in an airtight container in the fridge for up to 3 days. The texture actually improves after 24 hours.
- Freezer: Freezing is not recommended for this cake, as the custard layer can separate and become watery upon thawing.
The Vanilla Magic Custard Cake is a testament to the wonders of baking science. It is light, creamy, and rich all at once—a perfect dessert for when you want to impress without the stress.
Vanilla Magic Custard Cake
Ingredients
Equipment
Method
- Preheat oven to 325°F (160°C). Grease an 8×8 inch baking pan and line with parchment paper.
- Separate the eggs. In a large bowl, beat the egg yolks and sugar until pale yellow and creamy.
- Add the melted butter and vanilla extract to the yolks, beating until combined.
- Mix in the flour until evenly incorporated.
- Slowly pour in the lukewarm milk and water while beating on low speed until smooth.
- In a separate clean bowl, whip the egg whites until stiff peaks form.
- Gently fold the egg whites into the batter in three batches. Do not overmix; leave some white lumps floating.
- Pour the batter into the prepared pan. Bake for 45-60 minutes, until the top is golden and the center jiggles slightly when shaken.
- Cool completely in the pan, then refrigerate for at least 3 hours before dusting with powdered sugar and slicing.