Salted Fudgy Brownie Cookies
The Ultimate Salted Fudgy Brownie Cookies
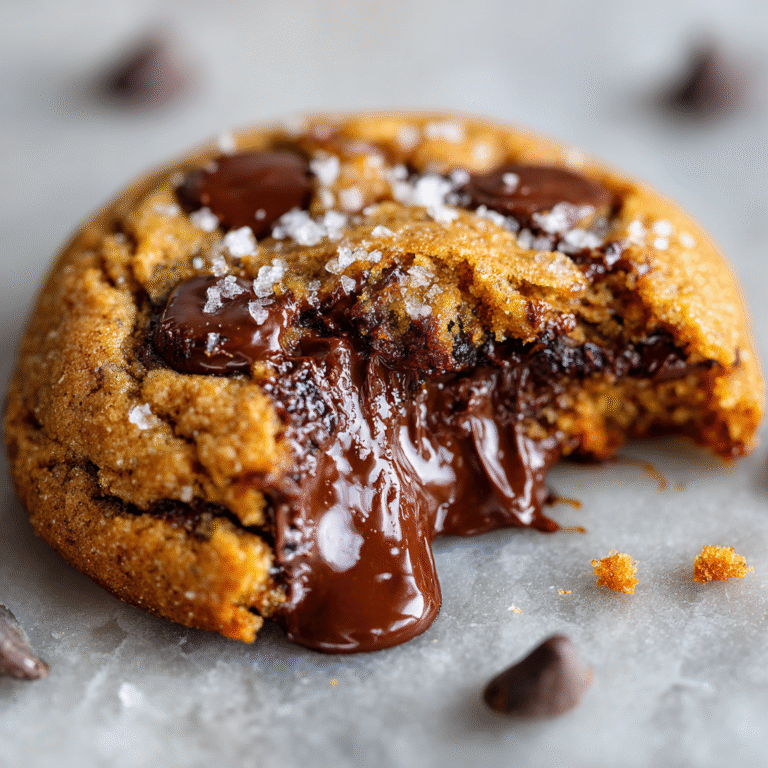
Imagine the best corner piece of a brownie—chewy, fudgy, and rich—transformed into a portable, perfectly portioned cookie. That is exactly what these Salted Brownie Cookies are. With their signature crinkly, paper-thin tops and decadently soft, truffle-like interiors, these cookies are a chocolate lover’s dream come true. The finishing touch? A generous sprinkle of flaky sea salt that cuts through the richness and elevates the flavor to gourmet status.
There is a reason this specific type of cookie has taken the baking world by storm. It satisfies two cravings at once: the need for a classic cookie crunch and the desire for a dense, melting-chocolate brownie experience. They are messy, they are indulgent, and they are unapologetically rich. Whether you are baking for a holiday exchange, a birthday treat, or just a Tuesday night chocolate emergency, this recipe delivers restaurant-quality results in under an hour.
Why You Will Love This Recipe
It is rare to find a recipe that yields such professional-looking results with such standard pantry ingredients. Here is why this recipe deserves a permanent spot in your cookbook:
- The Texture Contrast: The magic lies in the contrast between the shiny, crisp outer shell and the wet, dense, fudgy center. It is a sensory experience that standard chocolate chip cookies just can’t match.
- Chocolate Overload: We use both melted chocolate and cocoa powder, plus chocolate chips. This “triple chocolate” threat ensures a deep, complex flavor profile.
- No Chill Time: Unlike many cookie recipes that require hours in the fridge, this batter is best baked immediately while warm to achieve that glossy top.
- Pantry Staples: If you bake occasionally, you likely already have everything you need: butter, sugar, flour, eggs, and chocolate.
The Science of the “Crinkle Top”
The hallmark of a perfect brownie cookie is that shiny, crackly skin that shatters when you bite into it. Achieving this isn’t luck; it’s chemistry. The glossy crust forms when dissolved sugar and egg whites rise to the surface of the batter as it bakes. As the cookie puffs up and spreads, this sugar-egg film dries out and cracks, creating those beautiful fissures.
To ensure you get this effect every time, this recipe emphasizes whipping the eggs and sugar together until they are pale and thick. This process, often called the “ribbon stage,” ensures the sugar is fully dissolved and incorporated into the protein structure of the egg, which is crucial for that meringue-like crust.
Ingredients Notes
Because this recipe relies heavily on chocolate, the quality of your ingredients matters more than usual. Here is a breakdown of what you need:
Salted Brownie Cookies
Ingredients
Equipment
Method
- Preheat oven to 350°F (175°C). Line two baking sheets with parchment paper.
- Melt butter and chopped dark chocolate together in a microwave-safe bowl or double boiler until smooth. Set aside to cool slightly.
- In a large bowl, beat eggs, granulated sugar, and brown sugar on high speed for 5 minutes until pale and thick.
- Fold the melted chocolate mixture and vanilla extract into the egg mixture.
- Sift in flour, cocoa powder, baking powder, and fine salt. Gently fold until just combined.
- Stir in chocolate chips. Let batter sit for 5 minutes to thicken.
- Scoop batter onto baking sheets, spacing 2 inches apart.
- Bake for 10-12 minutes until tops are shiny and cracked. Sprinkle immediately with flaky sea salt.
Notes
- Dark Chocolate: – Use a high-quality chocolate bar (60% to 70% cocoa) chopped up, or high-quality chocolate feves. Avoid using standard chocolate chips for the melting step if possible, as they contain stabilizers that prevent them from melting smoothly.
- Butter: – Unsalted butter is preferred so you can control the salt level. It will be melted with the chocolate, so it doesn’t need to be at room temperature initially.
- Sugar: – We use a combination of granulated white sugar and light brown sugar. The white sugar helps create the shiny crust, while the molasses in the brown sugar adds moisture and chewiness.
- Eggs: – Room temperature eggs whip up better than cold ones. If you forgot to take them out, place them in a bowl of warm water for 5 minutes.
- Cocoa Powder: – Dutch-processed cocoa powder is recommended for a darker color and smoother, less acidic flavor. However, natural cocoa powder works too.
- All-Purpose Flour: – Measure this carefully. Too much flour will turn these from fudgy brownies into dry cakes. Use the spoon-and-level method.
- Sea Salt Flakes: – Maldon salt or any flaky finishing salt is essential. Do not use table salt for the topping; it is too harsh and salty.
Step-by-Step Instructions
Step 1: Melt the Chocolate and Butter
Start by chopping your dark chocolate bar into small, even pieces. Place the chocolate and the cubed butter into a heatproof bowl. You can melt this in the microwave in 30-second bursts, stirring in between, or over a double boiler on the stove. The goal is a smooth, glossy liquid. Set this aside to cool slightly—you don’t want it to scramble the eggs later!

Step 2: Whip the Eggs and Sugar
In a large mixing bowl (or stand mixer), combine the eggs, granulated sugar, and brown sugar. Beat on medium-high speed for exactly 5 minutes. This seems long, but do not shortcut this step! The mixture should become pale yellow, double in volume, and fall off the whisk in thick ribbons. Whisk in the vanilla extract.
Step 3: Combine Wet Ingredients
Pour the slightly cooled chocolate-butter mixture into the whipped egg mixture. Use a spatula to fold them together gently but thoroughly. You want to keep as much of that air you just whipped in as possible.
Step 4: Add Dry Ingredients
In a separate small bowl, whisk together the flour, cocoa powder, baking powder, and fine salt. Sift this mixture over the wet ingredients. Sifting is crucial here to remove any hard lumps of cocoa powder. Fold the dry ingredients in gently until just a few streaks of flour remain.
Step 5: Fold in Mix-ins
Add your semi-sweet chocolate chips (or chunks). Fold until just combined and no flour streaks are visible. The batter will be thin and loose compared to normal cookie dough—more like a thick cake batter. Let it sit for 5-10 minutes; it will firm up slightly as the chocolate cools.
Step 6: Scoop and Bake
Preheat your oven to 350°F (175°C). Line two baking sheets with parchment paper. Use a medium cookie scoop (about 1.5 to 2 tablespoons) to drop mounds of batter onto the sheets, spacing them at least 2 inches apart as they will spread.
Tip: For perfectly round cookies, let the batter sit on the sheet for 1 minute before putting it in the oven.
Step 7: The Baking Process
Bake for 10-12 minutes. The edges should look set, and the tops should be glossy and crackled. The centers will still look slightly underbaked—that is okay! They will firm up as they cool. If you overbake them, you lose the fudge factor.
Step 8: The Finishing Touch
Immediately upon removing the pan from the oven, sprinkle the flaky sea salt over the wet chocolate tops. Let the cookies cool on the baking sheet for at least 15 minutes. They are very fragile when hot and will break if you try to move them too soon.
Expert Tips for Success
The “Pan Bang” Method: If your cookies aren’t crinkling or spreading enough, open the oven door halfway through baking, lift the pan up a few inches, and drop it onto the rack. This collapses the center and forces the edges to ripple out.
Chocolate Choice: Since chocolate is the main flavor, use a brand you enjoy eating plain. Brands like Ghirardelli, Guittard, or Lindt are excellent choices for baking.
Don’t Overmix: Once the flour is added, mix only until combined. Overmixing develops gluten, which can make the cookies tough instead of tender.
Shiny Top Hack: If your oven is humid or the weather is rainy, the crinkle top might be harder to achieve. Ensure your sugar is fully beaten into the eggs, as this structure is what creates the shell.
Variations to Try
Espresso Brownie Cookies: Add 1 teaspoon of instant espresso powder to the melting chocolate. Coffee intensifies the chocolate flavor without making the cookies taste like coffee.
Nutty Brownie Cookies: Fold in ½ cup of toasted chopped walnuts or pecans along with the chocolate chips for added crunch.
Peanut Butter Swirl: Drop a small dollop of peanut butter on top of each scoop of batter before baking and swirl it gently with a toothpick.
White Chocolate & Cranberry: Swap the semi-sweet chips for white chocolate chips and dried cranberries for a festive holiday version.
Storage and Freezing
Room Temperature: Store these cookies in an airtight container at room temperature for up to 4 days. If you stack them, place a piece of parchment paper between layers to prevent them from sticking or ruining the shiny tops.
Freezing: You can freeze the baked cookies for up to 3 months. Thaw them at room temperature before eating. Note that the shiny crust may lose some of its crispness after freezing and thawing.
Freezing Dough: Unlike standard cookies, this batter does not freeze well in raw form due to the specific way the eggs and chocolate set. It is best to bake the whole batch and freeze the finished cookies.
Serving Suggestions
These cookies are rich enough to stand on their own, but they are absolutely transformative when served warm with a scoop of vanilla bean ice cream. You can also sandwich two of them around a layer of peppermint buttercream for a decadent whoopie pie.
For a cozy night in, pair a warm Salted Brownie Cookie with a tall glass of cold milk or a hot cup of black coffee. The bitterness of the coffee perfectly balances the sweetness of the chocolate.
Enjoy the process of making these. There is something deeply satisfying about watching the batter transform into glossy, crackled masterpieces in the oven. Happy Baking!