Cheesecake Stuffed Chocolate Chip Cookies
Cheesecake Stuffed Chocolate Chip Cookies: The Ultimate Indulgence
In the world of baking, there are cookies, and then there are experiences. A standard chocolate chip cookie is a comforting classic, a reliable friend that never lets you down. But sometimes, you want more than just reliable. You want drama. You want decadence. You want a dessert that stops conversation and elicits an involuntary gasp from everyone at the table. Enter the Cheesecake Stuffed Chocolate Chip Cookie.
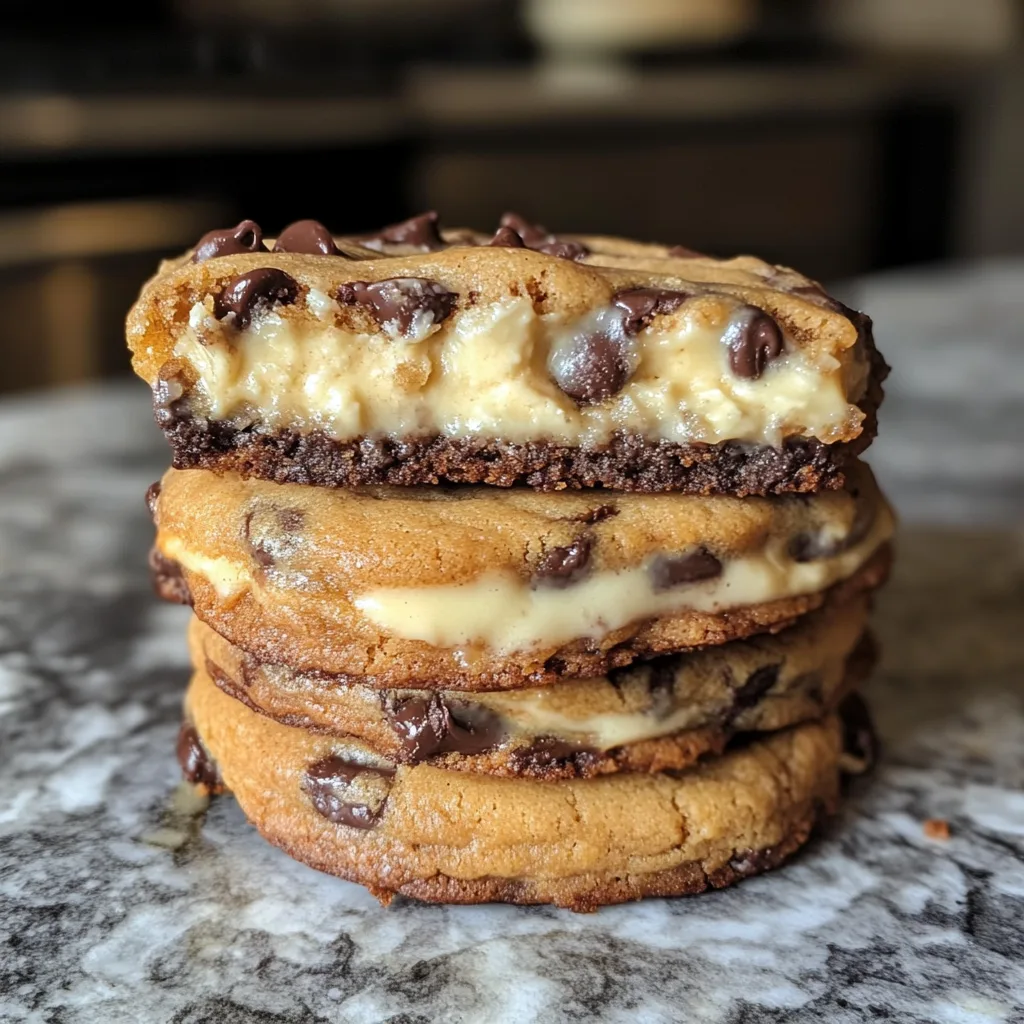
Take a moment to look at the image above. This isn’t just a cookie; it is a feat of structural engineering and culinary magic. On the outside, you have the golden, crispy edges of a bakery-style chocolate chip cookie, studded with melting pools of semi-sweet chocolate. But the real secret lies within. One bite reveals a hidden core of tangy, sweet, velvety cheesecake filling that contrasts perfectly with the rich, buttery dough.
This recipe is the answer to the indecisive dessert lover’s dilemma: “Do I want a cookie or a slice of cheesecake?” Why choose? By combining these two titans of the dessert world, you create a treat that offers the best of both textures—crunchy, chewy, and impossibly creamy. In this deep dive, we are going to explore the science of stuffing cookies, the secret to keeping the filling inside (and not on your baking sheet), and how to achieve that perfect, thick stack seen in the photo.
The Anatomy of a Stuffed Cookie
Stuffed cookies have taken the internet and artisanal bakeries by storm, and for good reason. They offer a surprise element that elevates a simple treat into a gourmet gift. However, they can be intimidating to make. Many home bakers worry about the filling leaking out or the dough spreading too thin.
The success of this recipe relies on two distinct components that must be prepared with care: the Cheesecake Disc and the Structure Dough.
1. The Cheesecake Core
The filling isn’t just plain cream cheese; that would be too savory. It is a sweetened, vanilla-infused mixture that mimics a New York-style cheesecake batter. The trick—and this is non-negotiable—is temperature. The filling must be frozen solid before it ever touches the cookie dough. This ensures that it melts at the exact same rate as the cookie bakes, remaining contained within the center rather than dissolving into the dough.
2. The Structure Dough
You cannot use a thin, crispy cookie recipe for this. You need a dough with structural integrity—something that can hold its shape around the heavy filling. This recipe uses a higher ratio of brown sugar to white sugar, which increases moisture and chewiness, and a bit of cornstarch to keep the dough soft and thick. The result is a cookie that acts as a sturdy, delicious vessel for the molten center.
Ingredients
To achieve the result in the picture, quality matters. Use full-fat ingredients for the best texture and flavor.
Cheesecake Stuffed Chocolate Chip Cookies
Ingredients
Equipment
Method
- Mix cream cheese, powdered sugar, and 1 tsp vanilla until smooth. Drop 12 tablespoons onto a parchment-lined sheet and freeze for 1 hour.
- Preheat oven to 350°F (175°C) and line baking sheets with parchment paper.
- Cream butter, brown sugar, and granulated sugar until fluffy (3-4 mins). Beat in eggs one at a time, then vanilla.
- Whisk flour, cornstarch, baking soda, and salt. Gradually add to wet ingredients. Fold in chocolate chips.
- Take a scoop of dough, flatten it, place a frozen cheese dollop in the center, and cover with more dough. Seal edges completely.
- Roll into balls. Place on baking sheet and bake for 11-13 minutes until edges are golden.
- Let cool on the pan for 15 minutes to set the filling before moving to a wire rack.
Notes
For the Cheesecake Filling:
- – 8 oz (225g) full-fat cream cheese, softened to room temperature
- – 0.33 cup powdered sugar (confectioners’ sugar)
- – 1 teaspoon pure vanilla extract
For the Cookie Dough:
- – 1 cup (2 sticks) unsalted butter, softened but still cool
- – 1 cup light brown sugar, packed
- – 0.5 cup granulated white sugar
- – 2 large eggs, room temperature
- – 1 tablespoon pure vanilla extract
- – 3 cups all-purpose flour
- – 1 teaspoon cornstarch
- – 1 teaspoon baking soda
- – 0.5 teaspoon salt
- – 2 cups semi-sweet chocolate chips (or chunks for a rustic look)
Instructions
This recipe requires a bit of patience due to the freezing steps, but the result is absolutely worth the wait.
- Prepare the Filling (Do this first!): In a medium bowl, beat the softened cream cheese, powdered sugar, and 1 teaspoon of vanilla extract until smooth and creamy. Line a baking sheet or plate with parchment paper. Scoop out 12 dollops of the mixture (about 1 tablespoon each) onto the parchment. Place this in the freezer for at least 1 hour, or until the dollops are rock hard.
- Cream Butter and Sugars: In a large bowl or stand mixer fitted with the paddle attachment, beat the butter, brown sugar, and white sugar together on medium-high speed for 3-4 minutes. You want the mixture to be pale and fluffy. This aeration is crucial for a thick cookie.
- Add Wet Ingredients: Add the eggs one at a time, mixing well after each addition. Scrape down the sides of the bowl. Stir in the vanilla extract.
- Mix Dry Ingredients: In a separate bowl, whisk together the flour, cornstarch, baking soda, and salt.
- Combine: Gradually add the dry ingredients to the wet ingredients, mixing on low speed just until streaks of flour disappear. Do not overmix, or your cookies will be tough. Fold in the chocolate chips by hand.
- Assembly (The Stuffing Step): Remove your frozen cheesecake dollops from the freezer. Take a large scoop of cookie dough (about 2-3 tablespoons) and flatten it into a pancake in your palm. Place a frozen cheesecake dollop in the center. Top with another smaller scoop of dough.
- Seal the Cookies: Gently pinch the edges of the dough together to completely seal the cream cheese inside. Roll it quickly between your hands to smooth it out into a large ball. It is vital that no cream cheese is exposed, or it will leak during baking.
- Chill Again: Place the formed dough balls back on a baking sheet and refrigerate for at least 30 minutes (or freeze for 15). Chilling the dough ensures the butter solidifies, preventing the cookies from spreading too flat in the oven.
- Preheat and Bake: Preheat your oven to 350°F (175°C). Line a large baking sheet with parchment paper. Arrange the chilled dough balls 2-3 inches apart (bake 4-6 at a time as they are large). Bake for 11-13 minutes. The edges should be golden brown, but the centers will still look pale and soft.
- Cooling is Key: Remove from the oven. The cookies will be very soft and fragile because of the molten filling. Let them cool on the baking sheet for at least 10–15 minutes to set. Transfer to a wire rack to cool completely.
The Science of the Bake: Why Use Cornstarch?
You might notice an unusual ingredient in the list: cornstarch. In cookie baking, cornstarch is a secret weapon. It softens the proteins in the flour, resulting in a crumb that is tender rather than bready. It also helps the dough hold its structure. When you are stuffing a cookie, you are essentially creating a heavy cargo for the dough to carry. The cornstarch helps the dough “lift” rather than “spread,” ensuring your filling stays suspended in the middle rather than sinking to the bottom.
Troubleshooting Common Issues
Even with the best recipes, things can go sideways. Here is how to avoid common pitfalls:
My Filling Leaked Out
This usually happens for two reasons: either the dough wasn’t sealed tightly enough, or the filling wasn’t frozen solid. Ensure you are pinching those seams tight! If you see a leak while they are baking, you can sometimes use a spoon to gently push the spreading edge back toward the cookie while it is still hot.
The Cookies are Too Flat
This is a temperature issue. If your butter was too warm when you started, or if you didn’t chill the dough balls before baking, the fat will melt before the structure sets. Always chill your dough.
The Bottoms are Burnt
These are large, heavy cookies that take longer to bake than standard ones. If your oven runs hot, the bottoms might darken before the middle is done. To prevent this, use a light-colored aluminum baking sheet (dark pans absorb more heat) and bake on the middle rack.
Variations on the Classic
Once you master the technique of stuffing cookies, the possibilities are endless. Here are a few variations to try using the same base dough:
- Red Velvet Cheesecake: Add 2 tablespoons of cocoa powder and red food coloring to the dough for a classic red velvet look.
- Oreo Stuffed: Crush Oreos into the cream cheese filling before freezing it for a “Cookies and Cream” inside a cookie.
- Nutella Core: Instead of cream cheese, freeze dollops of pure Nutella.
- Salted Caramel: Add a teaspoon of salted caramel sauce into the center along with the cream cheese.
Storage and Freezing
Because these cookies contain cream cheese, they should be treated differently than standard cookies.
Room Temperature: They are safe on the counter for about 24 hours if stored in an airtight container.
Refrigerator: For longer storage (up to 5 days), keep them in the fridge. Actually, many people prefer them chilled, as the center becomes like a firm, cold cheesecake bite.
Freezer: You can freeze the baked cookies for up to 2 months. Thaw them in the fridge overnight or microwave for 15 seconds to revive that gooey center.
Conclusion
The Cheesecake Stuffed Chocolate Chip Cookie is more than just a sugar rush; it is a testament to the joy of baking. It takes humble ingredients—flour, sugar, butter, and cheese—and transforms them into something spectacular. It’s the kind of treat that makes people ask, “How did you do that?”
Whether you are baking for a bake sale, a holiday party, or just a Tuesday night when you need a little extra comfort, these cookies deliver. They are messy, they are indulgent, and they are absolutely unforgettable. So clear some space in your freezer, soften that butter, and get ready to bake the best cookie of your life.