Crystal-Clear Edible Flower Agar Agar Jellies
There are few desserts that capture the beauty of the natural world quite like Edible Flower Agar Agar Jellies. These are not merely treats; they are intricate, miniature ecosystems, preserving the delicate grace of a fresh blossom within a flawless, glass-like dome. If you are looking for a dessert that is visually stunning, sophisticated, and surprisingly simple to create, this recipe is for you. Mastering these jellies means you can capture the essence of spring or summer in every single bite.
What makes these floral jellies so remarkable? It is the intersection of artistry and culinary science. We use high-quality agar agar—a plant-based, seaweed-derived gelling agent—to achieve a crystal-clear transparency that traditional gelatin can only dream of. When you set this matrix around vibrant, carefully selected edible flowers, you create a dynamic visual experience. The jellies become small, glistening lenses, magnifying the natural details of the blossoms within. We have seen these botanical treats elevate everything from elegant tea parties to whimsical wedding receptions, and even sophisticated cocktail garnishes. This is a recipe that will impress your guests, keeping your treats healthy, vegan, easy, and undeniably beautiful.
Creating perfect floral agar jellies requires a little technique, but once you know the rules, it is surprisingly simple. We will guide you through the process of choosing the right gelling agent, selecting the safest and most vibrant edible flowers, mastering the art of the flawless matrix, and designing the perfect suspended arrangement. This is a recipe that will not only change the way you see dessert but also how you see the flowers in your garden.
What is Agar Agar and Why Use It?
For this botanical recipe, we deliberately substitute traditional animal-derived gelatin for agar agar (sometimes listed simply as “agar”). Agar agar is a polysaccharide derived from the cell walls of certain species of red algae. This gelling agent is highly prized in molecular gastronomy and vegetarian cuisine for its unique properties, most notably its incredible clarity and strength.
Why choose agar agar over traditional gelatin for this recipe? First, and most crucially, is the transparency. Gelatin often sets with a slight yellowish tinge, which can dull the colors of your embedded flowers. High-quality agar, especially when refined, sets into a flawless, water-white matrix, acting like a true magnifying lens. Second, agar sets much faster and more firmly than gelatin, often achieving solidity at room temperature. This is essential for preventing your delicate flowers from wilting before the jelly can set. Finally, agar agar has a clean, neutral flavor profile, allowing the delicate sweetness of the elderflower liqueur and the subtle floral notes of the blossoms to truly shine without any interference.
Selecting the Perfect Edible Flowers
Ensuring Safety First
The most important rule of this entire botanical treats recipe: you must know that your flowers are safe for consumption. This means only using flowers that have been grown specifically for eating, labelled “edible” and “organic,” or sourced from a reliable culinary supplier. **Do not ever use flowers from a standard florist, nursery, or side-of-the-road garden**, as they are frequently treated with pesticides, herbicides, and preservatives that are toxic to consume.
Vibrant Varieties for Visual Impact
While safety is paramount, you also want to choose flowers that will look spectacular once preserved in the matrix. Some of the best candidates for Edible Flower Agar Agar Jellies include:
- Violas and Pansies: These classic edible flowers are small, flat, and often come in vibrant, multi-colored combinations, making them ideal for the top layer of the jelly dome.
- Marigolds: Look for smaller varieties (like French marigolds or Signet marigolds). Their intense orange, yellow, and deep red hues provide a dynamic, sun-drenched appearance.
- Nasturtiums: Both the leaves and flowers are edible, offering striking orange, red, and yellow colors with a slightly peppery flavor.
- Cornflowers: Known for their unique, intense blue color, which is exceptionally rare in the culinary world.
- Roses: Small rosebuds or individual petals add classic elegance. Ensure they are a fragrant variety.
Designing Your suspended arrangement
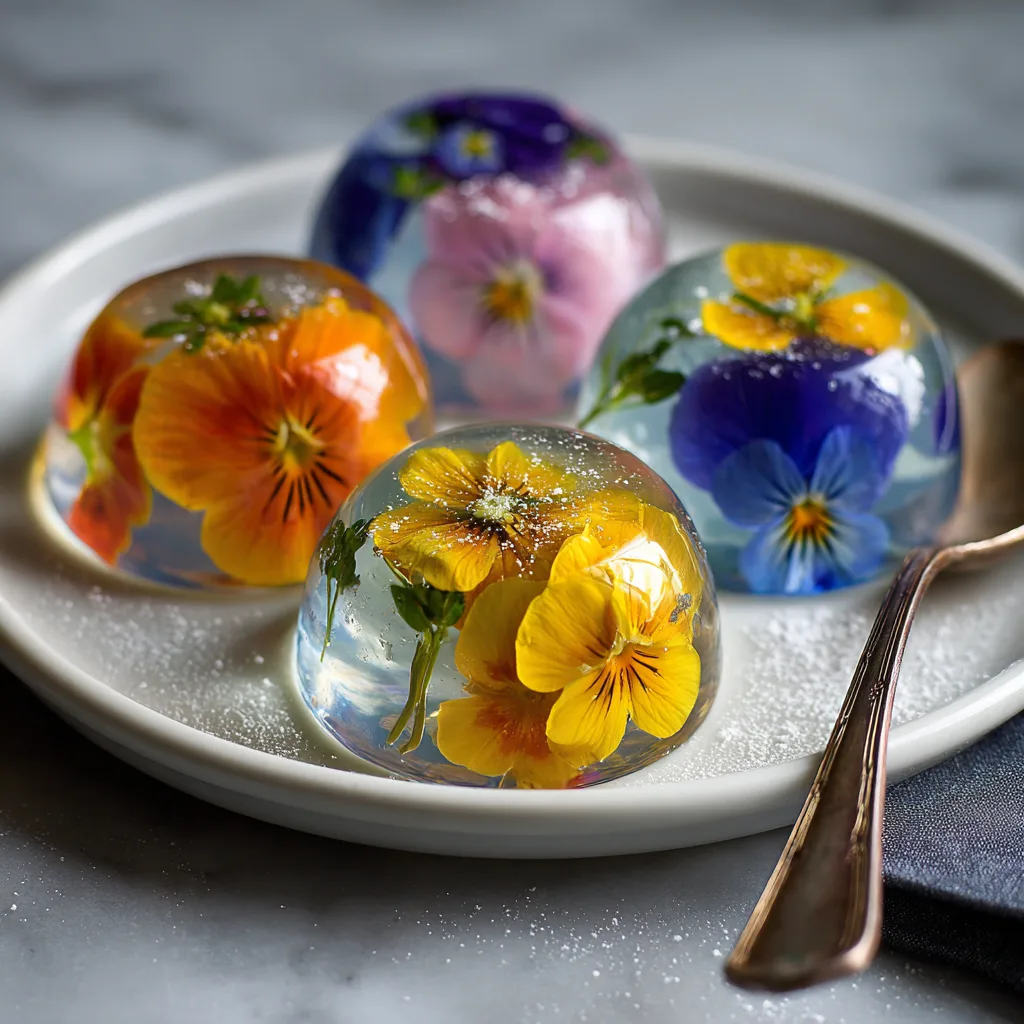
To break the monotony, consider the size and shape of your flowers relative to your molds. Small flowers can be placed whole, while larger flowers like marigolds can be gently taken apart to use individual, dynamic petals. We often stack our arrangements: a prominent pansy or viola at the top of the dome, with smaller petals or complementary delicate herbs (like thyme or mint) suspended beneath it, as captured in our hero image. This layering adds significant visual depth and complexity.
Detailed, Step-by-Step Agar Jellies Recipe
Ingredients
- – 3 teaspoons refined agar agar powder (ensure it is the refined, clear grade)
- – 3 cups distilled water (for maximum clarity)
- – 1/2 cup granulated white sugar (adjust to taste; substitute with a clear sweetener like rice syrup if needed)
- – 1 tablespoon elderflower liqueur (optional, for floral depth)
- – 1 teaspoon fresh lemon juice
- – A vibrant assortment of organic, culinary-grade edible flowers (e.g., pansies, violas, marigolds, nasturtiums, rosebuds)
- – Optional: Small delicate herbs (mint leaves, thyme sprigs)
Instructions
- Prepare and Sanitize the Molds: Wash and sanitize your silicone jelly molds (we recommend small sphere or dome shapes for best clarity and light dispersion). Ensure they are completely dry. Lightly oiling the molds is *not* recommended as it can cause cloudiness. For maximum clarity, place the molds on a tray and chill them in the refrigerator while preparing the agar matrix.
- Prepare the Flowers: Gently rinse your edible flowers in a bowl of cold water, ensuring all debris is removed. Pat them *completely* dry on paper towels. Wilting flowers do not set well, so keep them fresh. Design your arrangement mentally, separating flowers and petals for dynamic layering.
- Dissolve the Agar Matrix: In a small saucepan, whisk together the distilled water, sugar, refined agar agar powder, and elderflower liqueur (if using). Bring the mixture to a simmer over medium heat, stirring constantly with a clean spoon or spatula to ensure the agar powder dissolves fully. It is critical that it is fully dissolved.
- Clarify the Mix: Once simmering and clear, continue to cook for 1-2 minutes to fully activate the agar. Do not let it boil vigorously. Remove from heat and stir in the lemon juice for brightness. For the clearest possible results, pass the hot liquid through a fine-mesh sieve or a piece of cheesecloth into a clean bowl, filtering out any micro-bubbles or unresolved sugar. Let it cool for 2-3 minutes; it should still be hot but not scalding (around 120°F-130°F / 50°C-55°C).
- Assemble the Base Layer: Carefully pour a tiny amount (about 1/4 inch) of the hot agar mixture into the bottom of each prepared chilled mold. This creates a flawless clear base for the top of your dome. Place the molds in the refrigerator for 2-4 minutes, just long enough for this thin layer to set firmly.
- Layer the Arrangement and Suspended Elements: Once the base is set, take your first flower (e.g., a small pansy) and place it face down on the set base layer in the center of the mold. Gently press it into the set jelly. Re-heat the remaining agar mixture in the saucepan over low heat until it liquefies again (if it has set). Very carefully, use a spoon to add another 1/4 inch of agar mix over the first flower. This locks it in place.
- Continue to Stack and Set: Allow this second layer to set briefly (about 2 minutes). Then, carefully introduce your second round of elements: perhaps small marigold petals or tiny sprigs of thyme, arranging them around the first flower. We recommend designing to break the linear pattern of the flower petals. Layer with more agar mix, ensuring no air bubbles are trapped. Repeat this process, creating dynamic depth, until the molds are filled to the top. Keep re-liquefying the agar as needed.
- Final Set and Serve: Fill all molds completely to the top edge. Place the entire tray in the refrigerator for at least 1 hour, or until the jellies are completely set and firm to the touch. Once set, very gently peel the silicone mold away from the jellies, popping each botanical treat out from the base. Arrange them on a platter or in dynamic coupe glasses and serve cold. Garnish with a few fresh flowers.
Tips for Success and Troubleshooting
The biggest challenge with agar jellies is achieving crystal clarity and avoiding trapped bubbles or resolution issues. Here are our expert tips for guaranteed success.
Achieving Crystal Clarity
First, always use refined agar agar powder. Low-grade agar strips can be cloudy and often resolve poorly. Second, use distilled water to prevent any mineral deposits from creating cloudiness. Filtering your mixture through a fine-mesh sieve or cheesecloth after it is fully dissolved is a critical clarification step. Finally, do not incorporate air by whipping; stir gently.
Avoiding Air Bubbles
Pour the hot agar mixture very slowly, in a thin stream, over your flowers. Trapped air between the delicate petals and the matrix is the enemy. We sometimes use a clean toothpick to gently tease any hidden bubbles out before the layer sets. Make sure the matrix is sufficiently hot to fully surround the petals but not so hot that it boils and creates new bubbles.
The Art of Layering and Stacking
Do not try to set the entire jelly at once, or all the flowers will float to the top or cluster in a linear pattern. Using multiple thin layers is the only way to achieve true depth and suspended arrangement, as shown in our hero image. Be patient during the stacking process; the result is a dynamic, multi-dimensional visual experience that is well worth the time.
Correcting Texture and Melt
If your jellies are rubbery, you used too much agar. If they are too soft and won’t hold shape, you used too little, or your agar was low grade. Agar sets firmly at room temperature and *will not* melt in a warm room like gelatin will. However, it can release water (“syneresis”) if left uncovered for long periods. Serve them chilled for the best texture and visual appeal.
Creative Variations on Botanical Treats
This simple technique can be adapted to any number of flavor profiles and aesthetic styles. Once you have mastered the basic botanical recipe, try one of these other great ideas!
Rose & Hibiscus Floral Jellies
Modify the base liquid by infusing the water with hibiscus petals and rosebuds. Use a light pink agar matrix and layer in individual rose petals and delicate green mint leaves. The resulting jelly has a striking rosy hue and a sophisticated, fragrant flavor profile.
Citrus Botanical Jellies with Mint
Omit the elderflower. Instead, make the base liquid with fresh lemon juice, a touch of orange juice, and a few drops of mint extract. Layer in small violas, nasturtium petals, and tiny mint leaves. This variation is zesty, bright, and exceptionally refreshing.
Layered Milk & Flower Jellies (Panna Cotta Style)
Create a beautiful two-toned jelly. Make your clear flower jelly matrix as described. Once it is halfway full and set, prepare a separate, opaque milk-based agar mixture (like vegan panna cotta with coconut milk, sugar, and agar). Pour the milk agar over the set flower layer. This creates a stunning contrast and a creamy, complex dessert.
Botanical Cocktails and Garnishes
Instead of a standalone dessert, use your floral jellies as an exquisite garnish for sophisticated cocktails. A single viola jelly dome suspended in a gin and tonic or a coupe of champagne looks truly breathtaking. Simply prepare smaller jellies or even flower-filled agar spheres for this purpose.
Serving Suggestions for Floral Agar Agar Jellies
This dish is exceptionally versatile and visually impactful. We have seen it serve as a centerpiece, a dynamic component in a larger spread, and even a fancy appetizer. Here are some of our favorite ways to serve these botanical treats.
- Tea Party Centerpiece: Arrange the glistening jellies on a multi-tiered cake stand, flanked by small scones and finger sandwiches. The clear, elegant appearance provides a striking visual contrast to the other elements.
- Gourmet Garnish for Cocktails: As mentioned, a single nasturtium or rosebud jelly in a clear cocktail adds immense sophistication.
- Part of a Dessert Spread: Set the floral jellies next to macarons, vegan panna cotta, or delicate pastries. We often serve them in dynamic coupe glasses, which amplify their light-catching quality.
- Fancy Dessert Appetizer: Serve a single, perfectly formed jelly dome on a small, matching white ceramic saucer with a miniature silver dessert spoon, as seen in our hero shot.
Frequently Asked Questions (FAQ)
Can I make these floral jellies ahead of time?
You *must* make these jellies ahead of time! The setting process requires at least 1 hour in the refrigerator. We recommend making them 4-6 hours, or even a full day, in advance of your event. They can be stored in their silicone molds or popped out and kept in a sealed, airtight container in the refrigerator to prevent drying or absorbing other odors.
Do I have to use distilled water?
While you *can* use tap water, we highly recommend distilled water for this specific recipe. High mineral content in tap water can lead to cloudiness or micro-precipitates within the set matrix. Since the goal is crystal-clear transparency to showcase the delicate flowers, distilled water ensures a flawless result. Our hero image captures this essential water-like clarity.
Where can I find culinary-grade edible flowers?
You can find culinary-grade edible flowers at specialty food markets, high-end grocery stores (in the fresh herb section), and online from culinary suppliers. Many organic farmers and specialty growers will have them available, especially in spring and summer. Remember: only use flowers grown specifically for consumption.
Try This Recipe Today!
There is no reason to relegate flowers to the garden. This Edible Flower Agar Agar Jellies recipe is the ultimate low-effort, high-impact recipe that will change the way you see dessert forever. It is healthy, easy, vegan, and guaranteed to impress. Gather your ingredients, choose your vibrant blossoms, and discover the absolute magic of botanical agar jellies.
Crystal-Clear Edible Flower Agar Agar Jellies
Ingredients
Equipment
Method
- Prepare and Sanitize: Wash and sanitize silicone jelly molds. Ensure they are completely dry and chill them in the refrigerator.
- Prep Flowers: Gently rinse and pat edible flowers completely dry. WILTING FLOWERS DO NOT SET. Wilting flowers do not set, keep fresh.
- Dissolve Agar Matrix: Whisk distilled water, sugar, refined agar agar powder, and elderflower liqueur (if using) in a saucepan. Bring to a simmer over medium heat, stirring constantly until fully dissolved.
- Clarify: Clarify the mix. Simmer for 1-2 minutes to fully activate the agar. Remove from heat, add lemon juice, and filter through a sieve/cheesecloth for maximum clarity.
- Base Layer: Pour a 1/4 inch clear agar base into each chilled mold. Chill briefly (2-4 mins) to set firmly.
- Layer the Arrangement: Place a small flower face-down on the set base. Re-liquefy remaining agar if needed. Pour another 1/4 inch agar layer to lock it in place. Chill (2 mins).
- Continue Stacking: Design to break linear patterns of the flower petals. Layer more agar and suspended flowers (e.g., small marigold petals, thyme), creating depth. Repeat until molds are full.
- Final Set and Serve: Chill the filled molds for at least 1 hour until firm. Gently peel mold away and serve cold, garnished with fresh flowers.