Mini Tater Tot Cheeseburgers Recipe
When it comes to entertaining, finger foods reign supreme. Whether you are hosting a lively Super Bowl viewing party, a casual weekend get-together, a fun kids’ birthday celebration, or simply craving a creative twist on a classic comfort food, these Mini Tater Tot Cheeseburgers are guaranteed to steal the show. Combining the savory, juicy goodness of a classic cheeseburger with the irresistible, golden crunch of a tater tot, this appetizer is a masterclass in flavor and texture. It perfectly marries nostalgia with culinary creativity, resulting in a bite-sized treat that appeals to both the young and the young at heart.
Forget the heavy, filling slider buns that often overpower the meat and toppings. By swapping traditional bread for crispy baked tater tots—specifically the flat, round “crown” or “coin” style tots—you create a gluten-friendly, crunch-forward vessel that perfectly holds all your favorite burger fixings. In this comprehensive guide, we will walk you through everything you need to know to perfect these mini marvels, from selecting the best ingredients to mastering the assembly process so they look just as incredible as they taste.
Why You Will Absolutely Love This Recipe
There are countless reasons why these Mini Tater Tot Cheeseburgers deserve a permanent spot in your appetizer rotation. Here are just a few reasons why this recipe is an absolute game-changer:
- Incredible Texture Contrast: The satisfying crunch of the baked tater tot gives way to the tender, juicy beef patty and melted cheese, creating a mouthfeel that traditional bread buns simply cannot replicate.
- Perfectly Bite-Sized: They are genuinely a one-to-two bite affair, making them incredibly easy to eat while mingling, holding a drink, or watching the big game. No messy crumbs or falling-apart buns!
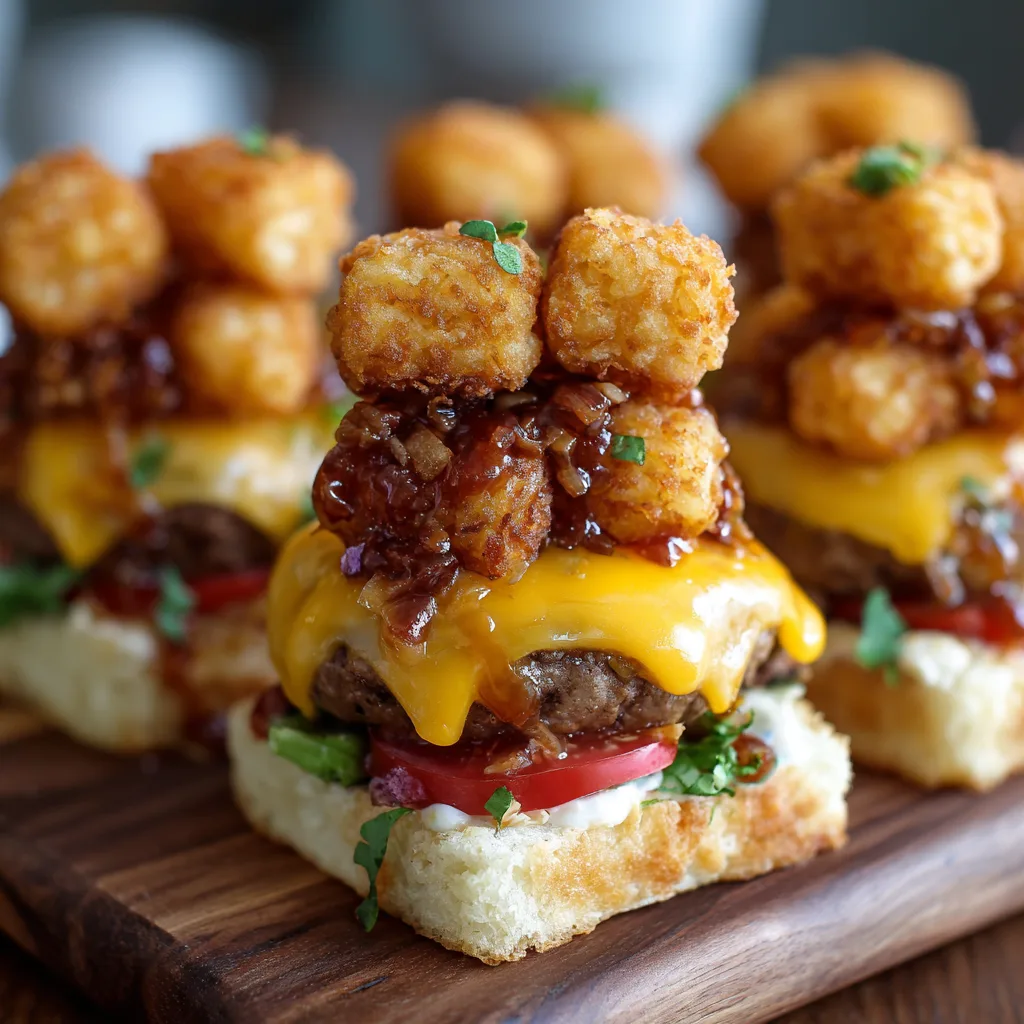
- Visually Stunning: Stacked high with vibrant colors—the bright red of a cherry tomato, the vivid green of fresh lettuce, the warm yellow of cheddar cheese, and the golden brown of the tots—these mini burgers look like a professional catering masterpiece on any platter.
- Highly Customizable: Just like a full-sized burger, these miniatures can be adapted to suit any palate. From the cheese selection to the tiny toppings, you can build a whole “mini burger bar” for your guests.
- Kid-Friendly and Adult-Approved: It is rare to find an appetizer that children will devour just as eagerly as culinary-minded adults. The familiar flavors make them accessible, while the clever presentation makes them gourmet.
The Anatomy of the Perfect Tater Tot Slider
Building a successful miniature burger requires attention to proportion. If the patty is too large, the tots will crumble under the weight. If the toppings are too thick, the burger will topple over. Let us break down the essential components that make these bites flawless.
1. The “Buns”: Finding the Right Tater Tots
Not all tater tots are created equal when it comes to acting as a structural foundation. Traditional cylindrical tater tots can work if you smash them slightly while baking, but for the absolute best results, look for “Tater Crowns,” “Crispy Coins,” or “Tater Rounds” in the freezer aisle. These are already shaped like flat little disks, making them the perfect miniature bun. They bake up incredibly crispy and provide a flat surface for the patty to rest on. If you want to elevate them further, consider tossing the frozen tots in a little garlic powder and paprika before baking.
2. The Meat: Crafting the Miniature Patties
For the patties, standard 80/20 ground beef is ideal. The 20% fat content ensures the tiny burgers stay juicy during their quick cooking time. Because they are so small, leaner meats like 90/10 beef or ground turkey can dry out quickly. You will want to form the meat into very small, thin patties—slightly wider than your tater tot, as the meat will shrink as it cooks. Seasoning is simple: a good pinch of kosher salt and freshly cracked black pepper is all you need to let the beefy flavor shine through.
3. The Cheese: Melting Magic
American cheese or mild cheddar are the classic choices here. Their excellent melting capabilities act as a “glue” to hold the burger together. You will want to cut standard cheese slices into small squares that perfectly match the diameter of your miniature patties. Placing the cheese on the patties during the final minute of cooking ensures a beautiful, cascading melt.
4. The Fresh Toppings
Toppings are where the visual appeal comes to life. You need miniature versions of classic burger toppings:
- Lettuce: Tear crisp iceberg or romaine lettuce into small, stamp-sized squares.
- Tomatoes: Sliced cherry or grape tomatoes are the exact right circumference for these sliders.
- Pickles: Cornichons (tiny French pickles) sliced into thin rounds, or standard dill pickle chips cut into quarters, provide the perfect acidic bite to cut through the richness of the beef and potato.
Detailed Ingredients List
Gathering the right ingredients is the first step to success. Here is exactly what you need to make about 24 Mini Tater Tot Cheeseburgers:
- 48 Tater Tot Crowns/Coins: (1 standard bag usually has plenty). These flat, round tots are essential for stability.
- 1 lb Ground Beef (80/20): The ideal ratio for juicy, flavorful mini patties.
- 1 tsp Kosher Salt: Essential for enhancing the beef.
- 1/2 tsp Black Pepper: Freshly ground for the best flavor.
- 1/2 tsp Garlic Powder: Optional, but adds a great savory depth to the meat.
- 4 Slices Cheddar or American Cheese: Cut into 6 small squares each (yielding 24 mini squares).
- 12 Cherry Tomatoes: Sliced in half horizontally.
- 1/2 cup Iceberg Lettuce: Torn into small, bite-sized squares.
- 3-4 Cornichons or Mini Dill Pickles: Thinly sliced into rounds.
- Mayonnaise and Ketchup: For serving and dipping.
- 24 Cocktail Toothpicks or Skewers: The structural support system that holds everything together.
Step-by-Step Instructions for Flawless Execution
Creating these bite-sized beauties is surprisingly straightforward. The key is in the prep work. Once all your components are ready, assembly is a breeze.
- Bake the Tater Tot “Buns”: Preheat your oven according to the instructions on the tater tot package (usually around 400°F or 425°F). Arrange the tater tot crowns in a single layer on a large baking sheet lined with parchment paper. Bake until they are deeply golden brown and incredibly crispy. You want them slightly crispier than you might normally eat them, as they need to hold up to the juicy burger. Remove from the oven and let them cool slightly so they firm up.
- Prepare the Toppings: While the tots are baking, prep your assembly station. Slice the cherry tomatoes, tear the lettuce, cut the cheese into small squares, and slice the pickles. Having all these items organized in small bowls (mise en place) will make the final step much faster and more enjoyable.
- Form the Mini Patties: Place the ground beef in a medium bowl. Add the salt, pepper, and garlic powder, gently mixing just until combined (do not overwork the meat, or it will become tough). Pinch off small, teaspoon-sized portions of the meat and roll them into small balls. Flatten the balls into very thin patties, slightly wider than your baked tater tots. You should get about 24 patties from one pound of beef.
- Cook the Burgers: Heat a large skillet (cast iron works beautifully) over medium-high heat. You can add a tiny drizzle of oil or cooking spray. Working in batches if necessary, place the mini patties in the hot skillet. Cook for about 1.5 to 2 minutes on the first side until a nice brown crust forms. Flip the patties.
- Melt the Cheese: Immediately after flipping, place a square of cheese on top of each patty. Cook for another 1 to 1.5 minutes until the meat is cooked through and the cheese is beautifully melted. Remove the patties from the skillet and let them rest on a paper towel-lined plate for just a minute to absorb any excess grease.
- The Grand Assembly: Now for the fun part! Lay out 24 baked tater tots on a serving platter or slate board to act as the bottom buns. Add a tiny dot of mayonnaise or ketchup if desired. Place a small piece of lettuce on the tot. Top with the cheesy mini beef patty. Add a slice of cherry tomato and a pickle round. Finally, top with a second baked tater tot.
- Secure and Serve: Carefully pierce the entire stack from top to bottom with a cocktail toothpick or skewer to hold everything securely in place. Serve immediately with extra ketchup, mustard, or mayonnaise on the side for dipping!
Pro Tips for the Ultimate Slider Experience
Want to guarantee that your appetizers are the talk of the party? Follow these professional tips to elevate your Mini Tater Tot Cheeseburgers from good to gourmet.
- The Thumbprint Trick: Even with tiny patties, the meat tends to puff up in the center during cooking. Use your pinky finger to make a tiny indentation in the center of each raw patty before cooking. This ensures they cook flat, making stacking much easier.
- Do Not Overcook the Meat: Because these patties are so small and thin, they cook incredibly fast. Do not walk away from the stove! Two minutes per side is usually the maximum time needed.
- Sauce Strategy: Rather than putting slippery ketchup and mustard inside the burger (which can cause the stack to slide apart), serve a variety of dipping sauces on the side. A “special sauce” made of mayo, ketchup, sweet relish, and a dash of vinegar is always a massive hit.
- Keep Them Warm: If you are serving a crowd and need to make these ahead of time, assemble everything except the fresh veggies. Keep the meat/cheese/tot stacks warm in a low oven (200°F). Right before serving, quickly add the cold, crisp toppings and skewer them.
Delicious Variations to Try
The beauty of the mini cheeseburger is its versatility. Once you master the base recipe, try creating a diverse platter with these fun flavor variations:
Bacon Bacon Bacon
Cook up some bacon until shatteringly crisp. Crumble the bacon into small pieces. When assembling, add a layer of bacon crumbles directly on top of the melted cheese before adding the tomato. For a smoky twist, use smoked gouda instead of cheddar.
The Spicy Jalapeño Popper Burger
Swap the cheddar for a small square of Pepper Jack cheese. Instead of standard pickles, use a slice of pickled jalapeño. Replace the mayo/ketchup dip with a side of cool ranch dressing to balance the heat. You can even mix a dash of cayenne pepper into the ground beef.
The Fancy Truffle Mushroom
For a more sophisticated crowd, skip the lettuce, tomato, and pickle. Instead, top the beef patty with a tiny slice of Swiss cheese and a spoonful of finely minced, sautéed cremini mushrooms. Serve with a side of truffle-infused mayonnaise for an incredibly decadent bite.
Vegetarian Friendly Options
Don’t leave out your plant-based friends! You can easily substitute the ground beef with your favorite plant-based ground meat alternative. Just remember to season it exactly as you would the beef. Because plant-based meats often lack fat, you might need a bit more oil in the pan to get a good crust.
How to Serve Your Mini Tater Tot Burgers
Presentation matters, especially when dealing with miniature foods. Serving these on a dark slate board or a rustic wooden cutting board provides a beautiful visual contrast to the golden tots and bright veggies. Scatter a few extra cherry tomatoes and cornichons around the board for a bountiful, inviting look.
For a fun, interactive party idea, consider setting up a “DIY Mini Burger Bar.” Keep the hot tater tots in a warming tray and the cooked patties in a slow cooker set to ‘warm’. Set out all the toppings, sauces, and toothpicks in cute little bowls, and let your guests build their own custom creations. This takes the pressure off you as the host and serves as a great conversation starter for guests.
Storage and Reheating Instructions
While these are undeniably best served fresh and hot, you might find yourself with leftovers (though we highly doubt it!).
To Store: Disassemble the burgers if possible, or at least remove the fresh toppings (lettuce, tomato, pickle), as they will become soggy in the fridge. Store the tater tots and the cooked patties in separate airtight containers in the refrigerator for up to 3 days.
To Reheat: To restore the crunch to the tater tots, place them in an air fryer at 350°F for 3-4 minutes, or in a 400°F oven for 5-7 minutes. You can warm the mini patties in the microwave for just 15-20 seconds, or throw them back into a hot skillet for a minute. Reassemble with fresh veggies and enjoy!
Frequently Asked Questions (FAQs)
Can I use regular tater tots if I can’t find the crowns/coins?
Yes, you absolutely can. Bake regular cylindrical tater tots according to package directions. About halfway through the baking time, use the back of a spatula or the bottom of a heavy glass to gently smash them flat. Return them to the oven to finish baking until completely crispy. They will have a slightly more rustic look but will taste just as delicious.
Can I prepare the patties in advance?
Yes! You can season and shape the raw ground beef patties up to 24 hours in advance. Place them on a parchment-lined tray, cover tightly with plastic wrap, and store them in the refrigerator until you are ready to cook. This is a great way to save time on the day of your party.
Are these gluten-free?
The recipe is naturally gluten-friendly because it uses potatoes instead of wheat buns. However, you must always check the specific brand of tater tots you are buying, as some brands dust their potatoes in wheat flour to enhance crispiness. Always verify your ingredient labels if cooking for someone with Celiac disease or a severe gluten intolerance.
Final Thoughts on This Fun Appetizer
These Mini Tater Tot Cheeseburgers are more than just a recipe; they are an experience. They bring a sense of whimsy and joy to any gathering, proving that sometimes the best things really do come in small packages. With their unbeatable crunch, savory flavor, and adorable presentation, they are destined to become your signature party dish. So preheat that oven, fire up the skillet, and get ready to watch these delightful little bites disappear faster than you can make them!
Mini Tater Tot Cheeseburgers
Ingredients
Equipment
Method
- Preheat your oven and bake the tater tot crowns on a parchment-lined baking sheet according to package directions until deeply golden and crispy. Let cool slightly.
- In a medium bowl, gently mix the ground beef with salt, pepper, and garlic powder. Form into 24 very small, thin patties, slightly wider than the tater tots.
- Heat a large skillet over medium-high heat. Cook the mini patties in batches for 1.5 to 2 minutes per side until browned and cooked through.
- Immediately after flipping the patties, place a small square of cheese on each to melt during the final minute of cooking.
- Assemble the burgers: Place one baked tater tot on the bottom, top with lettuce, the cheesy beef patty, a tomato slice, a pickle slice, and finish with a second tater tot on top.
- Secure the entire stack with a cocktail toothpick and serve immediately with ketchup and mayo for dipping.