No-Bake Chocolate Peanut Butter Oreo Dessert
When it comes to flavor combinations, few things in the culinary world are as universally adored as chocolate and peanut butter. It is a pairing that balances rich, slightly bitter cocoa with savory, salty, and sweet roasted nuts. Now, imagine taking that legendary combination and stacking it with the nostalgic crunch of classic chocolate sandwich cookies and clouds of fluffy whipped cream. Welcome to the ultimate Chocolate Peanut Butter Oreo Dessert—often lovingly referred to as a “dessert lasagna” or layered lush dessert. This masterpiece is a show-stopping, multi-layered marvel that requires zero baking time, making it the perfect addition to your recipe arsenal.
Whether you are preparing for a summer family barbecue, a neighborhood potluck, a holiday gathering, or simply a weekend treat to satisfy your most intense sweet tooth, this dessert checks every single box. In this comprehensive guide, we will explore the magic behind layered no-bake desserts, break down the anatomy of each delicious layer, provide foolproof step-by-step instructions, and share expert tips to ensure your dessert slices perfectly every single time.
The Magic of No-Bake Layered Desserts
There is a special kind of magic in no-bake desserts, particularly those assembled in a trusty 9×13 inch pan. Historically, “icebox cakes” and layered lush desserts gained massive popularity in the mid-20th century as refrigerators became household staples. They offered home cooks a way to create spectacular, cake-like desserts without ever turning on the oven—a massive relief during the sweltering summer months.
Today, the appeal remains just as strong. The beauty of this Chocolate Peanut Butter Oreo Dessert lies in its combination of textures. You have the dense, buttery crunch of the cookie crust, the dense and tangy sweetness of the peanut butter cream cheese layer, the silky smoothness of the chocolate pudding, and the ethereal lightness of the whipped topping. As the dessert chills in the refrigerator, these layers meld together just enough so that the cookies soften slightly, yet each flavor remains distinct and powerful.
Furthermore, this dessert is incredibly forgiving. Unlike a baked cake that can fall flat or a custard that can curdle, assembling a layered dessert is nearly foolproof. As long as you give it the proper time to chill and set, you are guaranteed a stunning, crowd-pleasing result.
Anatomy of the Ultimate Dessert: Breaking Down the Layers
To truly appreciate this dessert, we must look at it layer by layer. Each tier serves a specific purpose in building the ultimate flavor profile.
Layer 1: The Buttery Oreo Crust
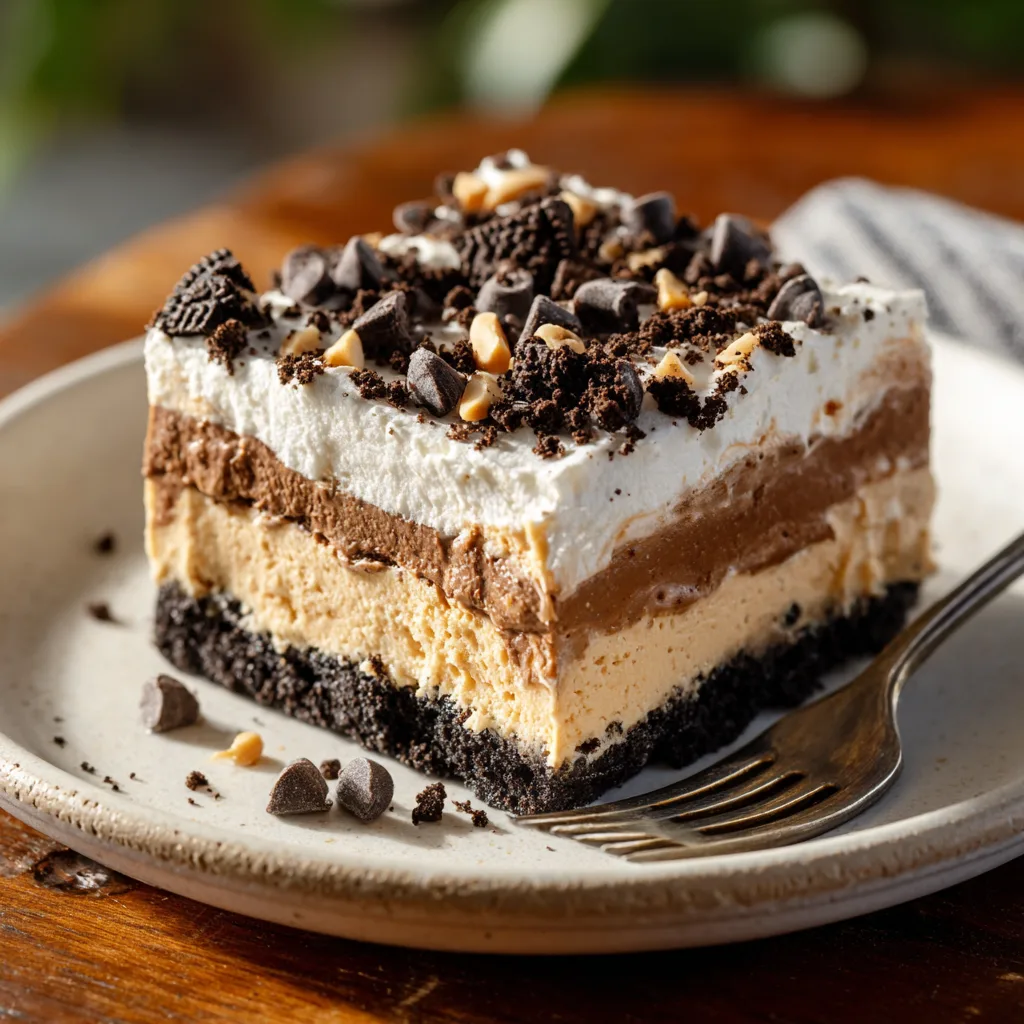
The foundation of our dessert is a classic cookie crumb crust. By crushing whole chocolate sandwich cookies (filling and all) and binding them with melted butter, we create a base that is firm enough to hold up the heavy layers above it, yet tender enough to easily cut through with a fork. The deep, dark cocoa flavor of the cookies provides the perfect contrast to the sweet layers to come.
Layer 2: The Fluffy Peanut Butter Cheesecake
This is where the magic really happens. We blend softened cream cheese with creamy peanut butter, powdered sugar, and a portion of whipped topping to lighten the mixture. The cream cheese adds a slight tang that prevents the dessert from being overwhelmingly sweet, while the peanut butter provides a rich, nutty depth. Folding in the whipped topping gives it a mousse-like texture that practically melts in your mouth.
Layer 3: The Middle Oreo Crunch
If you look closely at the ultimate slice, there is a secret weapon between the peanut butter and chocolate layers: an extra dusting of crushed Oreos. This thin layer not only provides a beautiful visual separation between the tan and brown layers, but it also introduces an unexpected textural crunch right in the middle of the soft, creamy fillings.
Layer 4: Rich Chocolate Pudding
For the chocolate component, we rely on instant chocolate pudding mix whisked with cold milk. As it sets, it transforms into a thick, cool, and silky layer that drapes over the peanut butter fluff. Using instant pudding keeps this recipe remarkably fast and easy while delivering that nostalgic, classic chocolate flavor we all crave.
Layer 5: Whipped Cream and Garnishes
The crowning glory is a thick layer of fluffy whipped topping. But we cannot stop there. To truly make it the “ultimate” dessert, we generously garnish the top with miniature chocolate chips, chopped roasted peanuts, and a few more crushed cookies. This hints at the flavors inside and gives the dessert a beautiful, finished look.
Ingredients You Will Need
Before you begin, gather these simple ingredients. Ensuring your cold ingredients (like cream cheese) are at the right temperature will make assembly a breeze.
- Chocolate Sandwich Cookies (Oreos): You will need one standard package (about 36 cookies). Regular stuffed cookies work best; avoid the “double stuffed” variety for the crust, as the extra cream can make the crust too greasy.
- Unsalted Butter: Melted, to bind the cookie crust together.
- Cream Cheese: One 8-ounce block. It is absolutely vital that this is softened to room temperature so it blends smoothly without lumps.
- Creamy Peanut Butter: Standard commercial creamy peanut butter (like Jif or Skippy) works best here. Natural peanut butters that require stirring can separate and make the filling oily.
- Powdered Sugar: To sweeten the peanut butter layer without adding grittiness.
- Whipped Topping (Cool Whip): You will need a large 16-ounce tub, thawed. We use this in the peanut butter layer and as the final top layer. You can substitute real whipped cream, but stabilized whipped topping holds its shape better for slicing.
- Instant Chocolate Pudding Mix: Two small boxes (3.9 oz each). Make sure it is instant, not the cook-and-serve variety.
- Cold Milk: Whole milk or 2% works best for setting the pudding firmly.
- Garnishes: Chocolate chips, chopped unsalted peanuts, and reserved cookie crumbs.
Step-by-Step Instructions
Follow these detailed instructions to construct your dessert lasagna. Patience is key when chilling!
- Prepare the Pan and Crust: Lightly spray a 9×13 inch glass baking dish with non-stick spray. Place the Oreo cookies into a food processor and pulse until they become fine crumbs. (Reserve about 1/2 cup of these crumbs for the middle layer and garnish). Pour the melted butter over the remaining crumbs and pulse until the mixture resembles wet sand. Press this mixture firmly and evenly into the bottom of your prepared dish. Place the pan in the refrigerator to firm up while you prepare the next layer.
- Mix the Peanut Butter Layer: In a large mixing bowl, use a hand mixer or stand mixer to beat the softened cream cheese until smooth and creamy. Add the peanut butter and powdered sugar, beating until completely combined and fluffy. Finally, use a rubber spatula to gently fold in half of the whipped topping (about 8 ounces) until no white streaks remain.
- Spread the Peanut Butter Layer: Remove the crust from the fridge. Carefully drop dollops of the peanut butter mixture over the crust, then use an offset spatula to spread it into an even layer.
- Add the Middle Crunch: Take about 1/4 cup of your reserved Oreo crumbs and sprinkle them evenly over the peanut butter layer.
- Prepare the Chocolate Layer: In a separate medium bowl, whisk together the instant chocolate pudding mix and the cold milk. Whisk continuously for about 2 minutes until the mixture begins to thicken significantly. Allow it to sit for 3 to 5 minutes to set up further.
- Spread the Chocolate Layer: Once the pudding has thickened but is still spreadable, pour it carefully over the middle crumb layer. Use your spatula to spread it gently all the way to the edges of the pan. Place the dish back into the refrigerator for at least 10 minutes to let the pudding set firmly.
- Add the Final Topping: Spread the remaining whipped topping smoothly over the chilled chocolate pudding layer.
- Garnish and Chill: Sprinkle the top generously with the remaining crushed Oreos, miniature chocolate chips, and chopped peanuts. Now comes the hard part: cover the dish tightly with plastic wrap and refrigerate for a minimum of 4 hours, though overnight is highly recommended for the cleanest slices.
Pro Tips for Perfect Slices
We all want that picture-perfect slice where every layer is clearly visible. To achieve this, follow these pro tips:
Patience with Chilling: Do not rush the chill time. The dessert needs several hours for the butter in the crust to harden, the pudding to fully set, and the cookies to absorb just a bit of moisture so they aren’t hard as rocks. Overnight chilling yields the absolute best results.
Clean Cuts: When it is time to serve, use a large, sharp knife. Before making your first cut, run the knife blade under hot water and wipe it dry. Repeat this hot water wipe between every single cut. This melts through the firm layers cleanly rather than dragging the brown pudding down into the tan peanut butter layer.
Room Temperature Cream Cheese: I cannot stress this enough. If your cream cheese is even slightly cold, you will have little white lumps in your peanut butter layer that no amount of mixing will get rid of. Leave it on the counter for at least two hours before starting.
Exciting Variations to Try
Once you have mastered the classic Chocolate Peanut Butter Oreo Dessert, you can use this blueprint to create entirely new flavor profiles:
The Mint Chocolate Lover: Swap the regular Oreos for Mint Oreos. Omit the peanut butter, and instead add 1/2 teaspoon of peppermint extract and a few drops of green food coloring to the cream cheese layer. Garnish with chopped Andes mints.
The Nutella Dream: Swap the peanut butter for an equal amount of chocolate hazelnut spread. Use a vanilla or white chocolate pudding for the middle layer to let the hazelnut flavor shine. Garnish with chopped toasted hazelnuts.
Gluten-Free Version: Making this dessert gluten-free is incredibly easy. Simply purchase gluten-free chocolate sandwich cookies (many major brands now offer excellent GF alternatives). Ensure your instant pudding mix is certified gluten-free, and you are good to go!
Make-Ahead and Storage Instructions
This dessert is a host’s best friend because it practically demands to be made ahead of time.
Refrigerator Storage: Store the dessert tightly covered with plastic wrap or a secure lid in the refrigerator. It will stay fresh and delicious for up to 4 days. Beyond that, the crust may become a bit too soggy.
Freezing Instructions: Yes, you can freeze this! In fact, some people prefer eating it semi-frozen like an ice cream cake. To freeze, assemble the dessert completely, wrap the pan tightly in a layer of plastic wrap followed by a layer of aluminum foil. Freeze for up to 1 month. When ready to serve, let it thaw in the refrigerator overnight, or let it sit at room temperature for about 30 minutes before slicing if you want that frozen texture.
Frequently Asked Questions
Can I use natural peanut butter?
It is not recommended. Natural peanut butters separate easily and the oils can compromise the fluffy texture of the cream cheese layer. Stick to conventional, stabilized peanut butter for the best structural integrity.
Can I make my own whipped cream instead of using Cool Whip?
Yes! If you prefer to avoid commercial whipped topping, you can whip 3 cups of heavy whipping cream with 1/2 cup of powdered sugar and a splash of vanilla until stiff peaks form. Use half in the peanut butter mixture and half for the topping. Keep in mind that homemade whipped cream is slightly less stable, so the dessert may weep a little faster over a few days.
Why is my pudding layer runny?
Make sure you are using cold milk and beating it for the full 2 minutes. Also, ensure you accidentally did not buy “Cook and Serve” pudding, which will not set up without being boiled first.
Conclusion
The Ultimate Chocolate Peanut Butter Oreo Dessert is more than just a sweet treat; it is an experience. The contrasting textures, the perfect balance of salty and sweet, and the undeniable visual appeal of those distinct layers make it a recipe you will reach for time and time again. Whether you are aiming to impress guests or simply indulge in a slice of pure comfort, this no-bake lasagna delivers on every front. Grab your ingredients, clear some space in your fridge, and get ready to enjoy one of the most irresistible desserts you will ever make.
The Ultimate Chocolate Peanut Butter Oreo Dessert
Ingredients
Equipment
Method
- Lightly grease a 9×13 inch baking dish. Crush the Oreo cookies into fine crumbs. Set aside 1/2 cup of crumbs for later. Mix the remaining crumbs with melted butter and press firmly into the bottom of the dish. Chill.
- In a large bowl, beat the softened cream cheese until smooth. Add the peanut butter and powdered sugar, beating until fluffy. Gently fold in 8 oz of the whipped topping.
- Spread the peanut butter mixture evenly over the chilled crust. Sprinkle with 1/4 cup of the reserved Oreo crumbs. Chill while making the next layer.
- In a medium bowl, whisk together the instant chocolate pudding mix and cold milk for 2 minutes until thickened. Let sit for 3 minutes.
- Spread the thickened pudding evenly over the peanut butter/crumb layer. Chill for 10 minutes to allow the pudding to set.
- Spread the remaining 8 oz of whipped topping over the chocolate pudding layer.
- Garnish evenly with the remaining 1/4 cup Oreo crumbs, mini chocolate chips, and chopped peanuts.
- Cover tightly and refrigerate for at least 4 hours, or preferably overnight, before slicing and serving.